Introduction
The builder pattern is a creational pattern which allows to create complex objects in an easy way. You can create multiple representations of the objects step by step using the same construction code.
Applicability
- you want to simplify the construction process of a complex object
- different representations of the same object are required
Implementation
You can find the full example source code here.
In our example we are going to define a Builder which will create cars and motorcycles. The example has been simplified to focus on the pattern.
First, we are going to create a interface for the Builder which will define the different operations needed to create our object. Then, we will create a concrete builder which will implement the interface and will implement the operations.
It would be possible to have multiple concrete builders in case that we wanted to create different types of objects with the same construction process. For example, following our example we could have a CarBuilder and a MotorcycleBuilder.
As a last step, we will see how we can add a Director class where we can define the different construction processes so that they have to be defined only once. The Director is not necessary, you can always use the builder directly from the
client code.
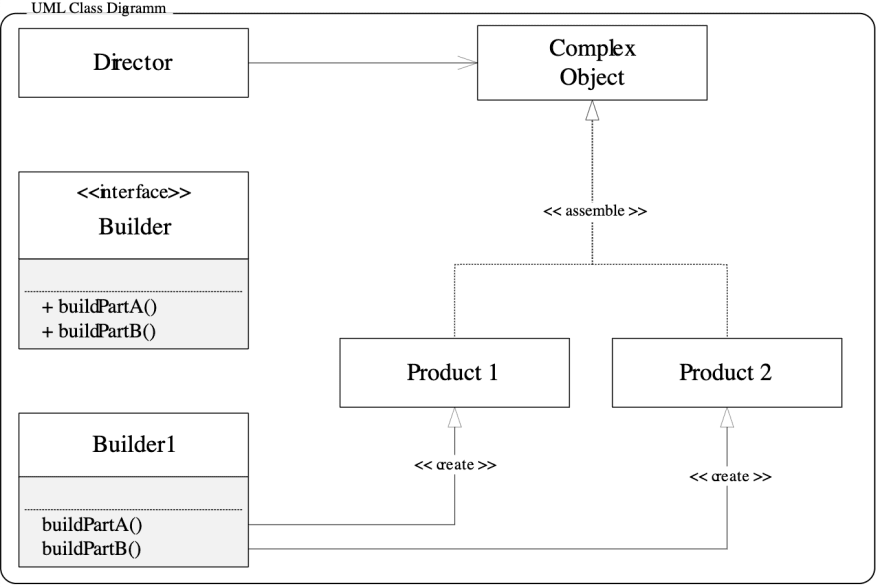
Diagram of the builder pattern. Credit: Wikimedia Commons
1. Create the Builder interface and define the different steps needed to build the objects.
In our case, the Builder will create cars and motorcycles. The construction process will have only two steps: setSeats and setEngine. Reminder: this example has been simplified to focus on learning the pattern. In a real world example, the creation process would have more steps and it would be much more complex.
interface Builder {
  setSeats(seats: number): this;
  setEngine(engine: string): this;
}
2. Create a concrete builder which will implement the Builder interface and will implement the steps. Do this for each type of object you want to create.
In our example we are only going to have two concrete Builders, the CarBuilder and the MotorcycleBuilder.
class CarBuilder implements Builder {
  private car: Car;

  constructor() {
    this.car = new Car();
  }

  public setSeats(seats: number): this {
    this.car.setSeats(seats);
    return this;
  }

  public setEngine(engine: string): this {
    this.car.setEngine(engine);
    return this;
  }

  public getResult(): Car {
    return this.car;
  }
}

class MotorcycleBuilder implements Builder {
  private motorcycle: Motorcycle;

  constructor() {
    this.motorcycle = new Motorcycle();
  }

  public setSeats(seats: number): this {
    this.motorcycle.setSeats(seats);
    return this;
  }

  public setEngine(engine: string): this {
    this.motorcycle.setEngine(engine);
    return this;
  }

  public getResult(): Motorcycle {
    return this.motorcycle;
  }
}
Just with this code it would be enough to implement the Builder pattern. We could create a Car or a Motorcycle using the CarBuilder or the MotorcycleBuilder directly from the client code.
const car = new CarBuilder().setSeats(2).setEngine("V-12").getResult();

const motorcycle = new MotorcycleBuilder()
  .setSeats(2)
  .setEngine("V-4")
  .getResult();
3. We are going to go one step further and create the Director class. The Director will contain the different construction processes of the object representations that we need in our app.
In our example we are going to define 2 construction processes for the car and 2 for the motorcycle.
class Director {
  public buildFerrari(): Car {
    return new CarBuilder().setSeats(2).setEngine("V-12").getResult();
  }

  public buildToyota(): Car {
    return new CarBuilder().setSeats(7).setEngine("V-6").getResult();
  }

  public buildHonda(): Motorcycle {
    return new MotorcycleBuilder().setSeats(2).setEngine("V-4").getResult();
  }

  public buildYamaha(): Motorcycle {
    return new MotorcycleBuilder().setSeats(1).setEngine("V-2").getResult();
  }
}
And the Director can be used like this:
const director = new Director();
director.buildFerrari();
director.buildToyota();

director.buildHonda();
director.buildYamaha();
Advantages
- You can create complex objects step by step in an easy way.
- The same construction code can be reused to create different representations of objects.
- Single Responsibility Principle: Complex construction processes can be isolated and separated from the object’s representation.
As always, make sure it makes sense to use this pattern in your application.
Otherwise you could be introducing unnecessary complexity.
Resources