
More and more web applications are being developed these days. And with each line of code being written, the potential for bugs arises.
Generally speaking, the costs of fixing bugs increase exponentially the later you find them.
The Systems Sciences Institute at IBM found that “the cost to fix an error found after product release was 4 to 5 times more than one uncovered during design, and up to 100 times more than one identified in the maintenance phase”.
And a study by the University of Cambridge found that software bugs cause economic damage of $312 billion per year worldwide.
These numbers highlight the importance of finding bugs as early as possible and to thoroughly test an application before it is released.
That is where web application testing comes in. Web application testing usually consists of multiple steps that ensure that an application is fully functional and runs smoothly and securely. It is an essential part of web development and ensures that an app is running properly before its release.
We put together a 6-step guide, which should give you an overview of what kind of tests to run to test your app.
Let’s get started!
What is Web Testing?
Website testing or web app testing is a process of evaluating your application or website for potential issues, defects, and bugs before it goes live and becomes available to the public. Before you launch a website it is important to know how to test a web application for different types of security, functionality, performance, and usability weaknesses and bugs.
What’s the Web Testing Process in a Nutshell?
A web testing process is a well-defined and organized method that enables QA teams to ensure fast and efficient test cases for their websites and applications. For web-based application testing or software application testing, they can rely on automation which reduces the burden of repetitive and routine tasks. These tests can compare real-world results with predicted ones to ensure there’s no discrepancy.
Step 1: Functional Testing
The first step of web testing ensures that the functions of a system are tested. On Wikipedia, Functional Testing is described as follows:
Functional testing is a quality assurance (QA) process and a type of black-box testing that bases its test cases on the specifications of the software component under test. Functions are tested by feeding them input and examining the output, and internal program structure is rarely considered (unlike white-box testing).
Functional testing happens in the source code, where the system is tested against functional requirements and specifications.
Typically, functional testing includes:
- the identification of functions that software is supposed to do
- data input and entry
- the execution of the test case
- an analysis of the actual results
During functional testing, actual system usage is simulated. The idea is to come as close as possible to real system usage and create test conditions that are related to user requirements.
Testing a website can be a tedious process. That’s why it is essential to break it down into different functionalities. Your web-based testing should include testing all the links including outgoing, internal, anchor, and MailTo links. Apart from that, you should test forms to ensure they are working as intended including scripting, default values, data, and formatting.
It is also essential to test cookies (sessions) along with HTML and CSS to identify any syntax errors. Ensure standard compliance and test end-to-end business workflow to deliver an exceptional experience to your visitors.
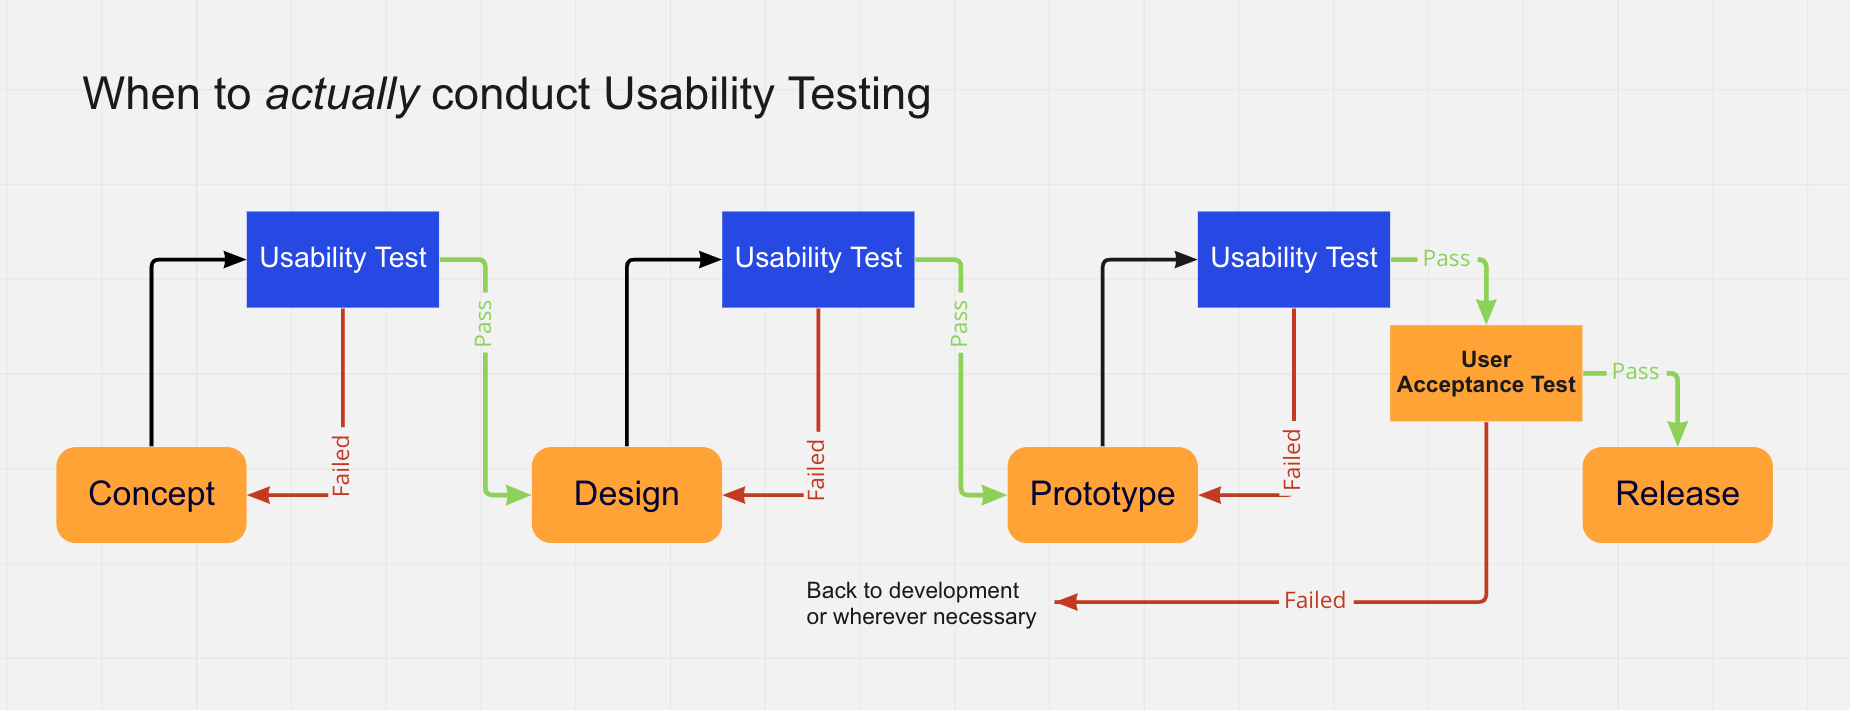
Step 2: Usability Testing
Usability goes beyond functionality testing and combines testing for functionality as well as overall user experience.
Usability testing should not be mixed up with User Acceptance Testing. Even though both are essential to the success of a web application. They each have a very different focus and are executed at different stages of the software development life cycle.
This can be done internally or by getting external testers that fit your potential user base. To find external testers, you can use services such as Apple’s TestFlight for applications designed for the app store.
Usability testing involves the following steps:
- Develop a testing strategy that ensures all functions of your application will be examined. These include navigation and content.
- Recruit test participants, either internally or externally.
- Run the test under the observation of experts.
- Analyze the results and improve your application accordingly.
Step 3: Interface Testing
Interface testing ensures that all interactions between the web server and application server interfaces are running smoothly. This includes checking the communication processes as well as making sure that error messages are displayed correctly. Further things to test are that interruptions by the user as well as by the server are handled correctly.
There are basically three areas you need to test including application, web, and database server. Ensure that test requests generated are relayed correctly to the database and the client-side output is free from any errors. Apart from that, make sure the web server is responding to all application requests as intended and the database is receiving the queries.
Recommended Reading:
Step 4: Compatibility Testing
Ensuring your application is compatible with all browsers and devices is a key step in web application testing. Here are the different elements of compatibility testing:
Browser Compatibility
Make sure that your application is functioning correctly across the different browsers. This includes checking that JavaScript, AJAX, WebSockets, browser notifications, and authentication requests are working as designed.
For browser compatibility testing we would recommend trying LambdaTest, a cross-browser testing cloud. Using the Lambda tool, users can test their website on 2000+ real browsers & OS devices.
Besides checking that your application runs in all the browsers (yes, even Internet Explorer!), you should also check it for different versions of the browsers, to see if any updates affect its functionality.
Operating System Compatibility
Just like with different browsers, your web application might run into problems on some operating systems. All new technologies that are now used in developing an app or a website may not be compatible with every operating system including interface calls, APIs, and designs. Check that it runs smoothly on Windows, macOS, Linux, and Unixes.
Mobile Compatibility
These days, mobile compatibility is a given. Ensuring that your application runs on different devices and functions just as well on Android as it does on iOS is an essential part of web testing.
Step 5: Performance Testing
After ensuring that your application’s functionality is working properly and responsively on all browsers and devices, it is time to take a look at how it performs under heavy load. This includes testing the application under different internet speeds and how it behaves under normal and peak loads (load testing). To determine the breaking point of your application, it is put under increasing amounts of stress until it ceases to function (stress testing).
Testing for resiliency is a crucial activity to find out how your application behaves under stress before your users do. Make sure you test the functionality under different scenarios and hardware configurations, and that your application recovers from crashes in the best way possible.
Step 6: Security Testing
The final step of web application testing makes sure that your application is protected against unauthorized access and harmful actions through viruses or other malicious software.
Security testing for web applications involves the following activities:
- Test whether secure pages can be accessed without authorization
- Check that open sessions are closed after ongoing user inactivity
- Verify the application’s SSL
- Make sure that restricted files cannot be downloaded without proper authorization
Overall, a security testing checklist comes in handy at this stage, as it helps you to structure and organize your testing efforts. Such a checklist should include tasks in the following areas:
- Secure Transmission
- Authentication
- Session Management
- Authorization
- Cryptography
- Data Validation
- Denial of Service
- Specific Functionality Tests
- Error Handling
Some of the specific tests that you should perform include the following:
- Test by copying and pasting the internal URL into the browser address bar without login to check whether internal pages open without credentials.
- If you are logged in using your credentials and exploring internal pages, then attempt to modify URL options directly. This should be denied right away.
- Try typing in a few invalid inputs in input fields like username, password, contact number, address, etc. See how the website responds to invalid inputs.
- No user should be able to access any web directory or file without the download option.
- Verify the CAPTCHA for automating script logins.
- Verify whether SSL is being used for web security. If yes, an adequate message should be communicated to the users when they go from non-secure HTTP:// pages to secure HTTPS:// pages and vice versa.
- Every transaction, error message, and security breach attempt should be recorded in log files.
What are Some Types of Web Testing?
There are different types of web testing including the following:
Simple Static Website Testing
It shows the same content to every visitor regardless of when and from where they visit the website. These types of websites are often informational and don’t offer a lot of functionality or interactive experience.
Dynamic Website/Application Testing (CMS)
This is the type of website where the user can change and update the content on a regular basis. These are more complex to test as they also have a backend programming language like PHP or ASP along with a database and scripting languages.
E-Commerce Website
These are a type of dynamic website where the primary purpose of the application is to deliver a shopping experience. In this type of web testing, the most crucial part is to ensure that the transactional process is functional end-to-end.
Mobile Website
It is important to carry out full testing of your mobile website as more than half of the visitors come from a mobile device. The web testing needs to ensure that the mobile website is properly responsive without any broken experiential occurrences.
Wrapping It Up
These are the six steps of web application testing. If you follow these steps thoroughly before rolling out your application, it should go a long way in finding any bugs and errors and enable you to fix them before it’s too late.
Bonus tip: Testing with Usersnap
Usersnap is a great bug tracking & testing tool for development teams, you can capture screenshots and annotate on-screen. Metadata is automatically included in the ticket. It saves time, ensures accuracy and boosts developer productivity. Used by startups, as well as companies like Facebook, Google, and Microsoft.
The post A 6-Step Guide to Web Application Testing appeared first on Usersnap blog – the #1 customer feedback software.