TailwindCSS Explained!

tailwindcss-explained!

TailwindCSS is a CSS framework for rapidly building custom UIs and design components without writing CSS code.

To understand why over 250,000 currently live websites use TailwindCSS, this article walks you through how to set up Tailwind inside your HTML project from scratch. But before we hop into the real deal, let’s briefly tour what exactly TailwindCSS is.

What is TailwindCSS?

TailwindCSS is a utility-first CSS framework, meaning you can style page elements directly in your HTML code using utility classes.

Utility classes are pre-existing classes that you can use to build custom UIs without having to write CSS code. You can use utility classes to control the color, layout, spacing, typography, etc. of page elements.

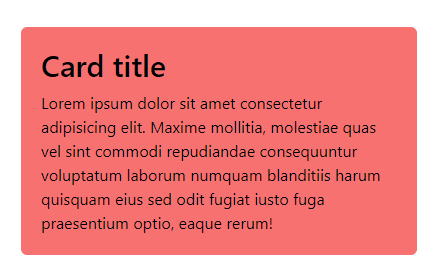
For instance, let’s say you want to create a simple card that has a title and some text.

Here’s the HTML code you’d use:

 class="bg-red-400 p-5 w-1/2 rounded-md">
  

class="text-3xl font-medium mb-2">Card title

Lorem ipsum dolor sit amet consectetur adipisicing elit. Maxime mollitia, molestiae quas vel sint commodi repudiandae consequuntur voluptatum laborum numquam blanditiis harum quisquam eius sed odit fugiat iusto fuga praesentium optio, eaque rerum!

The above HTML code contains 7 utility classes:

  • bg-red-400: This class sets the background color of the card to light red.
  • p-5: This class sets the horizontal and vertical padding of the card to 5 units.
  • w-1/2: This class sets the width of the card to 50% of the available window space.
  • rounded-md: This class sets the border radius of the card so it has rounded edges.
  • text-3xl This class sets the text size of the title as 3 times extra-large.
  • font-semibold: This class sets the font weight of the title to semibold.
  • mb-2 This class sets the bottom margin of the title to 2 units.

This will produce the results below:

Learning TailwindCSS involves familiarizing yourself with several utility classes. Once you do, you can quickly build any custom component of your choice without hassle.

Why Use TailwindCSS?

Let’s understand why TailwindCSS may be a better choice for your next project than other CSS frameworks. The following presents some significant benefits of using Tailwind:

Helps build unique web pages and applications: Tailwind is a low-level language, meaning, in contrast to other CSS frameworks such as Bootstrap, Tailwind does not provide you with fully styled components like modals, buttons, navbars, etc. Instead, it provides utility classes that you can use to create your own unique custom UIs. This gives you more flexibility and control over how you want your site or application to look.

No need to invent class names: One of the things most developers hate about writing custom CSS code is having to name a whole lot of classes. Picking the “perfect” class name or even remembering long, complicated ones like card-inner-wrapper-div can sometimes be pretty annoying. But Tailwind solves this problem by providing you with utility classes, where you just choose from a set of existing classes.

Increases development speed
Because you don’t have to spend an indeterminate amount of time choosing the “perfect” class name and also do not have to switch between your HTML and CSS files multiple times, Tailwind is much faster to work with than most CSS frameworks and definitely quicker than writing custom CSS.

Adding TailwindCSS to your project

There are several ways you can set up TailwindCSS. These include:

  • Method 1: Using TailwindCSS CDN
  • Method 2: Using Node Package Manager (NPM)

Method 1: Using TailwindCSS CDN

To start using TailwindCSS in your project, you can just include the following link in the tag of your HTML code.


  href="https://unpkg.com/tailwindcss@^1.0/dist/tailwind.min.css"
  rel="stylesheet"
/>

After that, you can start using Tailwind’s utility classes to build UIs.

Adding Tailwind to your project via CDN is very easy and beginner-friendly. It allows you to quickly start using Tailwind in your project without any configuration. However, there are some limitations associated with this method:

  • You cannot customize Tailwind’s default theme.
  • The CDN file loads the complete utility classes in Tailwind, causing the browser to load many unnecessary resources.
  • Specific directives like @apply and @variants, which can help clean up your TailwindCSS code, can’t be used.
  • You can’t install third-party plugins.

Method 2: Using Node Package Manager

Although the fastest and easiest way to set up TailwindCSS is via CDN, it is highly recommended that you always use the NPM method. This is because it allows you to access Tailwind’s full functionalities and benefits.

Before installing Tailwind via NPM, you need to install node on your device.

Open a terminal and run the following command to check if node is available on your machine:

node -v

When you have node installed, the command will return the version of node that you have. On my device, it returned the following:

v16.17.0

On the other hand, if you don’t have node installed, you can go to their official website and download it.

Let’s now start setting up Tailwind!

Step 1: Create a project

To get started, you need to create a project folder by running the following command in your terminal.

mkdir tailwind-project-01

Now, change into the new directory and create a new folder. Let’s name it src. This folder would contain the main CSS file.

// change into new directory
cd tailwind-project-01

// create new folder
mkdir src

Step 2: Create an NPM Configuration file

You can now go ahead and initialize a package.json file by running the following NPM command in the root directory of your project.

npm init -y

The package.json file will record all significant information about your project and the dependencies you would install.

Step 3: Install TailwindCSS

Here, you would install the latest version of TailwindCSS. You can do this by running the following command.

npm install -D tailwindcss

The above command will make TailwindCSS available in your node_modules folder. Also, -D ensures that the Tailwind dependency is recorded and saved to package.json.

Step 4: Setup Tailwind Configuration File

As mentioned earlier, the most recommended way to set up Tailwind is via NPM. One of the primary reasons is that it enables you to create a Tailwind configuration file that allows you to customize the default theme of TailwindCSS. This is a massive advantage as you can use it to modify Tailwind’s utility classes based on your needs.

Run the following command to create a Tailwind config file.

npx tailwindcss init

By running the above command, a new file tailwind.config.js will be created with the following code.

/** @type {import('tailwindcss').Config} */ 
module.exports = {
  content: [],
theme: {
  extend: {},
  plugins: []
  }

The content section of the Tailwind config file is where you’d configure the paths to all your HTML templates, JavaScript components, and any other source files containing some Tailwind utility classes.

Inside the content section of the tailwind.config.js file, you can add the path to your HTML file as shown below.

module.exports = {
  content: ["place_path_here"],
  theme: {
    extend: {},
  },
  plugins: [],
}

Step 5: Add Tailwind directives to your Main CSS file

Inside the src folder you created earlier, create your main CSS file input.css and add the following @tailwind directives.

@tailwind base;
@tailwind components;
@tailwind utilities;

The above directives represent three different “layers” in Tailwind.

  • The base layer can be used to add your own default base styles for specific HTML elements.
  • The components layer can be used to add custom classes to Tailwind that you want to be able to override with utilities.
  • The utilities layer can be used to add your own custom utility classes to Tailwind.

Step 6: Processing TailwindCSS

Here, you will run a Tailwind CLI command to build your CSS.

At the end of the build process, a new CSS file output.css will be created. This file contains the CSS variables needed for Tailwind to work.

npx tailwindcss -i ./src/input.css -o ./dist/output.css --watch

From the above CLI command:

  • ./src/input.css represents your main CSS file.
  • ./dist/output.css represents the template path for where the output.css file will be placed after the build process.

Instead of writing the lengthy CLI command above every time, you can just add the following script to package.json.

// package.json
 "scripts": {
    "build-css": "tailwindcss -i ./src/tailwind.css -o ./public/tailwind.css —-watch"
  },

Now, you can just build the CSS using the command below:
npm run build-css

Create an index.html file in your root project directory and include a link to output.css in the tag of your HTML code.

     href="https://dev.to/dist/output.css" rel="stylesheet" />

Congrats! you’ve successfully installed Tailwind inside an HTML project.

Building a Simple Card Using Tailwind CSS

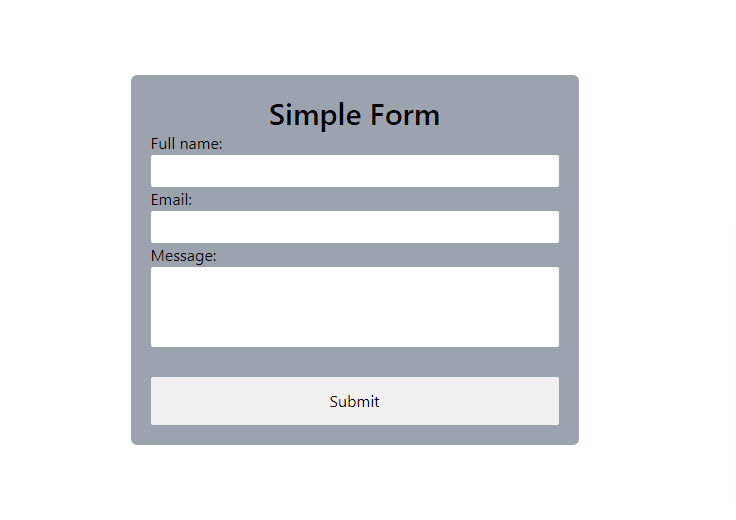
Here, you’ll start using Tailwind’s utility classes by creating the simple form shown in the image below.

In your index.html, create a form wrapper to contain all the HTML code for the form.

 class="bg-gray-400 w-80 p-5 rounded-md max-w-md">
  

class="text-center text-3xl font-semibold">Simple Form

for="lastName">Full name: type="text" id="lastName" name="lastName" class="w-full rounded-sm outline-none px-2 py-1">
for="email">Email: type="email" id="email" name="email" class="w-full rounded-sm outline-none px-2 py-1">
for="email">Message: class="w-full rounded-sm h-20 resize-none outline-none px-2">

id="submit" type="submit" value="Submit" class="w-full py-3 rounded-sm cursor-pointer hover:bg-gray-200">

The final live result of the project can be viewed on this codepen.

Conclusion

In this TailwindCSS tutorial, you learned:

  • Definition of TailwindCSS.
  • Benefits of using TailwindCSS.
  • Setting up TailwindCSS using various methods.
  • Building a simple form with Tailwind’s utility classes.

One thing to note about the project you just created is how you added the utility classes to your HTML code. You’ll notice that as the complexity of your styling grows, the code will get untidy. In my next article, I’ll tackle how to clean up your TailwindCSS code with a complete demo project.

To learn more about TailwindCSS, head over to their documentation page.

I hope this has been a worthwhile read. Kindly share this article and follow me on Twitter @dboatengx for updates on future posts.

Total
7
Shares
Leave a Reply

Your email address will not be published. Required fields are marked *

Previous Post
abstract-factory-pattern-in-typescript

Abstract Factory pattern in TypeScript

Next Post
explaining-pass-by-value-and-pass-by-reference-in-c-for-1st-year-it-student

Explaining pass-by-value and pass-by-reference in C for 1st year IT student

Related Posts