Introduction
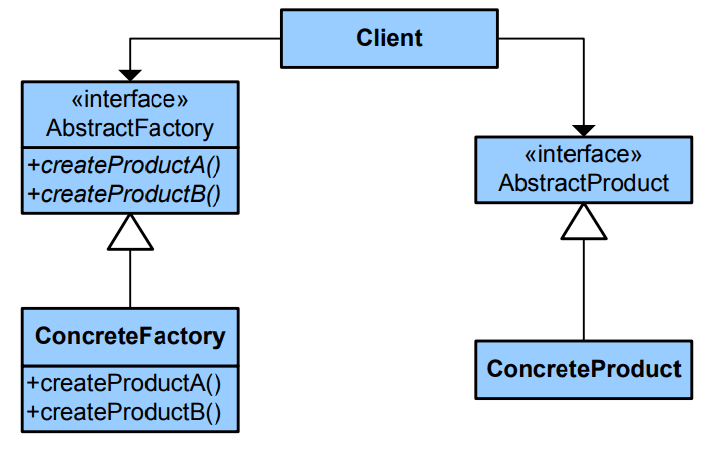
The abstract factory pattern is a creational pattern which provides you with an interface for creating families of related objects without specifying their concrete classes. As long as the objects are created using the factory, you don’t have to worry about creating the wrong combination of objects.
Applicability
- When a set of objects should be used together
- When the application should be independent of how the objects are created
- If you have a class with multiple Factory Methods, consider switching to an Abstract Factory
- If the types of the products are unknown beforehand or can change dynamically
Implementation
You can find the full example source code here.
1. Define an abstract interface for each object of the family of objects that the factory will create.
In our example we have two kinds of objects: Orders and Payments.
interface Order {
  id: number;
  addProduct(productId: string): void;
  addShippingAddres(address: string): void;
}

interface Payment {
  addCreditCardNumber(ccNumber: number): void;
  completePayment(order: Order): boolean;
}
2. Define all the variants of each object. These variants will implement the interfaces defined on the previous step.
For our example we have two variants: Online and Physical. So we have to create the following classes: OnlineOrder, OnlinePayment, PhysicalOrder and PhysicalPayment.
/**
 * Order object + Online variant
 */
class OnlineOrder implements Order {
  id: number;

  constructor(id: number) {
    this.id = id;
  }

  addProduct(productId: string): void {
    console.log(`Product ${productId} added to the online order`);
  }

  addShippingAddres(address: string): void {
    console.log(`Shipping address ${address} added to the online order`);
  }
}

/**
 * Order object + Physical variant
 */
class PhysicalOrder implements Order {
  id: number;

  constructor(id: number) {
    this.id = id;
  }

  addProduct(productId: string): void {
    console.log(`Product ${productId} added to the physical order`);
  }
  addShippingAddres(address: string): void {
    console.log(`Shipping address ${address} added to the physical order`);
  }
}

/**
 * Payment object + Online variant
 */
class OnlinePayment implements Payment {
  addCreditCardNumber(ccNumber: number): void {
    console.log(`Credit card number ${ccNumber} added to the online payment`);
  }

  completePayment(order: OnlineOrder): boolean {
    console.log(`Payment completed for the online order ${order.id}`);
    return true;
  }
}

/**
 * Payment object + Physical variant
 */
class PhysicalPayment implements Payment {
  addCreditCardNumber(ccNumber: number): void {
    console.log(`Credit card number ${ccNumber} added to the physical payment`);
  }
  completePayment(order: PhysicalOrder): boolean {
    console.log(
      `Physical payment completed for the physical order ${order.id}`
    );
    return true;
  }
}
3. Define the Abstract Factory which is an interface with a list of methods that will create the objects. These methods should have as a return type the interfaces of the products that we defined in the first step.
Our abstract factory has to define two methods: one to create orders and another one to create payments.
interface CommerceFactory {
  createOrder(id: number): Order;
  createPayment(): Payment;
}
4. A new class that implements the Abstract Factory has to be created for each variant of the family of objects.
In our example we have to create one factory for the online variant and another one for the physical variant.
/**
 * Factory for the Online variant
 */
class OnlineCommerceFactory implements CommerceFactory {
  createOrder(id: number): Order {
    return new OnlineOrder(id);
  }

  createPayment(): Payment {
    return new OnlinePayment();
  }
}

/**
 * Factory for the Physical variant
 */
class PhysicalCommerceFactory implements CommerceFactory {
  createOrder(id: number): Order {
    return new PhysicalOrder(id);
  }

  createPayment(): Payment {
    return new PhysicalPayment();
  }
}
5. The factories are ready to be used. An instance of a factory has to be passed to the client code to start creating new objects.
An example of how client code would create objects for the online variant:
const onlineCommerceFactory = new OnlineCommerceFactory();
const onlineOrder = onlineCommerceFactory.createOrder(1);
const onlinePayment = onlineCommerceFactory.createPayment();

onlineOrder.addProduct("123");
onlineOrder.addShippingAddres("123 Main St");
onlinePayment.addCreditCardNumber(123456789);
onlinePayment.completePayment(onlineOrder);
An this is how the client would use the physical variant:
const physicalCommerceFactory = new PhysicalCommerceFactory();
const physicalOrder = physicalCommerceFactory.createOrder(2);
const physicalPayment = physicalCommerceFactory.createPayment();

physicalOrder.addProduct("456");
physicalOrder.addShippingAddres("456 Main St");
physicalPayment.addCreditCardNumber(987654321);
physicalPayment.completePayment(physicalOrder);
It’s important that the client code uses the abstract interfaces and not the concrete classes. This lets us change the family of objects that are returned dynamically without modifying or breaking client code and it isolates the client from concrete implementations. The client can work with any family of objects as longs as it uses the abstract interfaces.
Advantages
- Improves consistency making sure that the products that are created using a factory will always be compatible with each other.
- Client code is isolated from concrete implementations.
- Single Responsibility Principle: All the object creation code is placed together.
- Open/Closed Principle: New families of objects can be introduced without breaking client code.
As always, make sure it makes sense to use this pattern in your application. Otherwise you could be introducing unnecessary complexity.
Resources