Hyvor Blogs is a simple and powerful blogging platform. In this tutorial, we will see how to create a blog with Hyvor Blogs and host it in an existing Laravel application’s /blog route. All contents of the blog will live inside a cache store in your application, which you can customize. We will use webhooks for cache invalidation.
Part 1: Set up Hyvor Blogs
In this part, we will create a blog and configure the basic settings needed for self-hosting.
-
First, create a blog at the Hyvor Blogs Console. You will get a subdomain, which you need in the next step.
-
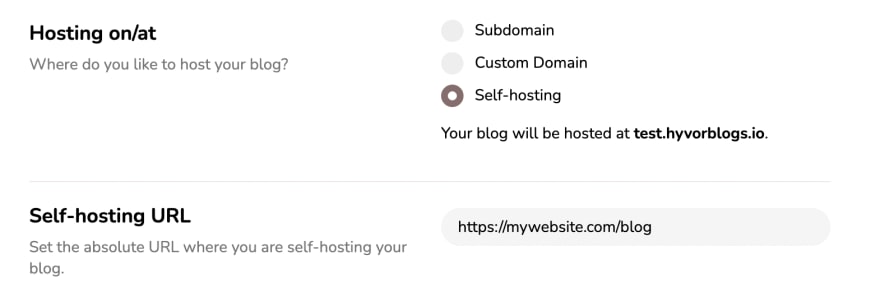
Go to Settings → Hosting
- Update Hosting on/at to Self-hosting
-
Set the Self-hosting URL to the absolute URL of your Laravel application’s blog route. For this tutorial, set it to
https://mywebsite.com/blog. You can customize the/blogroute later if needed.Note: To test webhooks, this URL should be publicly accessible. Therefore, if you are testing locally, we recommend using a tool like ngrok to expose your Laravel site temporarily on the internet.
-
Click Save

-
Go to Settings → API Keys
-
Click CREATE
- Set a name (ex: “For Laravel Blog”)
- Select Delivery API as the API
- Create API Key
-

This API key will be needed in the next step.
-
Go to Settings → Webhooks and create a Webhook with the following values.
- URL: Set this to “your website URL + /hyvorblogs/webhook”. Ex:
https://mywebsite.com/hyvorblogs/webhook -
Select the following events
-
cache.single -
cache.templates -
cache.all
-
- URL: Set this to “your website URL + /hyvorblogs/webhook”. Ex:
You will need the Webhook Secret in the next step.
Part 2: Set up Laravel Application
In this part, we will set up your laravel application to “communicate” with Hyvor Blogs APIs/Webhooks to render your blog correctly.
First, install the hyvor/hyvor-blogs-laravel Laravel package in your project using composer.
composer require hyvor/hyvor-blogs-laravel
Then, run the following command to generate the config file.
php artisan vendor:publish --provider="HyvorHyvorBlogsHyvorBlogsServiceProvider" --tag="config"
This command will copy the default configuration file to config/hyvorblogs.php in your application, where you will be configuring the blog.
return [
    'blogs' => [
        [
            'subdomain' => '',
            'delivery_api_key' => '',
            'webhook_secret' => null,
            'route' => '/blog',
            'cache_store' => null,
            'middleware' => [],
        ],
    ],
];
blogs key contains an array of blog configurations. It allows you to set up multiple blogs in the same Laravel application. Let’s configure a blog.
-
Set
subdomainto the subdomain of the blog, you created in the first step. You can get it to Console → Settings -> Hosting. -
Set
delivery_api_keyto the Delivery API key, you created earlier at Console → Settings -> API Keys -
Set
webhook_secretto the secret you got at Console → Settings -> Webhook -
Set
routeto the base path of your blog within the Laravel application. If you change this, make sure to update the Hosting URL in the Console. -
(optional) Set
cache_storeto use a custom cache store to cache your blog. -
(optional) If you need to add any additional middleware, use the
middlewarearray.
Now, try visiting the /blog path of your blog. If everything is fine, your blog should be displayed there. Try updating a post to make sure webhooks are working.
Finally
-
If you have any troubles, comment below or contact support.
-
If you would like to know how this works internally, see our self-hosting with web frameworks documentation.
-
Once you have set up everything, you can customize your blog theme and start writing. Our documentation has all the information you need.
-
If you like to set up multiple blogs within the same applications, you can add more configuration arrays to the
blogsarray in the config file. -
Any problems with the Laravel package? Raise an issue or contribute at Github.
This article was original published on our blog.
![15+-organizational-skills-every-leader-needs-[+-ways-to-develop-them]](https://prodsens.live/wp-content/uploads/2022/09/3605-15-organizational-skills-every-leader-needs-ways-to-develop-them-110x110.jpg-23keepprotocol)