If you are finding a way to build a website that uses multiple languages. This place is for you.
The hero of this solution is React-I18next. It’s a react library that is used for translating languages. You can install the library by the command line below:
npm install i18next react-i18next@latest
To start off, we need to configure the library:
1. Create an initiation i8next file. I will name it i18n.js:
import i18n from 'i18next';
import { initReactI18next } from 'react-i18next';

i18n
  .use(initReactI18next)
  .init({
    debug: true,
    fallbackLng: 'en',
    interpolation: {
      escapeValue: false, // not needed for react as it escapes by default
    },
    // language resources
    resources: {
      en: {
        translation: {
         welcome: "Welcome to React"
        }
      },
      vn: {
        translation: {
         welcome: "Chào mừng đến với bình nguyên vô tận"
        }
      },
    }
  });

export default i18n;
Next, import the file into index.js
//pla pla
import './i18n'

const root = ReactDOM.createRoot(document.getElementById('root'));
root.render(
  <React.StrictMode>
    <App />
  </React.StrictMode>
);
Let’s notice the resource property where you can push more corresponding language. In a real-world project, this resource can come from a database (we will discuss in another article) but to keep the demonstration simply, I would like to translate English into Vietnamese and use an object directly. The default language is English.
2. Play with the library.
The idea is that the user will click on the button to translate languages on the website. Let’s open App.js
To display and switch between two languages, the library provides useTranslation(). It’s a react-18next built-in that exposes some functions as below:
import { useTranslation } from 'react-i18next';

export default function App() {

  const { t, i18n } = useTranslation();

  return (
    <div>
      <h1>{t('welcome')}</h1>
    </div>
  );
}
export default App;
We use t to get content by the key object in the resource object where we have configured it. The default language is English so it displays Welcome to React.
import { useTranslation } from "react-i18next";

const lngs = [
  { code: "en", native: "English" },
  { code: "vn", native: "Vietnamese" },
];

export default function App() {
  const { t, i18n } = useTranslation();

  const handleTrans = (code) => {
    i18n.changeLanguage(code);
  };

  return (
    <div style={{padding: '50px'}}>
      <h1>{t("welcome")}</h1>

      {lngs.map((lng, i) => {
        const { code, native } = lng;
        return <button onClick={() => handleTrans(code)}>{native}</button>;
      })}

    </div>
  );
}
Next, the i8next instance contains changeLanguage function which is used for changing language by country code. It takes a parameter as a country code (en and vn).
3. Result
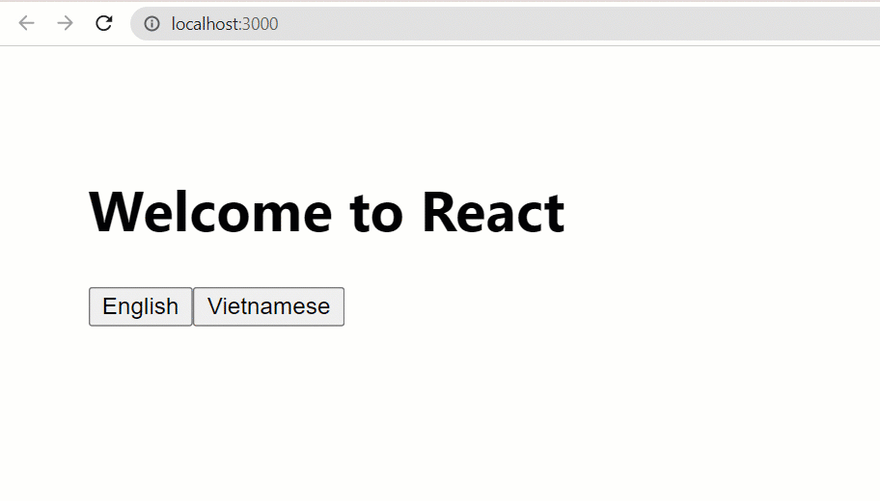
Finally, I hope it will be helpful to you. If you want me to use it with the database, just comment below. Really recommend you visit their document to learn the way to scale a huge project.


