Introduction
When working with a server, we will always have to save and retrieve data using a database. There are many server-side languages and databases. In this article, we will learn how to use MongoDB with Node.js
MongoDB is a non-relational database. It is a document-oriented storage system. It stores and retrieves data in JSON format, instead of the traditional table and row format used in relational databases ( MYSQL, PostgreSQL )
Goals
This guide will focus on the following use cases:
- Get the MongoDB connection string
- Build a simple book inventory
Prerequisites
- A supported version of Node.js installed
- A MongoDB Atlas account
- Basic knowledge of Node.js and Express.js
Getting started
To demonstrate how to use MongoDB with Node.js, we will build a simple book inventory. We will learn how to add, get, edit and remove books from our inventory.
Let’s make sure that our code editor has the following folders and files ready.

Installing dependencies
Quick note:
Mongoose is a library that creates a connection between MongoDB and an Express based application.
Dotenv is used to load data from our
config.envfile into the environment so we can access it usingprocess.env.
Moving on, run the commands below in your terminal to install the dependencies needed for this project.
npm install express
npm install mongoose
npm install  dotenv
Retrieving the MongoDB connection string
Login into your MongoDB Atlas account to connect to the database from your Node.js application
Follow these easy steps to retrieve the connection string:
- Click on
connecton your Database Deployment dashboard.

- Choose the
Connect to your applicationoption.
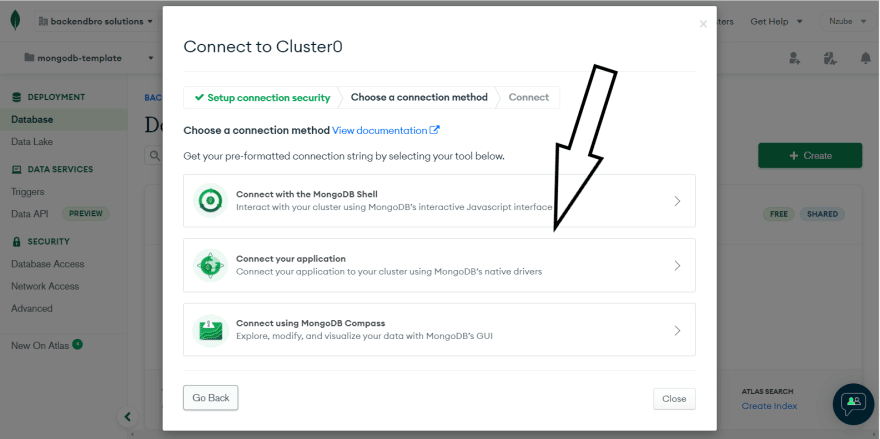
- Copy the connection string

Let’s delve in
At this point, the dependencies and connection string should be ready for use.
The server.js file should look like this for the time being
const express = require('express')
const dotenv = require('dotenv')
const path = require('path')
const app = express()

dotenv.config({path: './config/config.env'})
app.use(express.json())

const port = process.env.port
app.listen(port, () => {
    console.log(`port ${port} connected...`)
})
Let’s illustrate the config.env file, this file will hold all environment variables.
port = 8080
mongo_uri = mongodb+srv://mongodb-template:@cluster0.8lmmv.mongodb.net/myFirstDatabase?retryWrites=true&w=majority
Restart your server after copying the code into the config.env file
Replace
with the actual password of the database
Next step, let’s create a MongoDB connection, in the db.js file.
const mongoose = require('mongoose')

const connectDb = async () => {
const conn = await mongoose.connect(process.env.mongo_uri,  {
useNewUrlParser: true,
useUnifiedTopology: true
})
console.log(`mongodb connected: ${conn.connection.host}`)
}

module.exports = connectDb
Now that the database connection is up and ready, update the server.js file.
const express = require('express')
const dotenv = require('dotenv')
const connectDb = require('./database/db')
const app = express()

dotenv.config({path:'./config/config.env'})
app.use(express.json())

//database connection
connectDb()

const port = process.env.port
app.listen(port, () => {
    console.log(`port ${port} connected...`)
})
Creating the Schema
MongoDB Schema is a JSON object that helps us decide what the database structure will look like and what is allowed to be stored.
Setting up BookSchema.js :
const mongoose = require('mongoose')

const BookSchema = new mongoose.Schema({
    title:{
        type:String,
        required:true,
        unique:true
    },
    author:{
        type:String,
        required:true,
        unique:true
    },
    isbn:{
        type:String,
        unique:true
    }
})

module.exports = mongoose.model('BookSchema', BookSchema)
Routes
Starting out on the book.js file, bring in the router and BookSchema modules.
const router = require('express').Router()
const Book = require('../model/BookSchema')
The book.js file will contain this following requests:
POST request
router.post('/', async (req,res) => {
    const { title, author, isbn } = req.body
    const newBook = await Book.create({ title, author, isbn })
    res.status(201).json({
        success:true,
        data:newBook
    })
})
The code above will store the name, author, and isbn of a book.
GET request
There will be two variants of the
GETrequest. One willGETall books while the other willGETjust a particular book.
router.get('/',  async (req,res) => {
    const books = await Book.find()
    res.status(200).json({
        success:true,
        data: books,
        num: books.length
    })
})

router.get('/:id',  async (req,res) => {
  const book = await Book.findById(req.params.id)
  res.status(200).json({
      success:true,
      data: book
    })
})
PUT request
router.put('/:id', async (req,res) => {
    let book = await Book.findById(req.params.id)
    book = await Book.findByIdAndUpdate(req.params.id, {$set:req.body}, {
        new:true,
        runValidator:false
    })
    res.status(200).json({
        success:true,
        data: book
    })
})
DELETE request
This operation will also have two variants in case we want to DELETE one or all entries from the database.
router.delete('/:id', async (req,res) => {
    await Book.findByIdAndRemove(req.params.id)
    res.status(200).json({
        success:true,
        data: 'book deleted'
    })
})

router.delete('/', async (req,res) => {
    await Book.deleteMany()
   res.status(200).json({
       success:true,
       data: 'All books deleted'
    })
})
Lastly, export the router.
module.exports = router
Take a deep breath. At this point, we are almost done with our project.
The server.js file should be updated with the router module.
const express = require('express')
const dotenv = require('dotenv')
const connectDb = require('./database/db')
const app = express()

dotenv.config({path:'./config/config.env'})
app.use(express.json())

//database connection
connectDb()

//mount the route
const bookRoute = require('./routes/book')
app.use('/api/v1/book', bookRoute)

const port = process.env.port
app.listen(port, () => {
    console.log(`port ${port} connected...`)
})
Conclusion
In this article, we learnt how to use MongoDB with Node.js by creating a simple project. I hope you found this tutorial easy to navigate.
Link to the full project on github: https://github.com/backendbro/mongodb_template
Happy coding 😀
Credits