Artificial intelligence (AI) has revolutionized how we interact with technology. One intriguing innovation in the world of AI is the chatbot. Chatbots are computer programs designed to communicate with humans through text or voice. They can be found in various applications, from customer service to personal assistants that aid daily tasks.
As a popular application UI development framework, Flutter enables us to construct AI chatbot applications with appealing and responsive displays. By combining the power of Flutter and Artificial Intelligence, you can create an app that understands and responds to user conversations in a manner resembling human interaction.
This article will guide you through creating a user-friendly multimodal AI chatbot application using Flutter. We’ll walk you through the development process from start to finish, including implementing AI to comprehend and respond to user conversations.
Obtaining the API Key
First, visit the AI Studio website at https://aistudio.google.com/. If you still need to sign in with your Google account, Google AI Studio will direct you to the sign-in page. After you sign in, the web will redirect you to Google AI Studio’s home page. Then, choose Get API Key on the sidebar and choose Create API key in a new project.
If you’re familiar with Flutter, you can skip to Creating the UI part.
Flutter Installation
The first step to installing Flutter on Android Studio is to visit the website https://docs.flutter.dev/get-started/install and download the Flutter SDK compatible with the operating system in use. Once the Flutter SDK has been downloaded, extract the file to a desired directory (for example, C: flutter).

After that, we must open our computer’s “Environment Variable” settings. In the search menu, type “env,” and the “Edit the system Environment Variable” option will appear.

After entering that menu, click the Environment Variables button, select the Path variable, and click Edit. Once in the edit path menu, click the New button and add the bin path from the Flutter folder extracted in the previous step (for example, C:flutterbin).

Flutter Installation on Android Studio and Creating a Flutter Project
The first step is to open the Android Studio application. Once inside the application, select the plugins menu, search for and install the Flutter & Dart plugins.

After installing, restart your Android Studio. Then, to start the Flutter Project, choose the menu New Flutter Project and Flutter SDK Path according to the path, such as (C:flutter).
Creating the UI
Before starting to code the Flutter application UI, we can install the dependencies required for this sample project. This project uses additional dependencies gradient_borders for display, google_generative_ai for using Gemini in the app, and file_picker to get the image file from the device. Dependencies can be added to the pubspec.yaml file, as shown in the code snippet below.
dependencies:
  flutter:
    sdk: flutter
  gradient_borders: ^1.0.0
  google_generative_ai: ^0.2.2
  file_picker: ^8.0.0+1
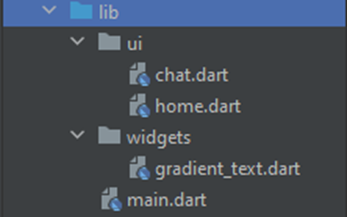
In the next step, create folders and files, as shown in the image below. In the ‘lib’ folder, the ‘ui’ folder contains the code for the UI of each page, and the ‘widgets’ folder is for custom widgets that we will create and use.
Populate the gradient_text.dart file in the widgets folder with the code snippet below.
class GradientText extends StatelessWidget {
  const GradientText(
        this.text, {
          required this.gradient,
          this.style,
        });

    final String text;
    final TextStyle? style;
    final Gradient gradient;

    @override
    Widget build(BuildContext context) {
      return ShaderMask(
        blendMode: BlendMode.srcIn,
        shaderCallback: (bounds) => gradient.createShader(
          Rect.fromLTWH(0, 0, bounds.width, bounds.height),
        ),
        child: Text(text, style: style),
      );
    }
  }
In the main.dart folder, input the code as shown below, which determines the application name, the theme used, and the route for the application pages.
void main() {
  runApp(const MyApp());
}

class MyApp extends StatelessWidget {
  const MyApp({super.key});

  @override
  Widget build(BuildContext context) {
    return MaterialApp(
      title: 'Chat Bot',
      theme: ThemeData(
        colorScheme: ColorScheme.fromSeed(seedColor: Colors.orangeAccent),
        useMaterial3: true,
      ),
      initialRoute: HomePage.routeName,
      routes: {
        HomePage.routeName: (context) => const HomePage(),
        ChatPage.routeName: (context) => const ChatPage(),
      },
    );
  }
}
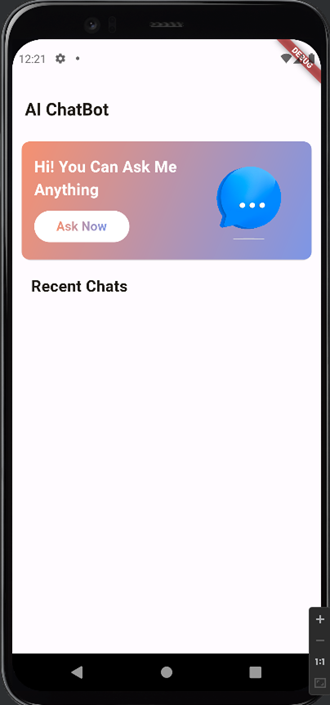
In the home.dart file, create a stateless widget, assign a routeName, and a UI card containing the “Ask Now” button, which is used to navigate to the chat view as displayed in the code below.
class HomePage extends StatelessWidget {
static const routeName  = '/home';
  const HomePage({super.key});

  @override
  Widget build(BuildContext context) {
    return Scaffold(
      appBar: AppBar(
        title: const Text("AI ChatBot", style: TextStyle(fontWeight: FontWeight.bold),),
      ),
      body: Container(
        child: Padding(
          padding: const EdgeInsets.all(8.0),
          child: Column(
            crossAxisAlignment: CrossAxisAlignment.stretch,
            children: [
              Card(
                child: Container(
                  decoration: const BoxDecoration(
                    gradient: LinearGradient(
                      begin: Alignment.topLeft,
                      end: Alignment.bottomRight,
                      colors: [
                        //get colors from hex
                        Color(0xFFF69170),
                        Color(0xFF7D96E6),
                      ]
                    ),
                    borderRadius: BorderRadius.all(Radius.circular(10.0)),
                  ),
                  child: Row(
                    children: [
                      Column(
                        crossAxisAlignment: CrossAxisAlignment.start,
                        children: [
                          const Padding(
                            padding: EdgeInsets.only(top: 16.0, left: 16.0),
                            child: (
                              Text("Hi! You Can Ask Me", style: const TextStyle(fontSize: 20.0, fontWeight: FontWeight.bold, color: Colors.white))
                            ),
                          ),
                          const Padding(
                            padding: EdgeInsets.only(left: 16.0),
                            child: (
                                Text("Anything", style: const TextStyle(fontSize: 20.0, fontWeight: FontWeight.bold, color: Colors.white))
                            ),
                          ),
                          Padding(
                            padding: const EdgeInsets.only(top: 8.0, left: 16.0, bottom: 16.0),
                            child: (
                              TextButton(
                                onPressed: (){
                                  Navigator.pushNamed(context, '/chat');
                                },
                                style: ButtonStyle(
                                  backgroundColor: MaterialStateProperty.all(Colors.white),
                                  foregroundColor: MaterialStateProperty.all(Colors.black),
                                ),
                                child: const Padding(
                                  padding: EdgeInsets.symmetric(horizontal: 16.0),
                                  child: GradientText(
                                    "Ask Now",
                                    style: TextStyle(
                                      fontSize: 16.0,
                                      fontWeight: FontWeight.bold,
                                    ),
                                    gradient: LinearGradient(
                                      colors: [
                                        Color(0xFFF69170),
                                        Color(0xFF7D96E6),
                                      ]
                                    ),
                                  ),
                                )
                              )
                            ),
                          ),
                        ],
                      ),
                      const Padding(
                        padding: EdgeInsets.only(left: 16.0),
                        child: DecoratedBox(
                          decoration: BoxDecoration(
                          image: DecorationImage(image: AssetImage("assets/images/icon.png"), fit: BoxFit.cover),
                        ),
                        child: SizedBox(height: 150, width: 150,),
                        ),
                      )
                    ],
                  ),
                ),
              ),
              const Padding(
                padding: EdgeInsets.only(top: 16.0, left: 16.0),
                child: Text("Recent Chats", style: TextStyle(fontSize: 20.0, fontWeight: FontWeight.bold),),
              ),
            ],
          ),
        ),
      ),
    );
  }
}
Next, in the chat.dart file, create a stateful widget with a route name that resembles a typical chat application. Also, create an empty variable of type List
class ChatPage extends StatefulWidget {
  static const routeName  = '/chat';
  const ChatPage({super.key});

  @override
  State createState() => _ChatPageState();
}

class _ChatPageState extends State {
  final TextEditingController _chatController = TextEditingController();
  final ScrollController _scrollController = ScrollController();
  List> _chatHistory = [];
  String? _file;

  @override
  Widget build(BuildContext context) {
    return Scaffold(
      appBar: AppBar(
        title: const Text("Chat", style: TextStyle(fontWeight: FontWeight.bold),),
      ),
      body: Stack(
        children: [
          Container(
            //get max height
            height: MediaQuery.of(context).size.height - 160,
            child: ListView.builder(
              itemCount: _chatHistory.length,
              shrinkWrap: false,
              controller: _scrollController,
              padding: const EdgeInsets.only(top: 10,bottom: 10),
              physics: const BouncingScrollPhysics(),
              itemBuilder: (context, index){
                return Container(
                  padding: EdgeInsets.only(left: 14,right: 14,top: 10,bottom: 10),
                  child: Align(
                    alignment: (_chatHistory[index]["isSender"]?Alignment.topRight:Alignment.topLeft),
                    child: Container(
                      decoration: BoxDecoration(
                        borderRadius: BorderRadius.circular(20),
                        boxShadow: [
                          BoxShadow(
                            color: Colors.grey.withOpacity(0.5),
                            spreadRadius: 2,
                            blurRadius: 5,
                            offset: const Offset(0, 3),
                          ),
                        ],
                        color: (_chatHistory[index]["isSender"]?Color(0xFFF69170):Colors.white),
                      ),
                      padding: EdgeInsets.all(16),
                      child: _chatHistory[index]["isImage"] ? Image.file(File(_chatHistory[index]["message"]), width: 200) : Text(_chatHistory[index]["message"],
                      style: TextStyle(fontSize: 15,
                      color: _chatHistory[index]["isSender"] ? Colors.white : Colors.black)),
                    ),
                  ),
                );
              },
            ),
          ),
          Align(
            alignment: Alignment.bottomCenter,
            child: Container(
              padding: const EdgeInsets.symmetric(horizontal: 16.0, vertical: 8.0),
              height: 60,
              width: double.infinity,
              color: Colors.white,
              child: Row(
                children: [
     MaterialButton(
        onPressed: () {

                  }
                },
                minWidth: 42.0,
                shape: RoundedRectangleBorder(
                  borderRadius: BorderRadius.circular(80.0)),
                  padding: const EdgeInsets.all(0.0),
                  child: Ink(
                    decoration: const BoxDecoration(
                      gradient: LinearGradient(
                        begin: Alignment.topLeft,
                        end: Alignment.bottomRight,
                      colors: [
                        Color(0xFFF69170),
                        Color(0xFF7D96E6),
                      ]
                    ),
                    borderRadius: BorderRadius.all(Radius.circular(30.0)),
                  ),
                  child: Container(
                    constraints: const BoxConstraints(
                      minWidth: 42.0, minHeight: 36.0),
                      alignment: Alignment.center,
                      child: Icon(_file==null?Icons.image:Icons.check, color: Colors.white,)
                      ),
                    ),
                  ),
                  const SizedBox(width: 4.0,),
                  Expanded(
                    child: Container(
                      decoration: const BoxDecoration(
                        border: GradientBoxBorder(
                            gradient: LinearGradient(
                                begin: Alignment.topLeft,
                                end: Alignment.bottomRight,
                                colors: [
                                  Color(0xFFF69170),
                                  Color(0xFF7D96E6),
                                ]
                            ),
                        ),
                        borderRadius: BorderRadius.all(Radius.circular(50.0)),
                      ),
                      child: Padding(
                        padding: const EdgeInsets.all(4.0),
                        child: TextField(
                          decoration: const InputDecoration(
                            hintText: "Type a message",
                            border: InputBorder.none,
                            contentPadding: EdgeInsets.all(8.0),
                          ),
                          controller: _chatController,
                        ),
                      ),
                    ),
                  ),
                  const SizedBox(width: 4.0,),
                  MaterialButton(
                    onPressed: (){

                    },
                    shape: RoundedRectangleBorder(borderRadius: BorderRadius.circular(80.0)),
                    padding: const EdgeInsets.all(0.0),
                    child: Ink(
                      decoration: const BoxDecoration(
                        gradient: LinearGradient(
                            begin: Alignment.topLeft,
                            end: Alignment.bottomRight,
                            colors: [
                              Color(0xFFF69170),
                              Color(0xFF7D96E6),
                            ]
                        ),
                        borderRadius: BorderRadius.all(Radius.circular(50.0)),
                      ),
                      child: Container(
                        constraints: const BoxConstraints(minWidth: 88.0, minHeight: 36.0), // min sizes for Material buttons
                        alignment: Alignment.center,
                        child: const Icon(Icons.send, color: Colors.white,)
                      ),
                    ),
                  )
                ],
              ),
            ),
          )
        ],
      ),
    );
  }

After creating the UI, let’s create the functionality of this chatbot. First, create some variables, as displayed below. _model and _visionModel are used to initialize the Gemini models used. Meanwhile, _chat the model stores the history. Also, copy the initState method as displayed in the code below. Remember to replace with your API Key.
late final GenerativeModel _model;
late final GenerativeModel _visionModel;
late final ChatSession _chat;

 @override
 void initState() {
   _model = GenerativeModel(
   model: 'gemini-pro', apiKey: '');
   _visionModel = GenerativeModel(
   model: 'gemini-pro-vision', apiKey: '');
   _chat = _model.startChat();
   super.initState();
 }
Then, we implement it to retrieve images from storage. In the onPressed attribute on the add image button, add async to the onPressed method and enter the code below. Here, we save the path in our _file variable that will later be saved in the chat history.
onPressed: () async {
  FilePickerResult? result =
  await FilePicker.platform.pickFiles(
    type: FileType.custom,
    allowedExtensions: ['jpg', 'jpeg', 'png'],
  );
  print(result);
  if (result != null) {
    setState(() {
      _file = result.files.first.path;
    });
  }
},
In the onPressed event on the send button, provide code for setState after adding chatHistory according to what the user typed in the textfield and if _file is not null, we also add chatHistory with the isImage attribute true. An example of a code snippet can be seen below. Also, call the getAnswer method, which has parameters from the text controller, before clearing the text.
onPressed: () {
 setState(() {
   if (_chatController.text.isNotEmpty) {
     if (_file != null){
       _chatHistory.add({
         "time": DateTime.now(),
         "message": _file,
         "isSender": true,
         "isImage": true
     });
   }

   _chatHistory.add({
     "time": DateTime.now(),
     "message": _chatController.text,
     "isSender": true,
     "isImage": false
    });
   }
  });

  _scrollController.jumpTo(
   _scrollController.position.maxScrollExtent,
  );

  getAnswer(_chatController.text);
  _chatController.clear();
},
Finally, it’s time to call Gemini according to what we need. Here, we first check whether an image needs to be sent. If it exists, then we have to use visionModel, whereas if it’s just text we can use a regular model. Don’t forget to also setState when the response is received so that the chat from the model can be updated on the screen. The code is as follows.
void getAnswer(text) async {
  late final response;
  if(_file != null){
    final firstImage = await (File(_file!).readAsBytes());
    final prompt = TextPart(text);
    final imageParts = [
      DataPart('image/jpeg', firstImage ),
    ];
    response = await _visionModel.generateContent([
      Content.multi([prompt, …imageParts])
    ]);
    _file = null;
    }else{
      var content = Content.text(text.toString());
      response = await _chat.sendMessage(content);
    }
  setState(() {
  _chatHistory.add({
  "time": DateTime.now(),
  "message": response.text,
  "isSender": false,
  "isImage": false
  });
  _file = null;
  });

  _scrollController.jumpTo(
  _scrollController.position.maxScrollExtent,
  );
}
After that, the application can be run, and you can try to chat with the bot.
This comprehensive guide has walked you through creating a user-friendly, multimodal AI chatbot application using Flutter and Gemini. We’ve covered everything from obtaining the necessary API key and installing Flutter to crafting the UI, implementing functionalities, and integrating Gemini for text and image processing.
With the knowledge gained from this tutorial, you can now build and customize your AI chatbot applications to enhance user interactions and explore the potential of multimodal AI experiences. Remember to experiment and adapt the code to your specific needs and creative vision. Happy building!
![]()
Chatbot with Multimodality Features using Flutter and Gemini was originally published in Google Developer Experts on Medium, where people are continuing the conversation by highlighting and responding to this story.