Introduction
Since the release of PaliGemma models by Google, I’ve been following it closely. As a developer who enjoys experimenting and building, it’s impressive to see how this open vision language model tackles tasks like image captioning, object detection, segmentation, OCR, and more.
PaliGemma 2, the latest VLM in the Gemma family, brings several improvements, including adaptability on a variety of transfer tasks. Similar to its predecessor, PaliGemma 2 uses the SigLIP vision encoder, with Gemma 2 serving as the language decoder.
Learn more about inferencing with PaliGemma and its architecture in my previous blog.
While we typically use Python and Colab notebooks for making inferences, I wanted to show something different — how to serve PaliGemma 2 with Transformers.js and run inferences directly in the browser.
In this article, I‘ll take you through all the technical details of converting and quantizing the PaliGemma 2 model, specifically the SigLIP vision encoder, Gemma 2 language decoder, and embedding tokens, into ONNX weights.
These weights will then be integrated with 🤗 Transformers.js to make inferences in the web browser using a Node.js web app.
Note: This isn’t a fully on-device implementation; rather, it demonstrates how to set up a local server to load the model weights and create a Node.js web app for running inferences.
Pre-requisites:
Before we start, make sure you have the following:
- Access to PaliGemma 2 model card on Hugging Face
- Colab runtime with at least L4 GPU
- A good machine with a GPU, at least 16 GB of RAM, and Node.js installed
Clone the repository on your local machine: https://github.com/NSTiwari/PaliGemma2-ONNX-Transformers.js
Why ONNX?
Since PaliGemma 2 is a PyTorch model, it isn’t natively compatible with JavaScript for running in web browsers. Hence, we convert its weights to the ONNX format to enable inference with Transformers.js.
Part I: Convert and quantize PaliGemma 2 to ONNX
Open theConvert_PaliGemma2_to_ONNX.ipynb notebook in Colab from the cloned repository.
Step 1: Install libraries
We need HF Transformers to load PaliGemma 2, and the below ONNX libraries for the conversion process.
# Install Transformers and ONNX.
!pip install -q --upgrade git+https://github.com/huggingface/transformers.git
!pip install optimum[exporters]
!pip install onnxslim
!pip install onnx_graphsurgeon==0.5.2
!pip install onnxruntime
!pip install onnxruntime-tools
!pip install optimum[onnxruntime]
!pip install onnxconverter-common
Step 2: Convert PaliGemma 2 to ONNX
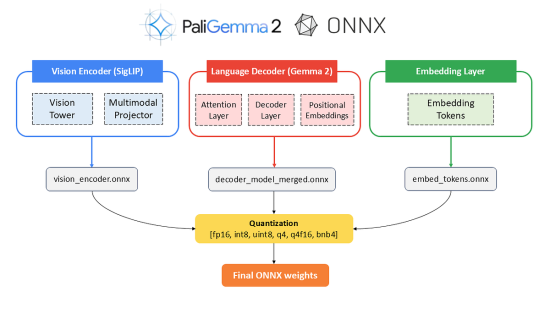
Since PaliGemma 2 is a Vision-Language Model (VLM), it consists of two components: the SigLIP vision encoder and the Gemma 2 language decoder, along with the embedding tokens. To make the model compatible with the browser, we need to convert all three parts into the ONNX format.
The following PaliGemma 2 variants are convertible:

In this blog, I’ll be using the latest paligemma2–3b-mix-224 model.
Let’s understand the conversion process with the image below:

- Vision Encoder (SigLIP): The vision encoder processes images (pixel values) and generates image feature vectors. It consists of the below two components:
- Vision Tower: The part of the model that processes the raw image inputs to generate features.
- Multimodal Projector: This projects the image features into a form suitable for use in the text processing pipeline.
The conversion process is as follows: SigLIP [Vision Tower, Multimodal Projector] → vision_encoder.onnx.
""" Supported models are:
1. paligemma2-3b-mix-224
2. paligemma2-3b-mix-448
3. paligemma2-3b-pt-224
4. paligemma2-3b-ft-docci-448
5. paligemma2-3b-pt-448
6. paligemma2-3b-pt-896
"""
model_id = "google/paligemma2-3b-mix-224"

## Vision model (SigLIP).
VISION_MODEL_OUTPUT_PATH = os.path.join(TEMP_MODEL_OUTPUT_FOLDER, VISION_MODEL_NAME)
torch.onnx.export(
    vision_model,
    args=vision_inputs_positional,
    f=VISION_MODEL_OUTPUT_PATH,
    export_params=True,
    opset_version=14,
    do_constant_folding=True,
    input_names=['pixel_values'],
    output_names=['image_features'],
    dynamic_axes={
        'pixel_values': {0: 'batch_size'},
        'image_features': {0: 'batch_size'}
    },
)

input_ids = torch.randint(0, embed_layer.num_embeddings, (batch_size, sequence_length))
2. Language Decoder (Gemma 2): The Gemma 2 Language Decoder processes text inputs (embeddings) and image features to generate logits for text prediction.
- Attention Layer: The part of the model that helps focus on different parts of the input sequence while generating output.
- Decoder Layers: The multi-layer transformer decoder that processes the embeddings and outputs token predictions.
- Position Embeddings: To preserve the order of tokens in the sequence.
Similarly, the conversion process for the language decoder is: Gemma 2 [Attention Layer, Decoder Layers, Position Embeddings] → decoder_model_merged.onnx.
## Text model (Gemma 2).
TEXT_MODEL_OUTPUT_PATH=os.path.join(TEMP_MODEL_OUTPUT_FOLDER, TEXT_MODEL_NAME)
torch.onnx.export(
    model,
    args=text_inputs_positional,
    f=TEXT_MODEL_OUTPUT_PATH,
    export_params=True,
    opset_version=14,
    do_constant_folding=True,
    input_names=list(text_inputs.keys()),
    output_names=["logits"]
    + [f"present.{i}.{key}" for i in range(num_layers) for key in ["key", "value"]],
    dynamic_axes={
        "inputs_embeds": {0: "batch_size", 1: "sequence_length"},
        "position_ids": {0: "batch_size", 1: "sequence_length"},
        **{
            f"past_key_values.{i}.{key}": {0: "batch_size", 2: "past_sequence_length"}
            for i in range(num_layers)
            for key in ["key", "value"]
        },
        "logits": {0: "batch_size", 1: "sequence_length"},
        **{
            f"present.{i}.{key}": {0: "batch_size", 2: "total_sequence_length"}
            for i in range(num_layers)
            for key in ["key", "value"]
        },
    },
    external_data_format=True,
)
3. Embedding Tokens Layer: Represents tokens (words) into dense vector representations (embeddings). This entire layer is converted to ONNX format to produce embed_tokens.onnx.
## Embedding model
EMBED_MODEL_OUTPUT_PATH = os.path.join(TEMP_MODEL_OUTPUT_FOLDER, EMBED_MODEL_NAME)
torch.onnx.export(
    embed_layer,
    args=(input_ids,),
    f=EMBED_MODEL_OUTPUT_PATH,
    export_params=True,
    opset_version=14,
    do_constant_folding=True,
    input_names=['input_ids'],
    output_names=['inputs_embeds'],
    dynamic_axes={
        'input_ids': {0: 'batch_size', 1: 'sequence_length'},
        'inputs_embeds': {0: 'batch_size', 1: 'sequence_length'}
    },
)
Note: To keep the blog concise, I’ve included only the important parts, but feel free to check out the complete code in the notebook.
Step 3: Quantize the ONNX models
While optional, quantizing the ONNX models is recommended to optimize inference.
The script below quantizes the vision encoder, language decoder, and token embedding ONNX models into precision data types such as fp16, int8, uint8, q4, q4f16, and bnb4. The entire quantization process takes about 40–45 minutes.
# Python script to quantize the ONNX model weights.
!wget https://raw.githubusercontent.com/NSTiwari/PaliGemma2-ONNX-Transformers.js/main/quantize.py

# Create a new directory to store quantized weights.
!mkdir onnx_model_quantized

# Start quantization.
!python quantize.py
  --input_folder $FINAL_MODEL_OUTPUT_FOLDER
  --output_folder onnx_model_quantized
  --modes fp16 int8 uint8 q4 q4f16 bnb4
  --per_channel
  --reduce_range
  --block_size 64
  --is_symmetric
  --accuracy_level 2
  --quant_type 1
Fantastic, we’ve successfully converted and quantized PaliGemma 2 to ONNX format, making it compatible to inference with Transformers.js.
Step 4: Upload the ONNX weights on Hugging Face
Let’s upload the ONNX weights on Hugging Face for convenient access during inference.
from huggingface_hub import whoami
from pathlib import Path
from huggingface_hub import upload_folder, create_repo

# Output directory.
output_dir = f"https://medium.com/content/output/{model_id}/"
username = whoami(token=Path("https://medium.com/root/.cache/huggingface/"))["name"]
repo_id = f"{username}/paligemma2-onnx"

repo_id = create_repo(repo_id, exist_ok=True).repo_id

upload_folder(
    repo_id=repo_id,
    folder_path=output_dir,
    commit_message=f"{model_id} ONNX",
    ignore_patterns=["step_*", "epoch_*"],
)

You should see the files shown above in your HF repository. If, for any reason, you weren’t able to convert the model successfully, you can refer to my repo: https://huggingface.co/NSTiwari/paligemma2–3b-mix-224-onnx.
Part II : Inference PaliGemma 2 with Transformers.js
Now, we’re ready to run inferences with our converted model. There are two ways to do this:
- On Colab: If your local machine doesn’t have enough resources (and of course, you don’t want to overload it 🤪), you can use the separate Colab notebook I’ve created for inference.
- Web app on your local machine: Alternatively, you can run the model in a web app (with a frontend) locally, utilizing your machine’s resources.
I’ll show both methods, starting with Colab.
Open the Inference_PaliGemma2_with_Transformers_js.ipynb notebook in Colab.
Step 1: Install Node.js
# Install Node.js
!curl -fsSL https://deb.nodesource.com/setup_20.x | sudo -E bash -
!sudo apt-get install -y nodejs
Step 2: Setup environment
Create a new Node.js project, and configure the package.
!mkdir paligemma2
%cd paligemma2

# Initialize NPM project.
!npm init -y
!npm i @huggingface/transformers canvas

# Create the package.json file.
%%writefile package.json

{
  "name": "paligemma2",
  "version": "1.0.0",
  "main": "index.js",
  "type": "module",
  "scripts": {
    "test": "echo "Error: no test specified" && exit 1"
  },
  "keywords": [],
  "author": "Nitin Tiwari",
  "license": "MIT",
  "description": "",
  "dependencies": {
    "@huggingface/transformers": "^3.1.2"
  }
}
Create an index.js file in the paligemma2directory.
import { AutoProcessor, PaliGemmaForConditionalGeneration, load_image } from "@huggingface/transformers";
import { createCanvas, loadImage } from "canvas";
import fs from "fs";
function getRandomColor() {
const r = Math.floor(Math.random() * 256);
const g = Math.floor(Math.random() * 256);
const b = Math.floor(Math.random() * 256);
return `rgb(${r},${g},${b})`;
}
// Load processor and model
const model_id = "NSTiwari/paligemma2-3b-mix-224-onnx";
const processor = await AutoProcessor.from_pretrained(model_id);
const model = await PaliGemmaForConditionalGeneration.from_pretrained(
model_id,
{
dtype: {
embed_tokens: "fp16", // or 'fp16'
vision_encoder: "fp16", // or 'q4', 'fp16'
decoder_model_merged: "q4", // or 'q4f16'
},
}
);
console.log("Model and processor loaded successfully!");
// Prepare inputs for PaliGemma 2.
const image = "https://medium.com/content/image.png"; // Path to the image.
const raw_image = await load_image(image);
const prompt = ""; // Default prompt.
// Extract the label from the prompt detect
Step 3: Run application
# Run the application.
!node index.js

if "detect" in prompt:
  output_image = Image.open("https://medium.com/content/output.jpg")
  display(output_image)
I tried an example for the below input image and text prompt.
Text prompt: detect
dog


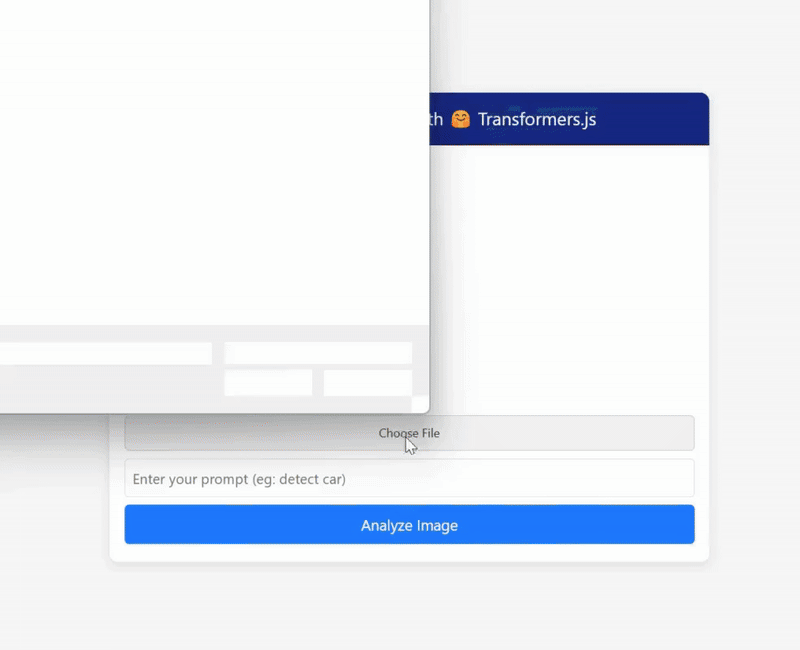
This looks great. 🤩 Now, let’s run inference on an actual web app with a visually appealing frontend. I’ve developed a sample web app that accepts image and text prompts as inputs.
Step 1: Install the npm packages
Open terminal, and navigate to the Web App directory in the repository you had cloned and run the below commands:
# Navigate to the Web App directory.
cd PaliGemma2-ONNX-Transformers.js/Web App

# Install the NPM packages.
npm install

# Start the Node.js server
node server.js
Step 2: Enjoy inferencing. 🎉
Open your web browser and go to localhost:3000. Wait for a few moments as the model weights are downloaded. The first time may take 10–15 minutes to load, so please be patient.
Some results from my tests:
The demo has been fast-forwarded to give you a quick preview of the results. In reality, it takes around 30–40 seconds to return a response, depending on your machine’s resources, but the results are truly impressive.
So, that’s all about this blog. I really enjoyed articulating my efforts and learnings, and I hope you enjoyed reading it too.
Author’s note:
Using ONNX to run PaliGemma 2 in a non-Pythonic environment was something new for me. It took several weeks of trial and error behind the scenes to make everything work and eventually present it to you.
What makes this article particularly special is that, just as I was writing it, Google announced the latest PaliGemma 2 Mix models. I quickly adapted all the scripts overnight to integrate this new model, and I have to say — it performs remarkably well compared to the pretrained versions.
If you appreciated my work, don’t forget to ⭐ the repository and share it with others. I’ll be back with more engaging blogs, stay tuned.
Acknowledgment

Thanks to the ONNX community for their support and valuable resources, and a special thanks to the Google ML Developers Program team for providing GCP and Colab units to help facilitate this project.
References & Resources
- Google DeepMind PaliGemma 2
- GitHub repo: https://github.com/NSTiwari/PaliGemma2-ONNX-Transformers.js
- paligemma2–3b-mix-224 ONNX weights
- ONNX Community
![]()
Inference PaliGemma 2 with 🤗 Transformers.js was originally published in Google Developer Experts on Medium, where people are continuing the conversation by highlighting and responding to this story.