

In today’s fast-paced tech world, creating clear, concise, and engaging technical content is more crucial than ever. Whether it’s writing blog posts that attract readers, crafting comprehensive code bases for your projects, or even generating video scripts, the demand for high-quality content is constant. But let’s be honest: content creation can be time-consuming. What if you could leverage the power of AI to streamline this process, freeing you up to focus on the core technical work? That’s precisely what this blog post explores — using generative AI to improve your content creation workflow.
The Content Creator AI Tools Project
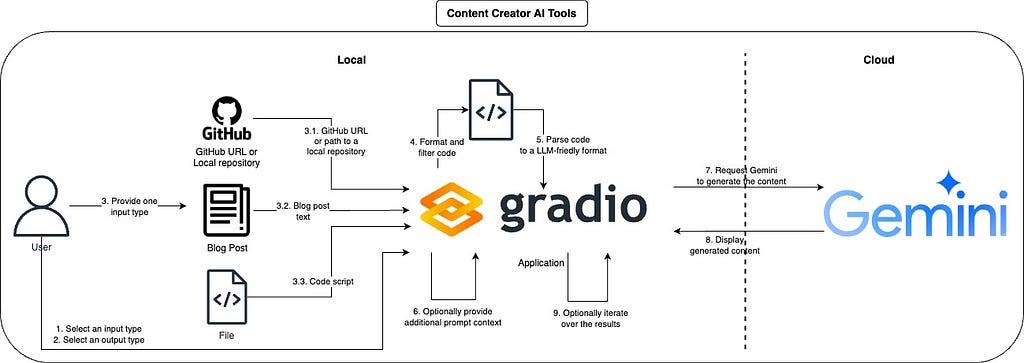
Here we will discuss an application designed to do just that: the “Content Creator AI Tools” project. This project uses Gemini, accessible through Google AI Studio and Vertex AI, to generate various types of technical content assets. It can take your raw code, files, text inputs, or even an entire GitHub repository and transform it into content like blog posts, GitHub README files, code Improvements, video walkthroughs, and more!
The goal is simple: make content creation faster, easier, and more efficient, allowing you to share your technical expertise with your audience more effectively.
From Code to Content
The idea of this project is to create an app that is an interface to a collection of tools tailored to create technical content, in this section, we will go through the main parts of the workflow.
1. Choosing Your Input and Output
The first step for the user is to pick and input and output type from the ones available, with this, the app can format the prompt and prepare the interface to create the desired content.

2. Providing an input
Then the user must provide the source input content that will be used to generate the output, you can go from any input to any output type, but some pairs will make more sense than others, a great option that is supported here is parsing an entire GitHub repository as input, this is a great option to create blog posts, README files, or just overall code improvements with the full context.

Under the hood, the app uses Gitingest which is an easy and convenient way to parse entire repositories to a LLM-friendly format.

3. Adding Context and Instructions
A very efficient way to steer the models to generate the output that you desired is to just describe how you want it, for this reason we have an input box that allows you to do just that, the app already provide some default prompts for some use cases, feel free to use them, add even more descriptions or use your own.

4. Generating the Content
When you are satisfied with all the inputs, just click on “Generate content” and wait to get your output. The app will take the file and inputs and properly use the required APIs to process and upload them so that the model can use it. During the generation process, the app will also provide some useful information like the token count of the input, this can help you with cost and processing estimation.

For some output types you might also want to visualize it as a Markdown, in those cases just click in the “Show markdown version”

5. Iterating and Refining
If you are not satisfied with the results, or just want to keep iterating over the content created, you can keep chatting with the model and iterate over the results.

You can iterate indefinitely until you get the desired results.

Examples
At this point you already have a very good idea of the flexibility of this app and its goal, check out a few more examples to give you some ideas.
Example 1: Generating a Blog Post from a Code Script
1. Select “Code” as the input type.
2. Select “Blog post” as the output type.
3. Upload a Python script containing code.
4. Provide additional instructions such as “Summarize the code and describe its functionality” in the prompt section.
5. Click on “Generate content”.

Example 2: Creating a README from a GitHub Repository
1. Select “Code base” as the input type.
2. Select “GitHub README.md file” as the output type.
3. Enter the URL or local path of the GitHub repository to parse.
4. Click on “Parse GitHub repository” to fetch repository summary, tree structure, and file content.
5. Provide additional instructions such as “Explain how to set up the environment and run the app” in the prompt section.
6. Click on “Generate content”.

Example 3: Creating a Video Walkthrough from a Blog Post
1. Select “Blog post” as the input type.
2. Select “Video walkthrough” as the output type.
3. Input the blog post into the “Input text field”.
4. Provide additional instructions such as “The video walkthrough must be engaging and suited for short content” in the prompt section.
5. Click on “Generate content”.

Closing Thoughts
The Content Creator AI Tools project demonstrates the great potential of AI to transform the way we create technical content. By automating the more tedious aspects of writing, documentation, and even video script creation, it frees up valuable time and helps you get started. This allows technical professionals to focus on what they do best: building innovative solutions and sharing their knowledge with the world.
This application is still under development, with exciting features planned for the future, including support for:
- Multiple file inputs.
- Local open-source models.
- Text-to-speech (TTS) audio generation.
- Image and video generation to further enhance content.
Next Steps
- Try it out: Clone the repository and follow the setup instructions.
- Experiment: Test different input types, output types, and prompt instructions to see what’s possible.
- Contribute: If you’re interested in helping to develop the project further, fork the repository and submit a pull request.
If you managed to build something cool, or have any suggestions, please reach out!
If you are into content generation using AI, you might be interested in these two other blog posts below:
- How to use generative AI to create podcast-style content from any input
- Building a generative AI-based GeoGuesser
![]()
Supercharge Your Technical Content Creation with Gemini was originally published in Google Developer Experts on Medium, where people are continuing the conversation by highlighting and responding to this story.

![which-llm-should-you-use-for-your-business?-[pros-and-cons]](https://prodsens.live/wp-content/uploads/2025/02/31849-which-llm-should-you-use-for-your-business-pros-and-cons-110x110.png)

![[sep-2025]-ai-community — activity-highlights-and-achievements](https://prodsens.live/wp-content/uploads/2025/10/40306-sep-2025-ai-community-activity-highlights-and-achievements-380x250.jpg)