In this guide, we’ll explore Kubernetes Deployments using the imperative way on Google Kubernetes Engine (GKE).
We’ll cover creating, scaling, updating, exposing, and managing deployments step by step.
📌 Topics Covered
- Create Deployment
- Scale the Deployment
- Expose Deployment as a Service
- Update Deployment
- Rollback Deployment
- Rolling Restarts
🔹 Step 01: Introduction to Deployments
What is a Deployment?

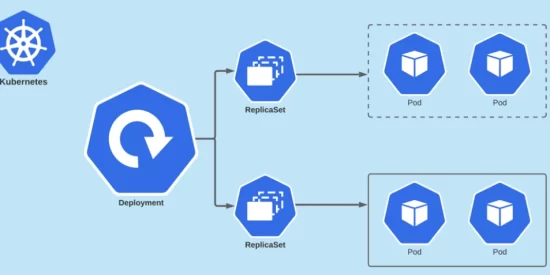
A Deployment in Kubernetes is a higher-level abstraction that manages Pods and ReplicaSets.
It allows you to define:
- The container image to run
- The number of replicas (Pods)
- Update strategies (rolling updates)
- Rollback in case of failures

What can we do with a Deployment?
Using a deployment, you can:
- Roll out new application versions
- Scale the number of Pods up/down
- Ensure self-healing (Pods restart if they fail)
- Perform rolling updates & rollbacks
- Expose applications internally or externally
🔹 Step 02: Create a Deployment
Let’s create a simple Nginx deployment with 3 replicas.

# Create Deployment
kubectl create deployment my-first-deployment
  --image=ghcr.io/stacksimplify/kubenginx:1.0.0
  --replicas=3

# Verify Deployment
kubectl get deployments
kubectl get deploy

# Describe Deployment
kubectl describe deployment my-first-deployment

# Verify ReplicaSet
kubectl get rs

# Verify Pods
kubectl get po
✅ At this point, we have 3 Pods running managed by a Deployment & ReplicaSet.

🔹 Rollout History with Change-Cause
Kubernetes allows tracking deployment revisions and rolling back if needed.
# Check Rollout History
kubectl rollout history deployment/my-first-deployment

# Add change-cause annotation
kubectl annotate deployment/my-first-deployment
  kubernetes.io/change-cause="Deployment CREATE - App Version 1.0.0"

# Verify rollout history
kubectl rollout history deployment/my-first-deployment

🔹 Step 03: Scaling a Deployment
We can easily scale the number of Pods up or down.
# Scale Up to 6 replicas
kubectl scale --replicas=6 deployment/my-first-deployment

# Verify
kubectl get deploy
kubectl get rs
kubectl get po

# Scale Down to 3 replicas
kubectl scale --replicas=3 deployment/my-first-deployment
kubectl get deploy

🔹 Step 04: Expose Deployment as a Service
By default, Pods are accessible only inside the cluster.
We’ll expose the Deployment using a LoadBalancer service so it’s accessible externally.
# Expose Deployment
kubectl expose deployment my-first-deployment
  --type=LoadBalancer
  --port=80
  --target-port=80
  --name=my-first-deployment-service

# Get Service Info
kubectl get svc

🔑 Note: On GCP, a public LoadBalancer IP will be created.
🔹 Step 05: Access the Application
Once the LoadBalancer is provisioned, you’ll see an External IP.
# Access Application in Browser
http://

# Or via curl
curl http://

✅ Recap
With imperative commands in GKE, we:
- Created a Deployment
- Verified ReplicaSet & Pods
- Scaled Pods up & down
- Exposed app via LoadBalancer
- Tracked rollout history
🌟 Thanks for reading! If this post added value, a like ❤️, follow, or share would encourage me to keep creating more content.
— Latchu | Senior DevOps & Cloud Engineer
☁️ AWS | GCP | ☸️ Kubernetes | 🔐 Security | ⚡ Automation
📌 Sharing hands-on guides, best practices & real-world cloud solutions