The Big Picture: Why This Project Matters
In the age of AI-driven decisions, retail businesses are sitting on a goldmine of customer interaction data, but most are struggling to use it effectively.
Imagine this:
- A customer browses your store but leaves without buying.
- You don’t know what caught their eye.
- You don’t know what’s likely to sell tomorrow.
- You’re restocking based on gut feel, not data.
This is the reality for many retailers.
The goal of this project is to build a cloud-native, AI-enhanced retail analytics platform that solves two critical business problems:
- What do you think we should stock next? → Predict demand using historical data and forecast which products need restocking.
- What should we recommend? → Use customer behavior to serve personalized product suggestions at runtime.
And we want to achieve this without maintaining complex infrastructure.
The Solution: Real-Time, AI-Driven Retail Intelligence
We’ll build a modern data pipeline with these pillars:
- Data Lake Architecture: S3-based Bronze → Silver → Gold zones for raw, cleaned, and model-ready data.
- AI at the Core: Bedrock for forecasting, Personalize for recommendations.
- Real-Time & Batch: Lambda for on-demand actions, EC2 for nightly forecasting.
- MLOps Foundation: Glue for ETL, EventBridge for orchestration, DynamoDB for fast lookup.
This is a full-stack, cloud-native project that covers everything from data ingestion to AI inference.
Phase 01: Ingesting Events Like a Real-Time System
Before anything else, we need data.
In this phase, we simulate a real-time ingestion pipeline by streaming historical customer interaction data into our system using Kinesis Firehose and Python.
What We’re Solving in Phase 1
To build useful AI models, we first need user behavior data. This includes:
- Product views
- Add-to-cart actions
- Purchases
- Timestamps and metadata
But unlike traditional ETL pipelines, we want to simulate a real-time data flow, so that our system behaves like it would in production, even while testing locally.
How We’re Building It
Here’s what we’re doing in this phase:
- Stream JSON events to Kinesis Firehose, which writes them to an S3 Bronze bucket.
- Simultaneously write selected fields to DynamoDB to store product metadata and inventory.
- Set the foundation for AI-driven recommendations and forecasting later on.
Let’s Build It
We’ll now walk through building this ingestion pipeline using AWS CDK, starting with:
- AWS CDK project setup
- Creating a DynamoDB table to store product info and initial inventory
- Creating the Base VPC
- Creating the S3 Buckets (bronze, silver, gold zones)
- Setting up Kinesis Firehose to deliver raw data to S3
- Writing Python scripts to simulate streaming events and populating DynamoDB
Step 1 – Setting Up the AWS CDK Project
To build this infrastructure in a clean, scalable way, we’re using AWS CDK (Cloud Development Kit). It allows us to define cloud infrastructure using familiar programming languages, in our case, TypeScript.
We’ll organize everything using a modular folder structure that separates shared resources, analytics components, and common storage logic.
Initialize the CDK Project
We start by creating and bootstrapping a CDK app:
mkdir retail-ai-insights && cd retail-ai-insights
cdk init app --language=typescript
This creates a basic CDK project with boilerplate files like cdk.json, tsconfig.json, and a lib/ directory to organize stacks.
Organize Your Constructs
Let’s build a modular file structure right from the start. Inside the lib/ directory, run the following one by one:
cd lib/

# Shared Networking (VPC, Subnets, etc.)
mkdir -p constructs/shared/networking && touch constructs/shared/networking/vpc.ts

# Analytics Pipeline (Firehose, Glue, etc.)
mkdir -p constructs/analytics && touch constructs/analytics/firehose-stream.ts

# Common Storage (S3 Buckets, DynamoDB)
mkdir -p constructs/common/storage
touch constructs/common/storage/dynamodb-inventory.ts
touch constructs/common/storage/s3-bucket-factory.ts
Once done, your project should look like this:
lib/
├── constructs/
│   ├── shared/
│   │   └── networking/
│   │       └── vpc.ts
│   ├── analytics/
│   │   └── firehose-stream.ts
│   └── common/
│       └── storage/
│           ├── dynamodb-inventory.ts
│           └── s3-bucket-factory.ts
└── retail-ai-insights-stack.ts
Step 2 – Creating a DynamoDB Table for Product Inventory
Now that our CDK project is set up, let’s provision a DynamoDB table that will store:
- Product metadata (product_id, product_name, etc.)
- Current stock levels
- Forecasted demand (to be updated later)
This table will power real-time lookups during both recommendation generation and inventory management phases.
Open lib/constructs/common/storage/dynamodb-inventory.ts and add the following:
import { Construct } from "constructs";

import * as dynamodb from "aws-cdk-lib/aws-dynamodb";
import * as cdk from "aws-cdk-lib";

export class DynamoDBInventory extends Construct {
  public readonly inventoryTable: dynamodb.Table;

  constructor(scope: Construct, id: string) {
    super(scope, id);

    this.inventoryTable = new dynamodb.Table(this, "RetailInventoryTable", {
      tableName: "RetailInventoryTable",
      partitionKey: { name: "product_id", type: dynamodb.AttributeType.STRING },
      billingMode: dynamodb.BillingMode.PAY_PER_REQUEST,
      encryption: dynamodb.TableEncryption.AWS_MANAGED,
      removalPolicy: cdk.RemovalPolicy.DESTROY,
    });
  }
}
Now open lib/retail-ai-insights-stack.ts and use the construct like this:
/**
* Retail Inventory Table
**/
const dynamoConstruct = new DynamoDBInventory(this, "DynamoDBInventory");
To see the output, run
cdk deploy
Navigate to the DynamoDB console

This completes our DynamoDB setup, giving us a real-time-accessible source of truth for product stock, prices, and metadata.
Step 3 – Creating the Base VPC
We’ll keep it minimal and efficient by using:
- 1 Availability Zones
- Public Subnets (for instance bootstrap, like downloading packages)
- Private Subnets with Egress (for EC2 forecasting to access Bedrock or S3 securely)
Open lib/constructs/shared/networking/vpc.ts and add:
import { Construct } from "constructs";
import { Vpc, SubnetType, NatProvider } from "aws-cdk-lib/aws-ec2";
import { StackProps } from "aws-cdk-lib";

export interface VpcResourceProps extends StackProps {
  maxAzs?: number;
}

export class VpcResource extends Construct {
  public readonly vpc: Vpc;

  constructor(scope: Construct, id: string, props: VpcResourceProps) {
    super(scope, id);

    this.vpc = new Vpc(this, "RetailForecastVpc", {
      vpcName: "RetailAIVPC",
      maxAzs: props.maxAzs ?? 1,
      natGatewayProvider: NatProvider.gateway(),
      natGateways: 0,
      subnetConfiguration: [
        {
          name: "PublicSubnet",
          subnetType: SubnetType.PUBLIC,
          cidrMask: 24,
        },
        {
          name: "PrivateSubnet",
          subnetType: SubnetType.PRIVATE_WITH_EGRESS,
          cidrMask: 24,
        },
      ],
    });
  }
}
In lib/retail-ai-insights-stack.ts, add:
/**
* VPC Setup
**/
const { vpc } = new VpcResource(this, "RetailVpc", {});
Let’s go run the
cdk deploy
Once done, navigate to the VPC console


With this, we now have an isolated network environment to run our compute workloads with secure access to AWS services (via VPC endpoints, later on).
Step 4 – Creating the Storage Foundation (S3 Buckets)
A production-grade data lake architecture often follows a multi-zone strategy to maintain a clean separation of data states:
- Bronze: Raw data as ingested (e.g., event streams)
- Silver: Cleaned, filtered, and enriched data
- Gold: Aggregated or transformed data that’s ready for ML/AI consumption
In our case, we’ll also include a zone-assets bucket to store static datasets and job scripts that need to be referenced during ETL jobs.
We’re creating multiple S3 buckets with similar configurations (like versioning, encryption, SSL-only access, and auto-deletion in dev environments), rather than duplicating logic, we’ll use a factory construct that makes it reusable and DRY.
Open the file:
lib/constructs/common/storage/s3-bucket-factory.ts
And update it with the following code:
import { Construct } from "constructs";
import {
  Bucket,
  BlockPublicAccess,
  BucketEncryption,
} from "aws-cdk-lib/aws-s3";
import * as cdk from "aws-cdk-lib";

interface CustomS3BucketProps {
  bucketName: string;
}

export class S3BucketFactory extends Construct {
  public readonly bucket: Bucket;

  constructor(scope: Construct, id: string, props: CustomS3BucketProps) {
    super(scope, id);

    const { bucketName } = props;

    this.bucket = new Bucket(this, "S3Bucket", {
      bucketName,
      versioned: true,
      enforceSSL: true,
      autoDeleteObjects: true,
      blockPublicAccess: BlockPublicAccess.BLOCK_ALL,
      encryption: BucketEncryption.S3_MANAGED,
      removalPolicy: cdk.RemovalPolicy.DESTROY,
    });
  }
}
Now in your retail-ai-insights-stack.ts, instantiate the factory construct like this:
/**
* Multi Zone Bucket
**/
const { bucket: bronzeBucket } = new S3BucketFactory(
  this,
  "BronzeDataLakeBucket",
  {
    bucketName: "retail-ai-bronze-zone",
  }
);

const { bucket: silverBucket } = new S3BucketFactory(
  this,
  "SilverDataLakeBucket",
  {
    bucketName: "retail-ai-silver-zone",
  }
);

const { bucket: goldBucket } = new S3BucketFactory(this, "GoldDataBucket", {
  bucketName: "retail-ai-gold-zone",
});

const { bucket: dataAssetsBucket } = new S3BucketFactory(
  this,
  "DataAssets",
  {
    bucketName: "retail-ai-zone-assets",
  }
);
Again, let’s do
cdk deploy
Verify the output by going to the S3 Bucket Console, you should see four of the buckets

This sets up the core storage foundation that the rest of our ETL, forecasting, and recommendation workflows will depend on.
Step 5 – Setting up Kinesis Firehose to deliver raw data to S3
With our Bronze bucket in place, we’re now ready to stream raw event data into it using Amazon Kinesis Data Firehose. Firehose is a fully managed service for delivering real-time streaming data directly to destinations like Amazon S3.
In our architecture, it enables our ingestion pipeline by capturing event streams and persisting them as raw JSON files in the Bronze zone.
Oepn the file:
lib/constructs/analytics/firehose-stream.ts
Add the following code:
import { Construct } from "constructs";

import { CfnDeliveryStream } from "aws-cdk-lib/aws-kinesisfirehose";
import { PolicyStatement, Role, ServicePrincipal } from "aws-cdk-lib/aws-iam";
import { Bucket } from "aws-cdk-lib/aws-s3";
import { LogGroup, LogStream } from "aws-cdk-lib/aws-logs";

interface FirehoseProps {
  destinationBucket: Bucket;
}

export class FirehoseToS3 extends Construct {
  public readonly deliveryStream: CfnDeliveryStream;

  constructor(scope: Construct, id: string, props: FirehoseProps) {
    super(scope, id);

    const logGroup = new LogGroup(this, "FirehoseLogGroup");
    const logStream = new LogStream(this, "FirehoseLogStream", {
      logGroup,
    });

    // IAM Role for Firehose to access S3
    const firehoseRole = new Role(this, "FirehoseRole", {
      assumedBy: new ServicePrincipal("firehose.amazonaws.com"),
    });

    props.destinationBucket.grantWrite(firehoseRole);

    firehoseRole.addToPolicy(
      new PolicyStatement({
        actions: [
          "logs:PutLogEvents",
          "logs:CreateLogGroup",
          "logs:CreateLogStream",
        ],
        resources: [logGroup.logGroupArn],
      })
    );

    // Firehose Delivery Stream
    this.deliveryStream = new CfnDeliveryStream(this, "DatasetFirehose", {
      deliveryStreamName: "firehose-to-s3",
      deliveryStreamType: "DirectPut",
      s3DestinationConfiguration: {
        bucketArn: props.destinationBucket.bucketArn,
        roleArn: firehoseRole.roleArn,
        prefix: "dataset/",
        bufferingHints: {
          intervalInSeconds: 60,
          sizeInMBs: 5,
        },
        compressionFormat: "UNCOMPRESSED",
        cloudWatchLoggingOptions: {
          enabled: true,
          logGroupName: logGroup.logGroupName,
          logStreamName: logStream.logStreamName,
        },
      },
    });
  }
}
Open lib/retail-ai-insights-stack.ts and wire it up:
/**
* Firehose Stream
**/
new FirehoseToS3(this, "FirehoseToS3", {
  destinationBucket: bronzeBucket,
});
Deploy and verify the output, this time go to the Kinesis Firehose console
cdk deploy

This completes our infrastructure deployment for our first phase. data.
Step 6 – Simulating Real-Time Events Using Python Scripts
Now that the infrastructure is in place, let’s simulate user activity by streaming mock sales data into our Firehose delivery stream and storing essential product metadata in DynamoDB.
What We’re Doing
- Sending user interaction events (like purchases, product views) into the Bronze zone via Firehose.
- Writing product-level information (with inventory and forecasted demand fields) directly into DynamoDB.
This gives us two distinct but complementary data flows: one for historical processing (S3), and one for operational lookups (DynamoDB).
Running the Simulation Scripts
Clone the scripts directory directly into your project root:
https://github.com/mohsinsheikhani/retail-ai-insights/tree/main/scripts
1. Stream to Firehose
This script sends historical user events to Firehose in batches (simulating real-time behavior):
python3 ./scripts/stream_to_firehose.py --stream-name firehose-to-s3
Once it’s running:
- Open the Kinesis Firehose Console
- Select the
firehose-to-s3stream - Scroll down to the monitoring tab
- You’ll start to see metrics update (incoming bytes, delivery success, etc.)

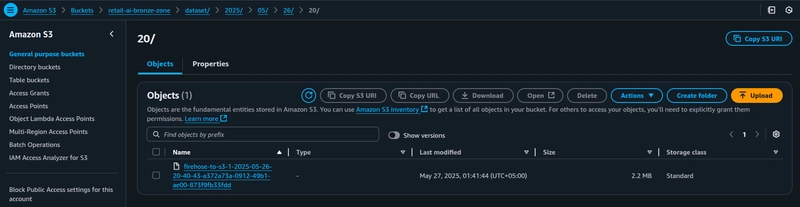
Then check your Bronze S3 bucket via the S3 Console:
- Navigate into the bucket named
retail-ai-bronze-data - You should see a new folder under dataset/ containing your streamed JSON records.
2. Populate DynamoDB
This script writes a subset of product info to DynamoDB:
python3 ./scripts/write_to_dynamodb.py
It sends fields like:
- product_id, product_name, category, price, rating
And auto-generates: - current_stock (random between 30–70)
- forecasted_demand (initially set to 0)
Once the script runs:
- Open DynamoDB Console
- Click Explore Items
- You’ll see all your ingested product records appear in the
RetailInventoryTable.

This completes our Phase 1: Ingestion Layer setup, where we now have:
- Realistic product interaction data flowing into S3
- Fast-access inventory data in DynamoDB
In the next phase, we’ll build our ETL pipeline using AWS Glue to clean and enrich this data. Stay tuned!
Complete Code for the First Phase
To view the full code for the first phase, checkout the repository on GitHub
🚀 Follow me on LinkedIn for more AWS content!