![[ml-story]-mobilellama3:-run-llama3-locally-on-mobile](https://prodsens.live/wp-content/uploads/2024/05/23479-ml-story-mobilellama3-run-llama3-locally-on-mobile.png)
Introduction
In April 2024, Meta released their new family of open language models, known as Llama 3. Building upon its predecessor, Llama 3 offers enhanced features and comes in pre-trained versions of 8B and 70B, as well as instruction-tuned variants.
In the ongoing trend of language models, developers are favoring local or offline usage over APIs to protect privacy and avoid personal data exposure. Ollama, an open-source project, is one tool that permits running LLMs offline on MacOS and Linux OS, enabling local execution. Yet, the ability to run LLMs locally on mobile devices remains constrained by the limited hardware capabilities of smartphones.
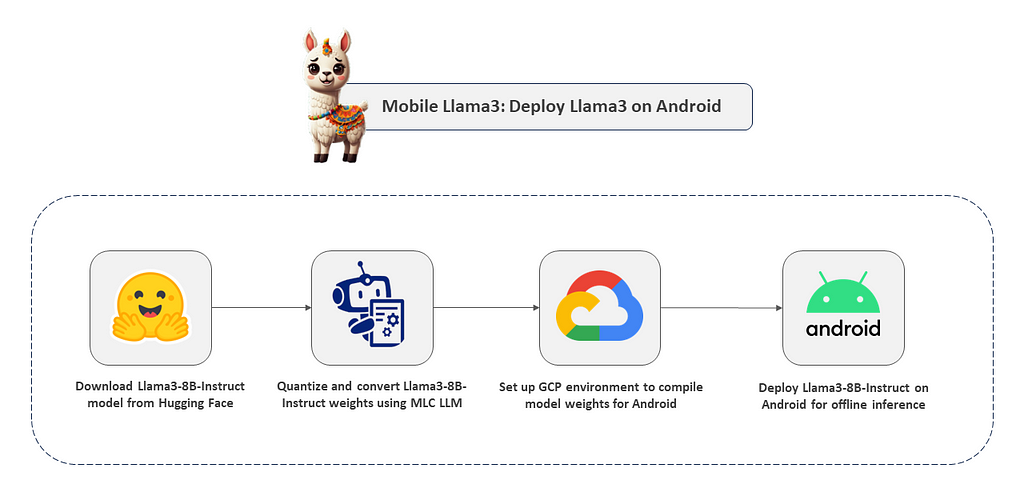
But not anymore. Thanks to MLC, running such large models on your mobile devices is now possible. This blog offers you an end-to-end tutorial on quantizing, converting, and deploying the Llama3–8B-Instruction model directly on your mobile phone for offline inference using MLC LLM.
MobileLlama3
Since we’re talking about on-device deployment of the Llama 3 model, I’ve decided to name this project “MobileLlama3”. Please note that this is not an official model from Meta.

Before we begin, let’s first understand the pipeline.
Alright, without further delay, let’s jump straight into the code for step-by-step implementation.
Section I: Quantize and convert original Llama-3–8B-Instruct model to MLC-compatible weights.
Step 0: Clone the below repository on your local machine and upload the Llama3_on_Mobile.ipynb notebook on Google Colab.
Note: You might need a Colab Pro or higher version to run this notebook as it demands high GPU and memory resources to convert the Llama-3–8B-Instruct model.
# Clone the repository.
git clone https://github.com/NSTiwari/Llama3-on-Mobile
Step 1: Install MLC-LLM
To convert the model weights, we need the MLC-LLM library. Additionally, it’s crucial to have NumPy version 1.23.5 specifically for running the notebook, as the conversion process encountered issues with other versions.
!pip install --pre --force-reinstall mlc-ai-nightly-cu122 mlc-llm-nightly-cu122 -f https://mlc.ai/wheels
!pip install numpy==1.23.5
Step 2: Import libraries
import mlc_llm
import torch
from huggingface_hub import snapshot_download
Step 3: Login to HF account and download the original Llama3–8B-Instruct model weights
# Login to HF account.
from huggingface_hub import notebook_login
notebook_login()

# Download Llama-3-8B-Instruct model.
snapshot_download(repo_id="meta-llama/Meta-Llama-3-8B-Instruct", local_dir="https://medium.com/content/Llama-3-8B-Instruct/")
Step 4: Check whether GPU is enabled
!nvidia-smi

# Check if CUDA is available.
torch.cuda.is_available()

device = torch.device("cuda:0" if torch.cuda.is_available() else "cpu")
device
Step 5: Configure model name and quantization type
MODEL_NAME = "Llama-3-8B-Instruct"
QUANTIZATION= "q4f16_1"
Step 6: Convert Llama-3–8B-Insruct model to MLC-compatible weights
The following code quantizes and shards the Llama-3–8B-Instruct model using q4f16_1 quantization into multiple chunks. It then converts and stores the model weights in a directory named Llama-3–8B-Instruct-q4f16_1-android.
!python -m mlc_llm convert_weight /content/$MODEL_NAME/ --quantization $QUANTIZATION -o /content/$MODEL_NAME-$QUANTIZATION-android/
Step 7: Generate token files
This line of code generates the token files using parameters like conv-template, context-window, and prefill-chunk-size. It’s important to mention that in this instance, conv-template is set to llama-3, corresponding to the Llama-3 model variant we’re working with.
!python -m mlc_llm gen_config /content/$MODEL_NAME/ --quantization $QUANTIZATION
    --conv-template llama-3 --context-window-size 8192 --prefill-chunk-size 1024
    -o /content/$MODEL_NAME-$QUANTIZATION-android/
Step 8: Compile the model to Android format
Here, we’re compiling the model weights into an Android-compatible format using the device parameter which generates a Llama3–8B-Instruct-q4f16_1-android.tar file. This .tar file will be used in subsequent steps for building files for on-device deployment of the model.
!python -m mlc_llm compile /content/$MODEL_NAME-$QUANTIZATION-android/mlc-chat-config.json
    --device android -o /content/$MODEL_NAME-$QUANTIZATION-android/$MODEL_NAME-$QUANTIZATION-android.tar
Step 9: Push the model on Hugging Face 🤗
Lastly, store the model weights on HF. These weights will be downloaded onto your mobile phone during inference.
from huggingface_hub import whoami
from pathlib import Path

# Output directory.
output_dir = "https://medium.com/content/" + MODEL_NAME + "-" + QUANTIZATION + "-android/"
repo_name = "Llama-3-8B-q4f16_1-android"
username = whoami(token=Path("https://medium.com/root/.cache/huggingface/"))["name"]
repo_id = f"{username}/{repo_name}"
from huggingface_hub import upload_folder, create_repo

repo_id = create_repo(repo_id, exist_ok=True).repo_id
print(output_dir)

upload_folder(
    repo_id=repo_id,
    folder_path=output_dir,
    commit_message="Quantized Llama-3-8B-Instruct model for Android.",
    ignore_patterns=["step_*", "epoch_*"],
)
You can directly find the sharded model weights along with the tokenizers on the following HF 🤗 repository:
https://huggingface.co/NSTiwari/Llama-3-8B-q4f16_1-android
Find the complete Colab notebook here.
Excellent. We’ve accomplished the initial stages of quantization and model weight conversion. Next, in the following section, we’ll establish the environment on a GCP instance to compile the model weights further.
Section II: Set up GCP environment to generate build files for Android (optional)
This step is optional and is not needed if you already have a UNIX-based system like Linux or MacOS.
Since I have a Windows machine, installing the necessary libraries and dependencies was a pain for me due to compatibility issues. Therefore, I decided to rent a Linux VM instance on GCP to avoid all those hassles.
I’ve written a separate blog that guides you through the steps of setting up the environment and installing Android Studio on a GCP VM instance.
If you too have a similar issue, please read it here, otherwise, feel free to skip it.
Section III: Install build dependencies
Step 1: Install Rust
This is needed to cross-compile HuggingFace tokenziers to Android. Run the below command to install Rust.

Choose Option 1 to proceed with standard installation.

Note: You might need to restart the terminal after installing Rust.
sudo curl --proto '=https' --tlsv1.2 -sSf https://sh.rustup.rs | sh
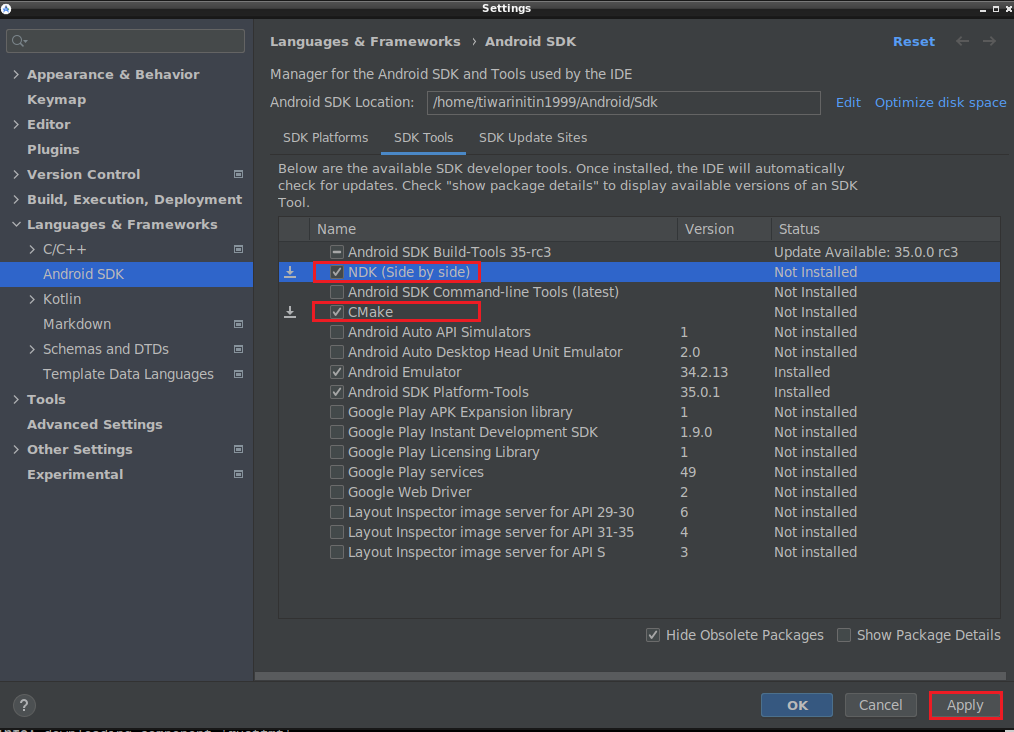
Step 2: Install NDK and CMake in Android Studio
Open Android Studio → Tools → SDK Manager → SDK Tools → Install CMake and NDK.
Step 3: Install MLC LLM Python package and TVM Unity Compiler

# Install MLC-LLM Python package and TVM Unity Compiler.
python3 -m pip install --pre -U -f https://mlc.ai/wheels mlc-llm-nightly mlc-ai-nightly

# Verify installation using the below command:
python3 -c "import mlc_llm; print(mlc_llm)"
Step 4: Install CMake

# Install CMake.
sudo apt-get install cmake
Step 5: Clone the MLC-LLM and Llama3-on-Mobile repositories
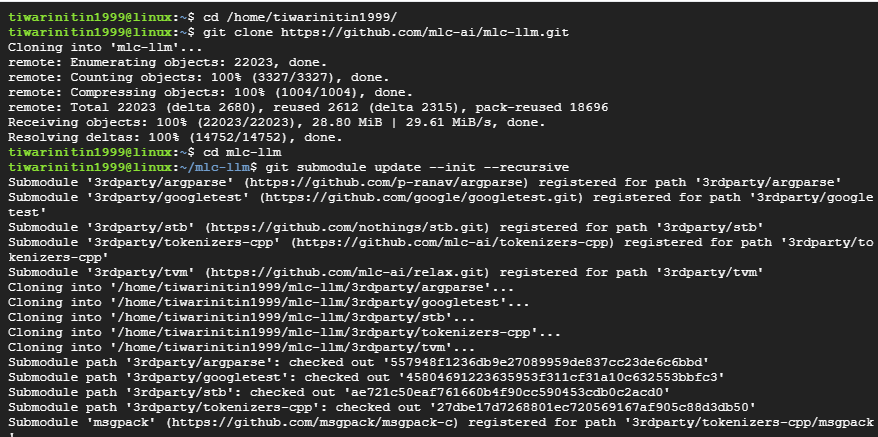
cd /home/tiwarinitin1999/
# Clone the MLC-LLM repository.
git clone https://github.com/mlc-ai/mlc-llm.git
cd mlc-llm
# Update submodules in the repository.
git submodule update --init --recursive
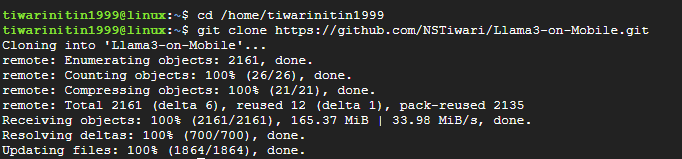
# Clone the Llama3-on-Mobile repository.
cd /home/tiwarinitin1999/
git clone https://github.com/NSTiwari/Llama3-on-Mobile.git
Step 6: Download HuggingFace repository of the converted model weights
Create a new folder dist inside the MLCChat directory. Inside the dist folder, create a sub-folder prebuilt.

cd /home/tiwarinitin1999/mlc-llm/android/MLCChat
mkdir dist
cd dist
mkdir prebuilt
cd prebuilt
Now, clone the HF repository (created in Step 9 of Section 1) in the prebuilt folder.

# Clone the HF repository of quantized Llama3-8B-Instruct weights.
git clone https://huggingface.co/NSTiwari/Llama-3-8B-q4f16_1-android.git
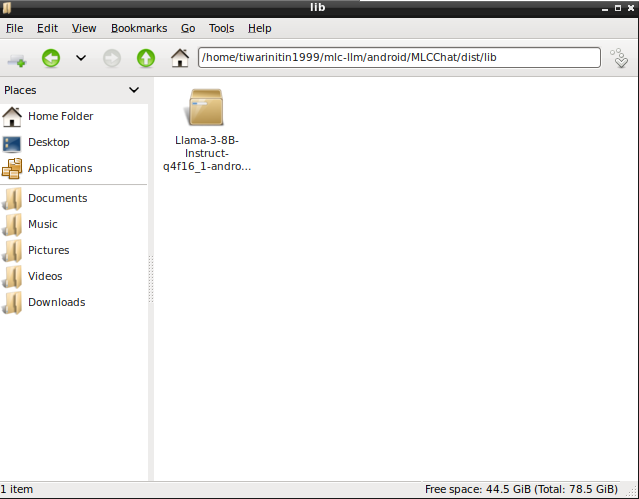
Step 7: Copy the Llama3–8B-Instruct-q4f16_1-android.tar file
Create a new folder lib inside the dist folder and copy the Llama3–8B-Instruct-q4f16_1-android.tar file (created in Step 8 of Section I) inside the lib directory.

cd /home/tiwarinitin1999/mlc-llm/android/MLCChat/dist
mkdir lib
cd lib/
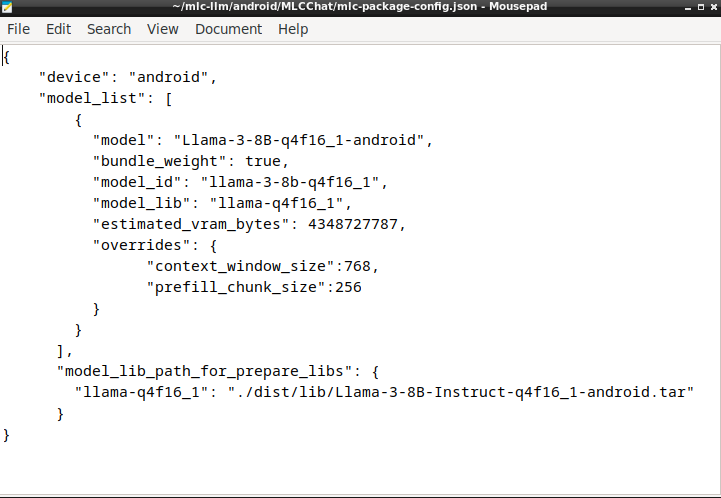
Step 8: Configure the mlc-package-config.json file
Configure the mlc-package-config.json file inside the MLCChat folder as follows:
{
    "device": "android",
    "model_list": [
        {
          "model": "Llama-3-8B-q4f16_1-android",
          "bundle_weight": true,
          "model_id": "llama-3-8b-q4f16_1",
          "model_lib": "llama-q4f16_1",
          "estimated_vram_bytes": 4348727787,
          "overrides": {
                "context_window_size":768,
                "prefill_chunk_size":256
          }
        }
      ],
      "model_lib_path_for_prepare_libs": {
        "llama-q4f16_1": "./dist/lib/Llama-3-8B-Instruct-q4f16_1-android.tar"
      }
}
Step 9: Set the environmental variables on path

export ANDROID_NDK=/home/tiwarinitin1999/Android/Sdk/ndk/27.0.11718014
export TVM_NDK_CC=$ANDROID_NDK/toolchains/llvm/prebuilt/linux-x86_64/bin/aarch64-linux-android24-clang
export TVM_HOME=/home/tiwarinitin1999/mlc-llm/3rdparty/tvm
export JAVA_HOME=/home/tiwarinitin1999/Downloads/android-studio/jbr
export MLC_LLM_HOME=/home/tiwarinitin1999/mlc-llm
Step 10: Generate Android build file
Finally, run the below command to build the .JAR files for the Llama3–8B-Instruct model for on-device deployment.
cd /home/tiwarinitin1999/mlc-llm/android/MLCChat
python3 -m mlc_llm package
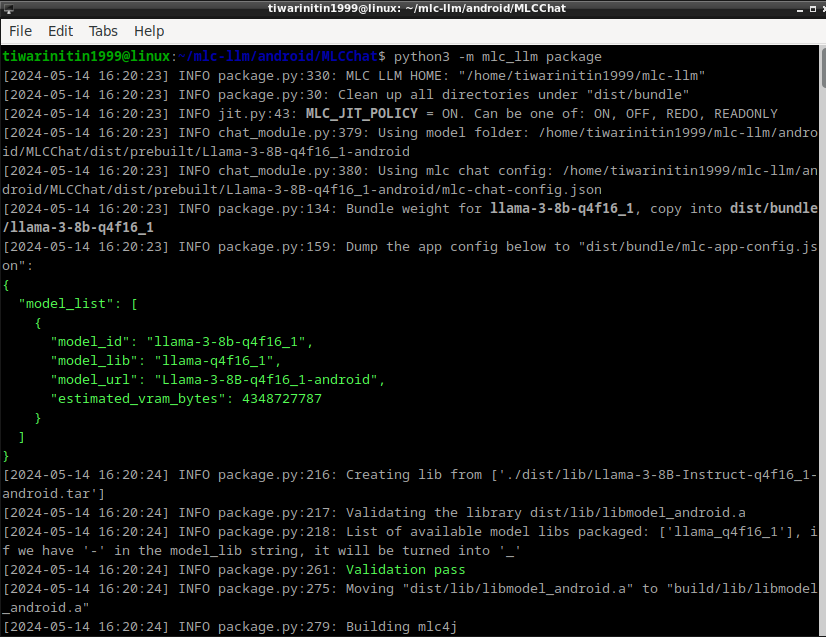
After the command runs successfully, you should see something like this.
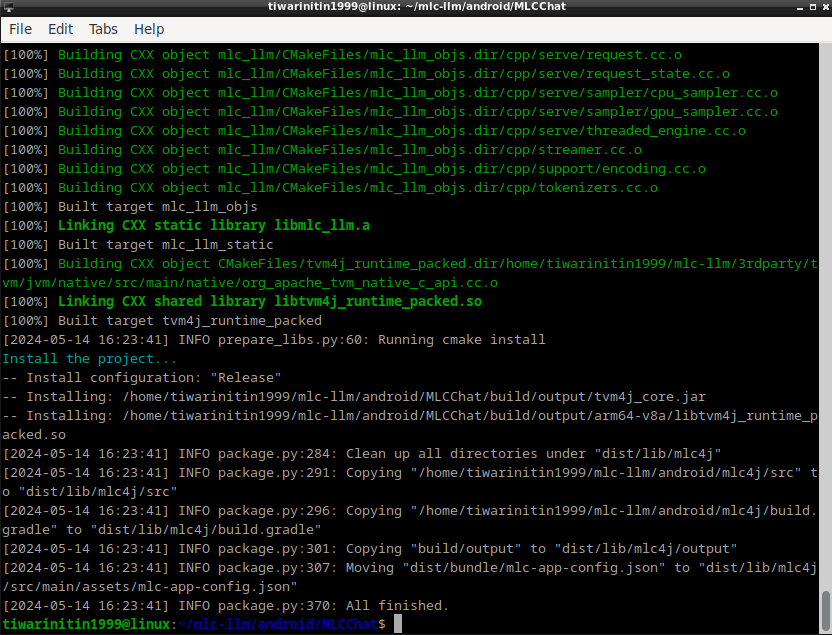
The above command generates the following files:
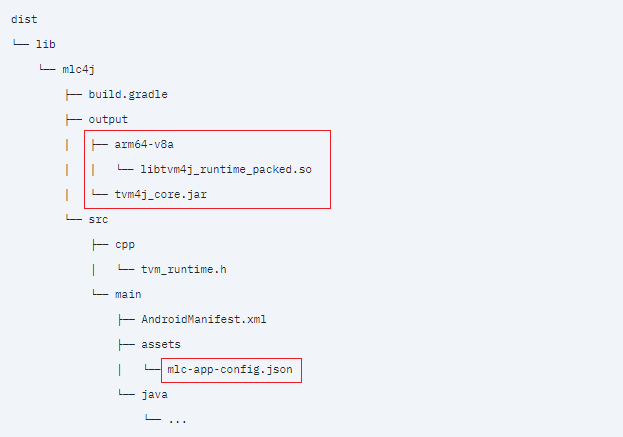
Copy the contents of the output folder from the source directory to destination directory:
Source directory:
/home/tiwarinitin1999/mlc-llm/android/MLCChat/dist/lib/mlc4j/output
Destination directory:
/home/tiwarinitin1999/Llama3-on-Mobile/mobile-llama3/MobileLlama3/dist/lib/mlc4j/output
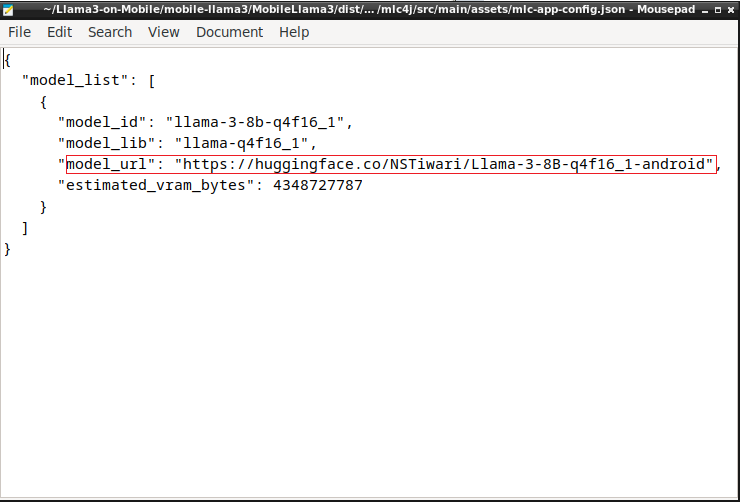
Now, configure the mlc-app-config.json file in the home/tiwarinitin1999/Llama3-on-Mobile/mobile-llama3/MobileLlama3/dist/lib/mlc4j/src/main/assets folder as follows:
{
  "model_list": [
    {
      "model_id": "llama-3-8b-q4f16_1",
      "model_lib": "llama-q4f16_1",
      "model_url": "https://huggingface.co/NSTiwari/Llama-3-8B-q4f16_1-android",
      "estimated_vram_bytes": 4348727787
    }
  ]
}
The model_url key in the config file downloads the model weights from HF repository on your mobile phone.
We’re now set with all the configs.
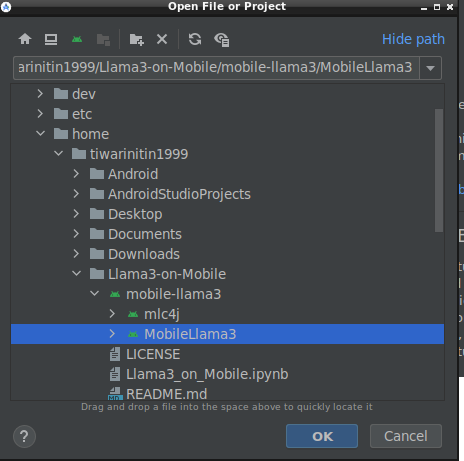
Section IV: Build the app in Android Studio
Open the MobileLlama3 app in Android Studio and let it build for some time.
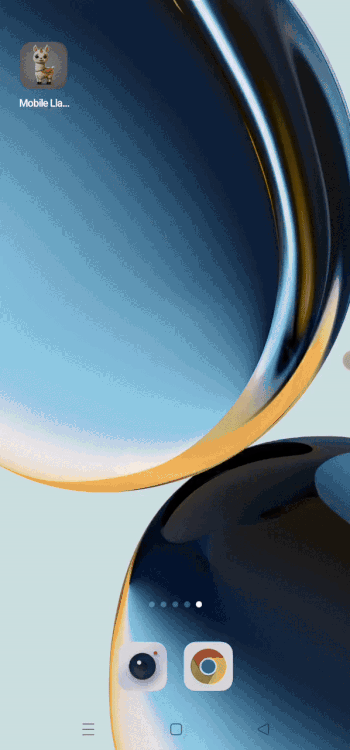
Once the app is built successfully, install the APK on your mobile phone. A readily available APK can be found here that you can directly install.
Make sure your phone’s got some serious compute power or it might just turn into a toasted marshmallow trying to handle this mammoth of a language model. 😜
Kudos on getting the Llama3–8B-Instruct model up and running on your mobile device for offline use. I trust you found some valuable insights in this article.
The complete project is available on this GitHub repository.
https://github.com/NSTiwari/Llama3-on-Mobile
If you liked the work, please don’t forget to leave a ⭐ to the repo, and spread the word with fellow on-device AI developers. Keep an eye out for more exciting projects and blogs in the future.
Acknowledgment
MobileLlama3 draws inspiration from MLC-LLM, and I extend my gratitude to them to make the project open-source.
References & Resources
- Colab notebook to quantize and convert Llama-3–8B-Instruct model
- MobileLlama3 GitHub repository
- HuggingFace repository for converted weights
- Llama3 models by Meta
- MLC-LLM
- Android SDK for MLC-LLM
![]()
[ML Story] MobileLlama3: Run Llama3 locally on mobile was originally published in Google Developer Experts on Medium, where people are continuing the conversation by highlighting and responding to this story.


