
One of the greatest nightmares of developers is the “It’s not working on my machine” problem. I struggled to run my website locally on different machines too. Shout out to Brittany Mitchell for giving me the idea to containerize my website. Containerization allowed me to build my website and run it consistently across different environments and machines. Docker is the tool for achieving this containerization.

What is Docker?
Docker is an open-source platform for developing, shipping, and running applications. It is a technology that allows you to incorporate and store your code and its dependencies into a neat little package called an image.
Dockerfile, Docker Image, and Docker Container
Dockerfile:
A Dockerfile is a text file containing a collection of commands or procedures. Consider this file as a script that defines how our container image will be built.
Docker Image:
A docker image is a packaged, runnable instance of an application or environment. It contains everything needed to run a piece of software (or website in our case), including the code, a runtime, libraries, environment variables, and configuration files. A docker image is read-only template for creating containers.
Docker Container:
A docker container is a lightweight, stand-alone, executable package of software that includes everything needed to run the software. Containers isolate applications from each other and the underlying infrastructure while providing an added layer of protection for the application. Containerization solves the problem related to application deployment, and scalability. It helps promote consistency and efficiency in software development and operations.

Here is how I containerized my website
As a prerequisite, ensure that you have docker installed locally on your machine. Install Docker Engine
The code for my website is hosted on GitHub. To follow along, fork and clone this repository and change directory into it by running the commands below:
git clone https://github.com/paschalogu/personal-website.git
cd personal-website
Step 1: Build the Docker image
- Add a Dockerfile
I created a new file named Dockerfile by running the command touch Dockerfile in the root of my website directory and added these lines of code below inside the Dockerfile:
FROM nginx:alpine

COPY . /usr/share/nginx/html

EXPOSE 80
The FROM nginx:alpine line tells Docker to create a Docker image based on the Nginx web server with Alpine Linux. The COPY . /usr/share/nginx/html line will copy the website content from the directory we are in into the image being built. This means that our website code will replace the default Nginx web server content. EXPOSE 80 specifies that the container should be capable of serving HTTP traffic on port 80.
- Build Image
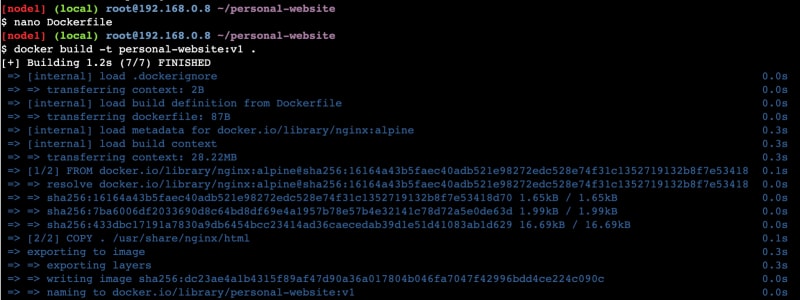
Then I built the image by running the line of code below:
docker build -t personal-website:v1 .
docker build command tells docker to build our website as an image based on the instructions provided in a Dockerfile above. The -t personal-website:v1 tells docker to tag the image personal-website:v1. v1 signifies that this is version 1. The period (.) tells Docker to look for the Dockerfile in the current directory and use the files and directories in this location during the build process.
Running the command docker images shows this image I just built:

Step 2: Push to Docker Registry
I logged in to Docker Hub Container Image Library and created a new repository. I named it personal-website and gave it a short description (description is optional).

Then I ran the docker push command below to push the image I built in the previous step, but it failed with the error below 😞.
docker push paschalogu/personal-website:v1

The push refers to repository [[docker.io/paschalogu/personal-website](http://docker.io/paschalogu/personal-website)]
An image does not exist locally with the tag: paschalogu/personal-website
Why did it fail? The push command was looking for an image named paschalogu/personal-website:v1, but didn’t find one.
To fix this, I ran the docker tag command to tag my image and then re-ran the docker push command to push to my docker repository.
docker tag personal-website:v1 paschalogu/personal-website:v1

docker push paschalogu/personal-website:v1
Step 3: Test Configuration
Opened my browser and navigated to the website https://labs.play-with-docker.com/
Selected Login and then chose docker from the drop-down list. Then, I sign in with my Docker Hub account and clicked the Start button.
I clicked on ADD NEW INSTANCE option on the left sidebar. After a few seconds, a terminal window opened up in my browser.
In the terminal, I started my freshly pushed wevsite.
docker pull paschalogu/personal-website:v1

docker run -dp 80:80 paschalogu/personal-website:v1
Will you be running your applications and websites as a docker container? Let me know in the comments. Feel free to connect with me on LinkedIn at https://www.linkedin.com/in/paschal-ogu/ and on Twitter @Paschal_Ik
References:
https://www.aquasec.com/cloud-native-academy/docker-container/


