NestJS is undoubtedly a popular framework for back-end development among NodeJs developers. It comes with a nice dependency injection system and a ton of features on top of it.
While NestJs boasts a lot of excellent features which are really useful, I’m going to discuss some of these features which will help us to run applications in the Google Cloud Platform easily. This will be a series of blogs on this aspect and expect to see more posts coming bi-weekly!
Today, let me discuss using NestJs’s capabilities to generate an OpenAPI spec needed for deploying an application running on Cloud Run in Google API Gateway.
Well, API Gateway is a way to expose your APIs to the rest of the world via the Google API portal. You can share your RESTful APIs with another party and impose authentications, rate limiting, monitoring and whatnot with it.
Prerequisites
- You have a NestJS application, obviously
- The application is hosted on Cloud Run. ( Just for this tutorial )
The main requirement for an application to be deployed to API Gateway is, it should have an OpenAPI spec. Of course, it should be deployed to somewhere that GCP can access, I’m assuming it’s given 😉
Step 1: Get a basic OpenAPI Spec working
Add the Swagger module to the project
npm install --save @nestjs/swagger
Let’s add a basic Swagger setup to the application. I created a file as swagger.ts adding the following.
import { SwaggerModule, DocumentBuilder } from '@nestjs/swagger';

export const buildSwagger = (app) => {
    const config = new DocumentBuilder()
    .setTitle('Cats example')
    .setDescription('The cats API description')
    .setVersion('1.0')
    .build();
    return SwaggerModule.createDocument(app, config);
}

export const setupSwagger = (app) => {
  const document = buildSwagger(app);
  SwaggerModule.setup('api', app, document);
};
Then imported the swagger.ts to the main.ts and used setupSwagger to initialize the Swagger document.
import { NestFactory } from '@nestjs/core';
import { AppModule } from './app.module';
import { setupSwagger } from './swagger';

async function bootstrap() {
  const app = await NestFactory.create(AppModule);
  setupSwagger(app); // <--- Added this
  await app.listen(8080);
}
bootstrap();
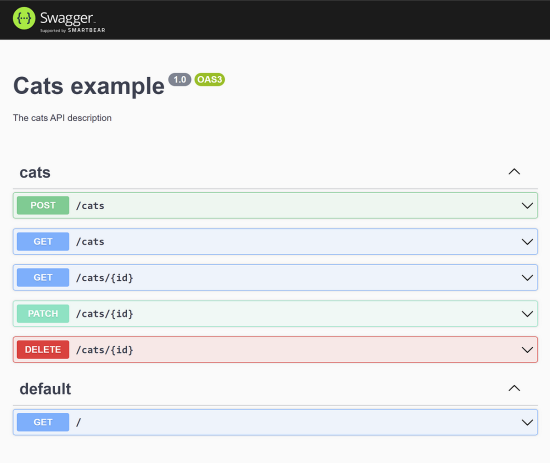
Now if you run the application ( npm run start:dev ) and navigated to /api ( http://localhost:8080/api) you will see the Swagger documentation!

And the amazing thing is if you navigated to /api-yaml you can see the API Spec already.

Note: You can add the tags to the controllers with addtags(‘tagName’) which will show the controllers grouped properly like above.
...
import { ApiTags } from '@nestjs/swagger';

@ApiTags('cats')
@Controller('cats')
export class CatsController {
...
}
Also, you can add @ApiProperty() decorators to define the DTOs to make requests and responses appear in the API Spec correctly.
import { ApiProperty } from '@nestjs/swagger';

export class CreateCatDto {
  @ApiProperty()
  name: string;

  @ApiProperty()
  age: number;

  @ApiProperty()
  breed: string;
}
Step 2: Make OpenAPI Spec generatable as a file 🔥
But if we had a way to generate this OpenAPI Spec into a file directly, we can use that in our CI/CD pipelines. For that, let’s add a new file as generate-spec.ts and add the following. Make sure you instal yaml as a dependency.
import * as fs from 'fs';
import { NestFactory } from '@nestjs/core';
import * as YAML from 'yaml'

import { AppModule } from './app.module';
import { buildSwagger } from './swagger';

export const setupSwaggerDoc = async () => {
  const app = await NestFactory.create(AppModule);

  const document = buildSwagger(app);
  fs.writeFileSync('openapi.yaml', YAML.stringify(document));
};

setupSwaggerDoc();
Then we can add generate:spec as an NPM script to package.json
{
  ...
  "scripts": {
    ...
    "generate:spec": "npx ts-node --esm ./src/generate-spec.ts"
  },
  ...
}
This will allow us to generate openapi.yaml file using the npm run generate:spec command!
Step 3: Make the generated OpenAPI Spec have the information needed for deploying in API Gateway 🔥
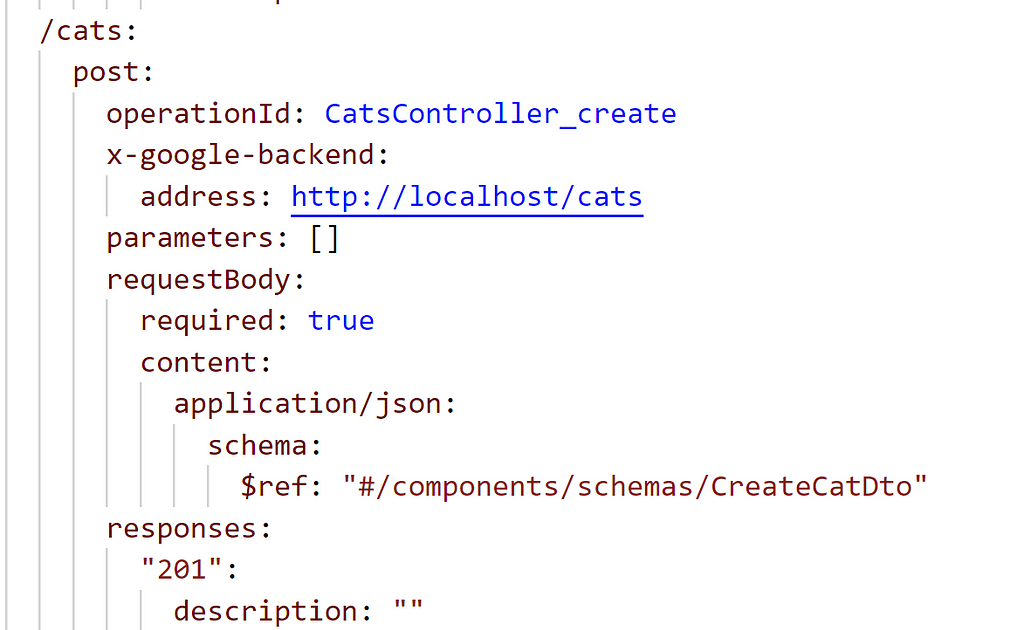
For this, we need to add the x-google-backend for each of the endpoints. This tells API Gateway how the URL mappings should happen. We can use the ApiExtention() decorator for this.
  @Post()
  @ApiExtension('x-google-backend', { address: 'http:localhost/cats'})
  create(@Body() createCatDto: CreateCatDto) {
    return this.catsService.create(createCatDto);
  }
But we need to pass the correct API_URL from the environment instead of http:localhost/
@Post()
  @ApiExtension('x-google-backend', { address: `${process.env.API_URL}/cats`})
  create(@Body() createCatDto: CreateCatDto) {
    return this.catsService.create(createCatDto);
  }
Now if we look at the generated OpenAPI Spec, we can see the x-google-backend values are correctly set from the environment variables.
Now the OpenAPI Spec is ready to be deployed to API Gateway.
Step 4: Deploy to API Gateway
Enable ‘API Gateway API’ & ‘Service Control API’ in https://console.cloud.google.com/api-gateway/enable_api as these two are needed.
Then we can use the following command to prepare the config using the openapi.yaml file which then can be deployed into API Gateway.
gcloud api-gateway api-configs create CONFIG_ID
  --api=API_ID --openapi-spec=API_DEFINITION
  --project=PROJECT_ID --backend-auth-service-account=SERVICE_ACCOUNT_EMAIL
An example command would be:
gcloud api-gateway api-configs create cat-api-config
  --api=cat-api --openapi-spec=openapi.yaml
  --project=cat-api-project --backend-auth-service-account=0000000000000-compute@developer.gserviceaccount.com
Then let’s create the API Gateway itself.
gcloud api-gateway gateways create GATEWAY_ID
  --api=API_ID --api-config=CONFIG_ID
  --location=GCP_REGION --project=PROJECT_ID
An example command would be:
gcloud api-gateway gateways create cats-api-gateway
  --api=cats-api --api-config=cats-api-config
  --location=us-central1 --project=cats-api-project
Once you run this command, you will get an output which will contain a defaultHostname. You can use this to query your API from the API Gateway!
In the next post, I will discuss how to add authentication to this endpoint we exposed in API Gateway.
![]()
NestJS with API Gateway was originally published in Google Developer Experts on Medium, where people are continuing the conversation by highlighting and responding to this story.