TL;DR
This guide shows you how to build and deploy and Go backend for a URL Shortener. It’s made up of a single service with a REST API, and uses a PostgreSQL database.
To get our Go backend up and running in the cloud in just a few minutes, we’ll be using Encore — a backend development platform that automates infrastructure.
🚀 What’s on deck:
- Install Encore
- Create your service and endpoints
- Add a SQL database
- Run locally
- Deploy to Encore’s free development cloud
🏁 Let’s go!
To make it easier to follow along, we’ve laid out a trail of croissants to guide your way.
Whenever you see a 🥐 it means there’s something for you to do!
💽 Install Encore
Install the Encore CLI to run your local environment:
-
macOS:
brew install encoredev/tap/encore -
Linux:
curl -L https://encore.dev/install.sh | bash -
Windows:
iwr https://encore.dev/install.ps1 | iex
🖥 Create your Encore app
🥐 Create a new application by running encore app create and selecting Empty app as the template.
🔨 Create a service and API endpoint
Now let’s create a new url service.
🥐 In your application’s root folder, create a new folder url and create a new file url.go that looks like this:
package url

import (
    "context"
    "crypto/rand"
    "encoding/base64"
)

type URL struct {
    ID  string // short-form URL id
    URL string // complete URL, in long form
}

type ShortenParams struct {
    URL string // the URL to shorten
}

// Shorten shortens a URL.
//encore:api public method=POST path=/url
func Shorten(ctx context.Context, p *ShortenParams) (*URL, error) {
    id, err := generateID()
    if err != nil {
        return nil, err
    }
    return &URL{ID: id, URL: p.URL}, nil
}

// generateID generates a random short ID.
func generateID() (string, error) {
    var data [6]byte // 6 bytes of entropy
    if _, err := rand.Read(data[:]); err != nil {
        return "", err
    }
    return base64.RawURLEncoding.EncodeToString(data[:]), nil
}
This sets up the POST /url endpoint. Note the //encore:api annotation on the Shorten function, this is all Encore needs to understand that this is an API endpoint, and it will automatically generate the code necessary to expose it.
🏁 Run your app locally
🥐 Let’s see if it works! Start your app by running encore run.
You should see this:
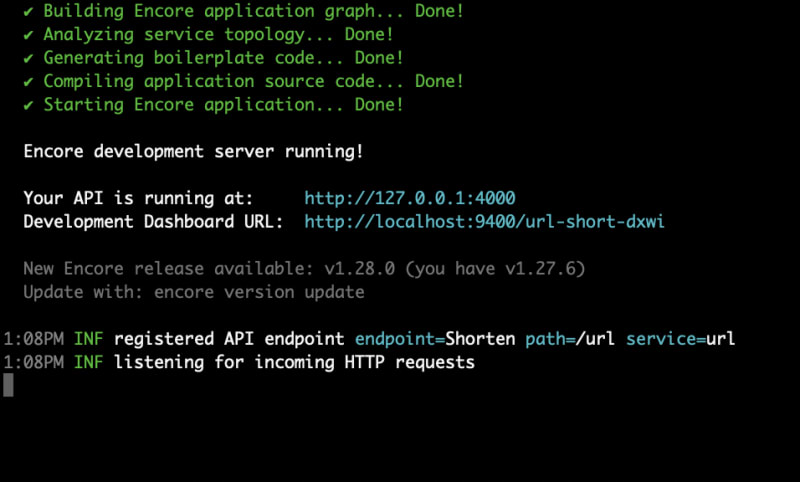
You’ll also see the Local Dev Dashboard (localhost:9400) open in a new tab. It gives you access to Encore’s API explorer, Local tracing, architecture diagrams, and Service Catalog.

🥐 Next, call your endpoint:
You can do this from the API explorer in the Dev Dashboard, or from your terminal like so:
curl http://localhost:4000/url -d '{"URL": "https://encore.dev"}'
You should see this:
{
  "ID": "5cJpBVRp",
  "URL": "https://encore.dev"
}
🎉 It works!
There’s just one problem…
Right now, we’re not actually storing the URL anywhere. That means we can generate shortened IDs but there’s no way to get back to the original URL! We need to store a mapping from the short ID to the complete URL.
💾 Save URLs in a database
Encore makes it really easy to set up a PostgreSQL database to store our data. To do so, we first define a database schema, in the form of a migration file.
🥐 Create a new folder named migrations inside the url folder. Then, inside the migrations folder, create an initial database migration file named 1_create_tables.up.sql. The file name format is important (it must start with 1_ and end in .up.sql).
🥐 Add the following contents to the file:
CREATE TABLE url (
    id TEXT PRIMARY KEY,
    original_url TEXT NOT NULL
);
🥐 Next, go back to the url/url.go file and import the encore.dev/storage/sqldb package by modifying the import statement to become:
import (
    "context"
    "crypto/rand"
    "encoding/base64"

    "encore.dev/storage/sqldb"
)
🥐 Then let’s tell Encore we need a database by adding the following to the end of url/url.go:
// Define a database named 'url', using the database
// migrations  in the "./migrations" folder.
// Encore provisions, migrates, and connects to the database.

var db = sqldb.NewDatabase("url", sqldb.DatabaseConfig{
    Migrations: "./migrations",
})
🥐 Now, to insert data into our database, let’s create a helper function insert:
// insert inserts a URL into the database.
func insert(ctx context.Context, id, url string) error {
    _, err := db.Exec(ctx, `
        INSERT INTO url (id, original_url)
        VALUES ($1, $2)
    `, id, url)
    return err
}
🥐 Lastly, we can update our Shorten function to insert into the database:
//encore:api public method=POST path=/url
func Shorten(ctx context.Context, p *ShortenParams) (*URL, error) {
    id, err := generateID()
    if err != nil {
        return nil, err
    } else if err := insert(ctx, id, p.URL); err != nil {
        return nil, err
    }
    return &URL{ID: id, URL: p.URL}, nil
}
🚨 Before running your application, make sure you have Docker installed and running. (It’s required to locally run Encore applications with databases.)
🥐 Next, start the application again with encore run and Encore automatically sets up your database.
🥐 Now let’s call the API again:
curl http://localhost:4000/url -d '{"URL": "https://encore.dev"}'
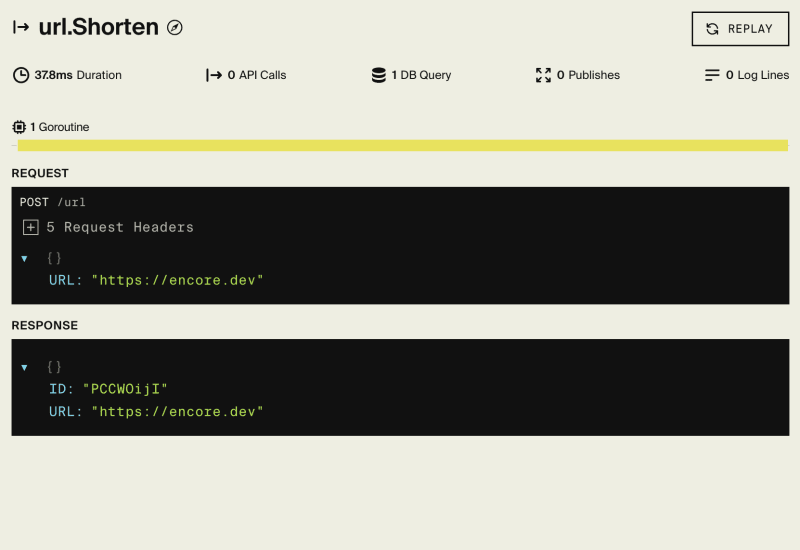
🥐 Finally, let’s verify that it was saved in the database.
Do this by looking at the trace that was automatically captured by Encore, available in the Local Dev Dashboard at localhost:9400.
🔨 Add an endpoint to retrieve URLs
To complete our URL shortener API, let’s add the endpoint to retrieve a URL given its short id.
🥐 Add this endpoint to url/url.go:
// Get retrieves the original URL for the id.
//encore:api public method=GET path=/url/:id
func Get(ctx context.Context, id string) (*URL, error) {
    u := &URL{ID: id}
    err := db.QueryRow(ctx, `
        SELECT original_url FROM url
        WHERE id = $1
    `, id).Scan(&u.URL)
    return u, err
}
Encore uses the path=/url/:id syntax to represent a path with a parameter. The id name corresponds to the parameter name in the function signature. In this case, it’s of type string, but you can also use other built-in types like int or bool if you want to restrict the values.
🥐 Let’s make sure it works by calling it (remember to change the id to the one you found when looking at the trace in the last step):
curl http://localhost:4000/url/zr6RmZc4
You should now see this:
{
  "ID": "zr6RmZc4",
  "URL": "https://encore.dev"
}
🎉 And there you have it! That’s how you build REST API and use PostgreSQL databases in Encore.
🚀 Deploy to the cloud
Now let’s commit all our changes to the project repo and deploy our app.
🥐 Commit the new files to the project’s git repo and trigger a deploy to Encore’s free development cloud by running:
$ git add -A .
$ git commit -m 'Initial commit'
$ git push encore
Encore will now build and test your app, provision the needed infrastructure, and deploy your application to the cloud.
After triggering the deployment, you will see a URL where you can view its progress in Encore’s Cloud Dashboard.👈
It will look something like: https://app.encore.dev/$APP_ID/deploys/...
From there you can also see metrics, traces, and connect your own AWS or GCP account to use for production deployment.
🎉 Great job – you’re done!
You now have the start of a scalable Go backend app running in the cloud, complete with PostgreSQL database.
Keep building with these Open Source App Templates.👈
If you have questions or want to share your work, join the developers hangout in Encore’s community Slack.👈