
Bu yazıda, Oracle Linux’ta oluşturulan yedekli yapıya yeni node (node-2 ve node-3) nasıl eklenir göreceğiz.
Yedekli yapının nasıl oluşturulacağını aşağıdaki yazıda bulabilirsiniz:
https://dev.to/aciklab/oracle-linux-88de-postgresql-13-yedekli-yapi-nasil-kurulur-patroni-etcd-haproxy-4711
Node-2
- Yapıya eklenecek olan makineye
sshile bağlanılır. - İlk yazıdaki gibi PostgreSQL ve Patroni kurulumları yapılır.
PostgreSQL’de oluşturulan kullanıcı ve şifrelerin aynı olmasına dikkat edilmelidir.
- İkinci makinedeki /etc/patroni.yml dosyasına
nanoile girilir ve aşağıdaki gibi düzenlenir.
scope: development
namespace: /db/
name: node-2

restapi:
    listen: :8008
    connect_address: :8008

etcd:
    host: :2379

bootstrap:
    dcs:
        ttl: 30
        loop_wait: 10
        retry_timeout: 10
        maximum_lag_on_failover: 1048576
        postgresql:
            use_pg_rewind: true

    initdb:
    - encoding: UTF8
    - data-checksums

    pg_hba:
    - host replication replicator 127.0.0.1/32 md5
    - host replication replicator :/0 md5
    - host replication replicator :/0 md5
    - host all all 0.0.0.0/0 md5

    users:
    admin:
            password: admin
            options:
                - createrole
                - createdb

postgresql:
    listen: :5432
    connect_address: :5432
    data_dir: /data/patroni
    pgpass: /tmp/pgpass
    authentication:
        replication:
            username: replicator
            password: postgres-parola
        superuser:
            username: postgres
            password: postgres-parola
    parameters:
        unix_socket_directories: '.'

tags:
    nofailover: false
    noloadbalance: false
    clonefrom: false
    nosync: false
İkinci makinedeki /etc/systemd/system/patroni.service dosyası birinci makinedeki gibi düzenlenmelidir.
Birinci makineye ssh ile bağlanılır ve aşağıdaki konfigürasyon dosyalarında ikinci düğümü eklemek için gereken düzenlemeler yapılır:
-
/etc/patroni.yml dosyasına
nanoile girilir ve aşağıdaki gibi düzenlenir.
scope: development
namespace: /db/
name: node-1

restapi:
    listen: :8008
    connect_address: :8008

etcd:
    host: :2379

bootstrap:
    dcs:
        ttl: 30
        loop_wait: 10
        retry_timeout: 10
        maximum_lag_on_failover: 1048576
        postgresql:
            use_pg_rewind: true

    initdb:
    - encoding: UTF8
    - data-checksums

    pg_hba:
    - host replication replicator 127.0.0.1/32 md5
    - host replication replicator /0 md5
    - host replication replicator /0 md5
    - host all all 0.0.0.0/0 md5

    users:
    admin:
            password: admin
            options:
                - createrole
                - createdb

postgresql:
    listen: :5432
    connect_address: :5432
    data_dir: /data/patroni
    pgpass: /tmp/pgpass
    authentication:
        replication:
            username: replicator
            password: postgres-parola
        superuser:
            username: postgres
            password: postgres-parola
    parameters:
        unix_socket_directories: '.'

tags:
    nofailover: false
    noloadbalance: false
    clonefrom: false
    nosync: false
-
/etc/etcd/etcd.conf dosyasına
nanoile girilir ve aşağıdaki düzenlemeler yapılır.
ETCD_LISTEN_PEER_URLS="http://:2380"
ETCD_LISTEN_CLIENT_URLS="http://localhost:2379,http://:2379"
ETCD_INITIAL_ADVERTISE_PEER_URLS="http://:2380"
ETCD_INITIAL_CLUSTER="etcd-1=http://:2380,etcd-2=http://:2380"
ETCD_ADVERTISE_CLIENT_URLS="http://:2379"
ETCD_INITIAL_CLUSTER_TOKEN="etcd-cluster"
ETCD_INITIAL_CLUSTER_STATE="new"
-
/etc/haproxy/haproxy.cfg dosyasına
nanoile girilir ve aşağıdaki düzenlemeler yapılır.
global
    maxconn 1000

defaults
    log global
    mode tcp
    retries 2
    timeout client 30m
    timeout connect 4s
    timeout server 30m
    timeout check 5s

listen postgres
    bind *:5000
    option httpchk
    http-check expect status 200
    default-server inter 3s fall 3 rise 2 on-marked-down shutdown-sessions
    server psql-node-1 :5432 maxconn 100 check port 8008
    server psql-node-2 :5432 maxconn 100 check port 8008
- Birinci makinedeki servisler tekrar başlatılır ve çalışma durumları kontrol edilir.
systemctl restart haproxy
systemctl status hasproxy
systemctl restart etcd
systemctl status etcd
systemctl restart patroni
systemctl status patroni
- İkinci makinedeki servis dosyaları yeniden yüklenir. PostgreSQL durdurulur. Patroni tekrar başlatılır ve çalışma durumu kontrol edilir.
systemctl daemon-reload
systemctl stop postgresql-13
systemctl restart patroni
systemctl status patroni
Servislerin loglarında hata alınıyorsa güvenlik duvarından kaynaklı olabilir.
systemctl stop firewalldkomutuyla güvenlik duvarı durdurulabilir.
- Her iki makinedeki tüm servislerin başarılı olarak çalıştığı kontrol edildikten sonra yedekli yapı aşağıdaki komutla, her iki makineden de kontrol edilebilir.
patronictl -c /etc/patroni.yml list
Bu komutun çıktısı aşağıdaki gibi olmalıdır.

Lider durumundaki patroni tekrar başlatıldığında eklenen ikinci makine lider durumuna geçmelidir.
systemctl restart patroni
patronictl -c /etc/patroni.yml list

Node-3
- Yapıya eklenecek olan makineye
sshile bağlanılır. - İlk yazıdaki ve ikinci makinede yapıldığı gibi PostgreSQL ve Patroni kurulumları yapılır.
PostgreSQL’de oluşturulan kullanıcı ve şifrelerin aynı olmasına dikkat edilmelidir.
- Üçüncü makinedeki /etc/patroni.yml dosyasına
nanoile girilir ve aşağıdaki gibi düzenlenir.
scope: development
namespace: /db/
name: node-3

restapi:
    listen: :8008
    connect_address: :8008

etcd:
    host: :2379

bootstrap:
    dcs:
        ttl: 30
        loop_wait: 10
        retry_timeout: 10
        maximum_lag_on_failover: 1048576
        postgresql:
            use_pg_rewind: true

    initdb:
    - encoding: UTF8
    - data-checksums

    pg_hba:
    - host replication replicator 127.0.0.1/32 md5
    - host replication replicator :/0 md5
    - host replication replicator :/0 md5
    - host replication replicator :/0 md5
    - host all all 0.0.0.0/0 md5

    users:
    admin:
            password: admin
            options:
                - createrole
                - createdb

postgresql:
    listen: :5432
    connect_address: :5432
    data_dir: /data/patroni
    pgpass: /tmp/pgpass
    authentication:
        replication:
            username: replicator
            password: postgres-parola
        superuser:
            username: postgres
            password: postgres-parola
    parameters:
        unix_socket_directories: '.'

tags:
    nofailover: false
    noloadbalance: false
    clonefrom: false
    nosync: false
Üçüncü makinedeki /etc/systemd/system/patroni.service dosyası da birinci ve ikinci makinedekiler gibi düzenlenmelidir.
- İkinci makineye
sshile bağlanılır ve /etc/patroni.yml dosyasınananoile girilir ve üçüncü düğüm, aşağıdaki gibi eklenir.
scope: development
namespace: /db/
name: node-2

restapi:
    listen: :8008
    connect_address: :8008

etcd:
    host: :2379

bootstrap:
    dcs:
        ttl: 30
        loop_wait: 10
        retry_timeout: 10
        maximum_lag_on_failover: 1048576
        postgresql:
            use_pg_rewind: true

    initdb:
    - encoding: UTF8
    - data-checksums

    pg_hba:
    - host replication replicator 127.0.0.1/32 md5
    - host replication replicator :/0 md5
    - host replication replicator :/0 md5
    - host replication replicator :/0 md5
    - host all all 0.0.0.0/0 md5

    users:
    admin:
            password: admin
            options:
                - createrole
                - createdb

postgresql:
    listen: :5432
    connect_address: :5432
    data_dir: /data/patroni
    pgpass: /tmp/pgpass
    authentication:
        replication:
            username: replicator
            password: postgres-parola
        superuser:
            username: postgres
            password: postgres-parola
    parameters:
        unix_socket_directories: '.'

tags:
    nofailover: false
    noloadbalance: false
    clonefrom: false
    nosync: false
Birinci makineye ssh ile bağlanılır ve aşağıdaki konfigürasyon dosyalarında üçüncü düğümü eklemek için gereken düzenlemeler yapılır:
-
/etc/patroni.yml dosyasına
nanoile girilir ve aşağıdaki gibi düzenlenir.
scope: development
namespace: /db/
name: node-1

restapi:
    listen: :8008
    connect_address: :8008

etcd:
    host: :2379

bootstrap:
    dcs:
        ttl: 30
        loop_wait: 10
        retry_timeout: 10
        maximum_lag_on_failover: 1048576
        postgresql:
            use_pg_rewind: true

    initdb:
    - encoding: UTF8
    - data-checksums

    pg_hba:
    - host replication replicator 127.0.0.1/32 md5
    - host replication replicator /0 md5
    - host replication replicator /0 md5
    - host replication replicator /0 md5
    - host all all 0.0.0.0/0 md5

    users:
    admin:
            password: admin
            options:
                - createrole
                - createdb

postgresql:
    listen: :5432
    connect_address: :5432
    data_dir: /data/patroni
    pgpass: /tmp/pgpass
    authentication:
        replication:
            username: replicator
            password: postgres-parola
        superuser:
            username: postgres
            password: postgres-parola
    parameters:
        unix_socket_directories: '.'

tags:
    nofailover: false
    noloadbalance: false
    clonefrom: false
    nosync: false
-
/etc/etcd/etcd.conf dosyasına
nanoile girilir ve aşağıdaki düzenlemeler yapılır.
ETCD_LISTEN_PEER_URLS="http://:2380"
ETCD_LISTEN_CLIENT_URLS="http://localhost:2379,http://:2379"
ETCD_INITIAL_ADVERTISE_PEER_URLS="http://:2380"
ETCD_INITIAL_CLUSTER="etcd-1=http://:2380,etcd-2=http://:2380,etcd-3=http://:2380"
ETCD_ADVERTISE_CLIENT_URLS="http://:2379"
ETCD_INITIAL_CLUSTER_TOKEN="etcd-cluster"
ETCD_INITIAL_CLUSTER_STATE="new"
-
/etc/haproxy/haproxy.cfg dosyasına
nanoile girilir ve aşağıdaki düzenlemeler yapılır.
global
    maxconn 1000

defaults
    log global
    mode tcp
    retries 2
    timeout client 30m
    timeout connect 4s
    timeout server 30m
    timeout check 5s

listen postgres
    bind *:5000
    option httpchk
    http-check expect status 200
    default-server inter 3s fall 3 rise 2 on-marked-down shutdown-sessions
    server psql-node-1 :5432 maxconn 100 check port 8008
    server psql-node-2 :5432 maxconn 100 check port 8008
    server psql-node-3 :5432 maxconn 100 check port 8008
- Birinci makinedeki servisler tekrar başlatılır ve çalışma durumları kontrol edilir.
systemctl restart haproxy
systemctl status hasproxy
systemctl restart etcd
systemctl status etcd
systemctl restart patroni
systemctl status patroni
- İkinci makinedeki Patroni tekrar başlatılır ve çalışma durumu kontrol edilir.
systemctl restart patroni
systemctl status patroni
- Üçüncü makinedeki servis dosyaları yeniden yüklenir. PostgreSQL durdurulur. Patroni tekrar başlatılır ve çalışma durumu kontrol edilir.
systemctl daemon-reload
systemctl stop postgresql-13
systemctl restart patroni
systemctl status patroni
Servislerin loglarında hata alınıyorsa güvenlik duvarından kaynaklı olabilir.
systemctl stop firewalldkomutuyla güvenlik duvarı durdurulabilir.
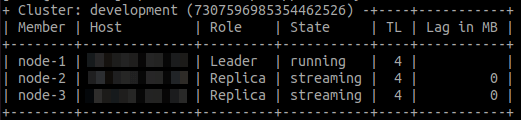
- Her üç makinedeki tüm servislerin başarılı olarak çalıştığı kontrol edildikten sonra yedekli yapı aşağıdaki komutla, her üç makineden de kontrol edilebilir.
patronictl -c /etc/patroni.yml list
Bu komutun çıktısı aşağıdaki gibi olmalıdır.
Lider durumundaki patroni tekrar başlatıldığında eklenen ikinci makine lider durumuna geçecektir.
systemctl restart patroni
patronictl -c /etc/patroni.yml list

İkinci makine lider durumundayken bu makinedeki patroni tekrar başlatılırsa da eklenen üçüncü makine lider duruma geçecektir.

![[mldp-newsletter]-nov-2023 — machine-learning-communities:-highlights-and-achievements](https://prodsens.live/wp-content/uploads/2023/12/17515-mldp-newsletter-nov-2023-machine-learning-communities-highlights-and-achievements-110x110.jpg)