![[ml-story]-computer-vision-made-easy-with-google-cloud-vision-api](https://prodsens.live/wp-content/uploads/2023/10/15527-ml-story-computer-vision-made-easy-with-google-cloud-vision-api-550x276.jpeg)
Are you passionate about Machine Learning and enjoy creating Computer Vision applications? Fed up with juggling countless Colab notebooks for various Computer Vision models?
If yes, then it’s high time you delve into Google Cloud’s Vision API. Welcome to the first installment of my “Machine Learning on Google Cloud” series, where I’ll acquaint you with the Vision API.
Before we start, let’s first understand what Vision API is.
Vision API
The Cloud Vision API offered by Google Cloud Platform is an API for common Computer Vision tasks such as image classification, object detection, text recognition and detection, landmark detection, and a lot more.
Pre-trained on datasets of some common objects, famous places, logos, etc., the Vision API is a powerful tool that easily integrates with Python, JavaScript/Node.js, Go, and other languages to solve Computer Vision problems. Let’s try a demo:
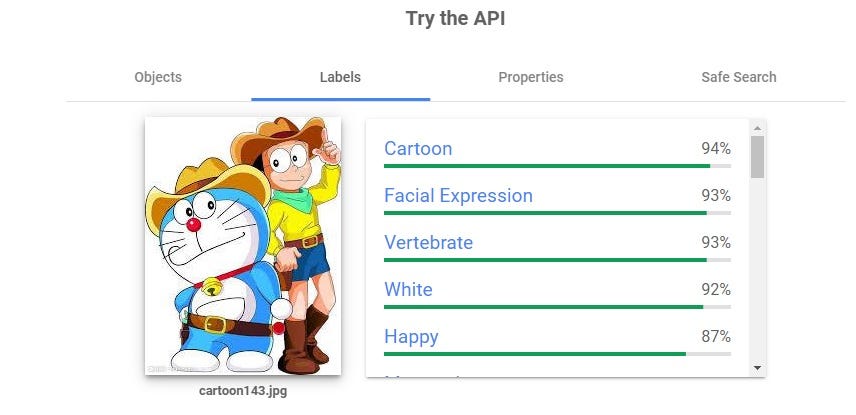
In the following example, I uploaded a picture of the cartoon character Doraemon, and here are the results, including image labels and facial expressions. You can also try uploading your own image to discover other information like objects in the image, dominant colors, cropping suggestions, and a safety check for potentially explicit content.
Isn’t having all these Computer Vision tasks in one place exciting? Now that you’re familiar with the Vision API, let’s dive deeper to see it in action on Google Cloud with some hands-on examples.
Pre-requisites:
You must have a Google Cloud account. If you don’t have one yet, Google gives you free credits worth $300 when you create a new account.
Okay, so let’s start.
Setting up your Google Cloud environment
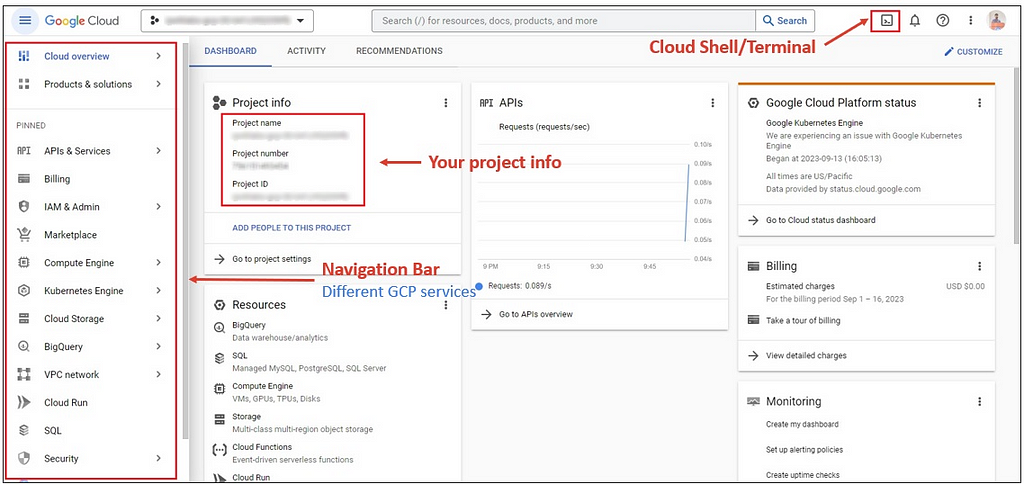
If you’re new to GCP, here’s a brief overview of the dashboard layout:
The left sidebar houses various GCP services, the center displays project details like project name, number, and ID, and in the top-right corner, you’ll find the cloud shell or terminal.
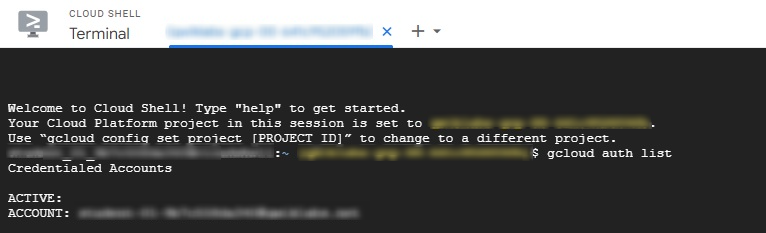
Open the cloud shell, and enter the following commands:
gcloud auth list
gcloud config list project
The above two commands are used to list the currently configured Google Cloud credentials and project ID respectively.

Now, we need to set up an API key in the environment variable.
Go to the navigation bar and expand the APIs & Services option → Click on Credentials → Create Credentials → API key.

Your API key will be generated.
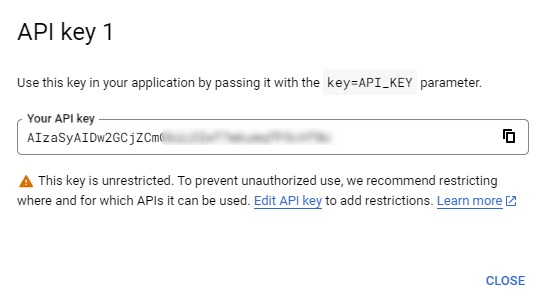
Save the generated key as an environment variable using the following command in the cloud shell.
export API_KEY=

Excellent. Settings and configurations are complete. These steps are necessary for each new project you work on.
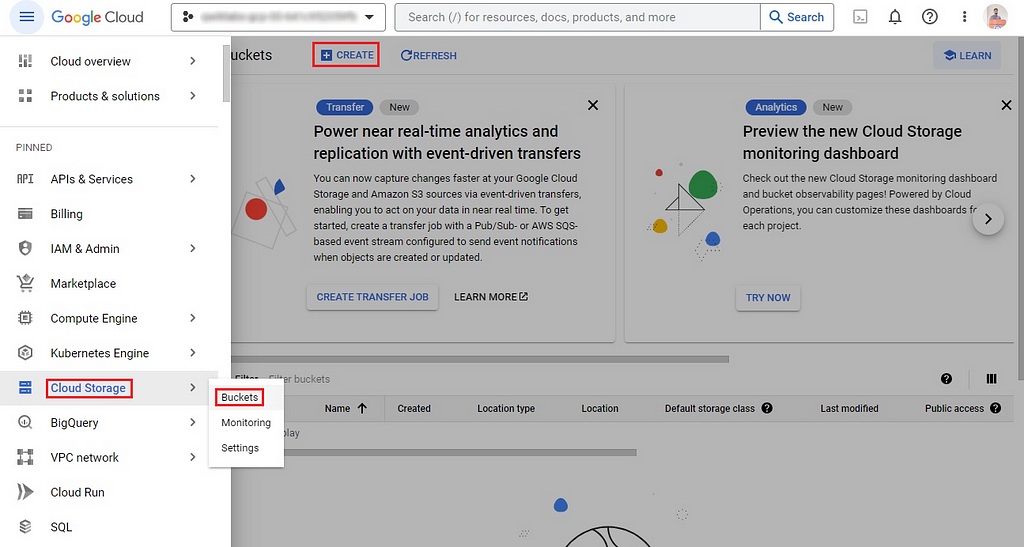
Uploading images on the Cloud Storage bucket
Now, we need to upload some images on the Cloud Storage bucket to use them with the Vision API.
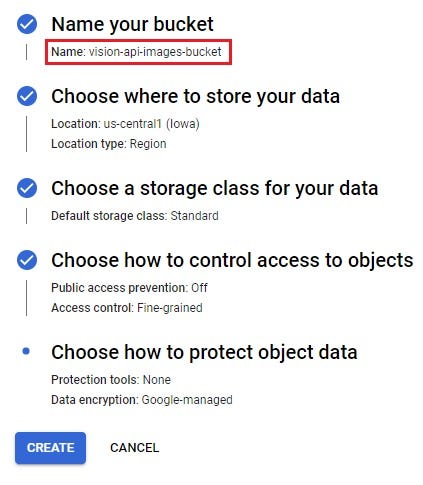
Create a new bucket in Google Cloud Storage as follows.
Enter a globally unique name for your bucket, set access control to Fine-grained, and ensure the Public access prevention checkbox is unchecked. Keep all other settings as they are. I’ve named my storage bucket vision-api-images-bucketas an example.
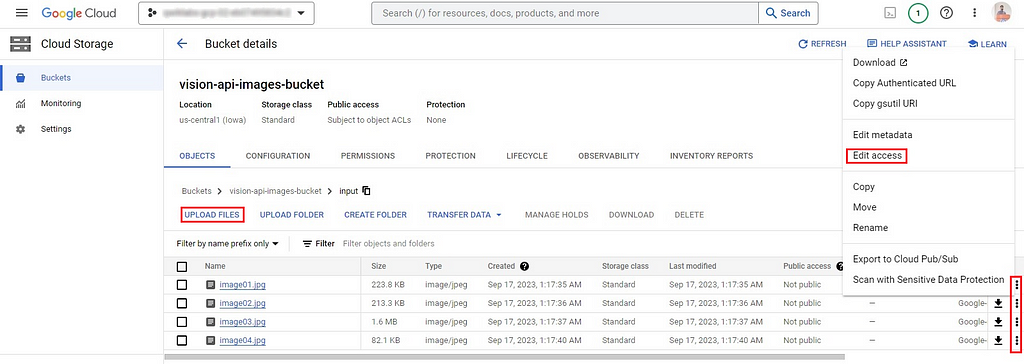
Once the bucket is created, upload some images into it. After the images are uploaded, click on the three dots against each image file, and then select the Edit access option.
Set the following to:
- Entity: Public
- Name: allUsers
- Access: Reader

This action will make all image files publicly accessible, allowing all users to have read-only access to them. Do this for all the images you have uploaded to your bucket.
Why is this necessary?
These images will be sent as a part of the request body to the Vision API. In order for the API to generate a response, it is necessary that these images be made publicly accessible.
Here’s a summary of the pictures I’ve added to the bucket.
Trying out the Vision API
Phew, we’re finally all set to run inferences on our images with the Vision API.
To send a request to the Vision API, we need to create a request.json file. The request body of this file includes the path to the image and the desired features for inference such as label detection, object localization, and so on.
Run the following command on the cloud shell to create the request.json file.
echo '
{
  "requests": [
      {
        "image": {
          "source": {
              "gcsImageUri": "gs://vision-api-images-bucket/image01.jpg"
          }
        },
        "features": [
          {
            "type": "LABEL_DETECTION",
            "maxResults": 5
          }
        ]
      }
  ]
}
' > request.json
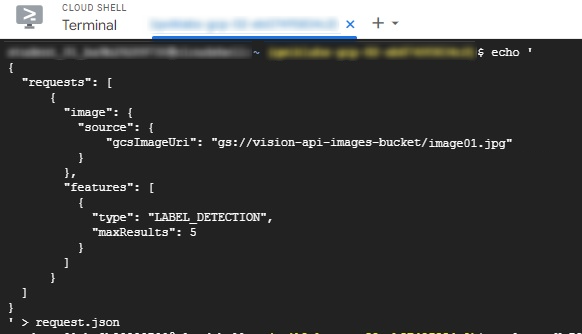
The request body of this JSON includes the path to the image01.jpg file stored in the Cloud Storage bucket. This image will be sent to the Vision API to perform LABEL_DETECTION, and the API will return the top 5 results.
To send the request to the Vision API, run the following command in the cloud shell:
curl -s -X POST -H "Content-Type: application/json" --data-binary @request.json https://vision.googleapis.com/v1/images:annotate?key=${API_KEY}
The Vision API returned the top 5 results for this image with the labels and their respective confidence scores.
{
  "responses": [
    {
      "labelAnnotations": [
        {
          "mid": "https://medium.com/m/0dnr7",
          "description": "Textile",
          "score": 0.87162435,
          "topicality": 0.87162435
        },
        {
          "mid": "https://medium.com/m/083wq",
          "description": "Wheel",
          "score": 0.8136176,
          "topicality": 0.8136176
        },
        {
          "mid": "https://medium.com/m/0h9mv",
          "description": "Tire",
          "score": 0.80493915,
          "topicality": 0.80493915
        },
        {
          "mid": "https://medium.com/m/0jjw",
          "description": "Art",
          "score": 0.80147284,
          "topicality": 0.80147284
        },
        {
          "mid": "https://medium.com/m/04g3r",
          "description": "Leisure",
          "score": 0.77031904,
          "topicality": 0.77031904
        }
      ]
    }
  ]
}
Try and experiment with the Vision API using various images and features, including OBJECT_LOCALIZATION, FACE_DETECTION, LANDMARK_DETECTION, and more.
Integrating Vision API with OpenCV to draw the inferences
Now that we’ve seen the impressive capabilities of the Vision API, let’s delve deeper into it. We can enhance our understanding by using Python and OpenCV to actually witness the API’s inferences in action.
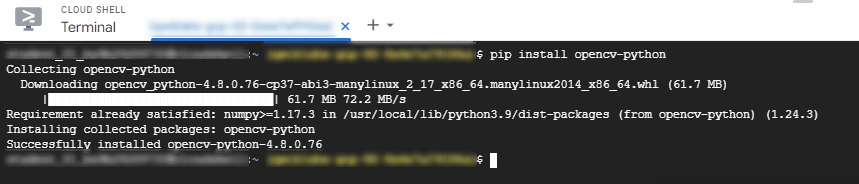
Install OpenCV using the below command on the cloud shell.
pip install opencv-python
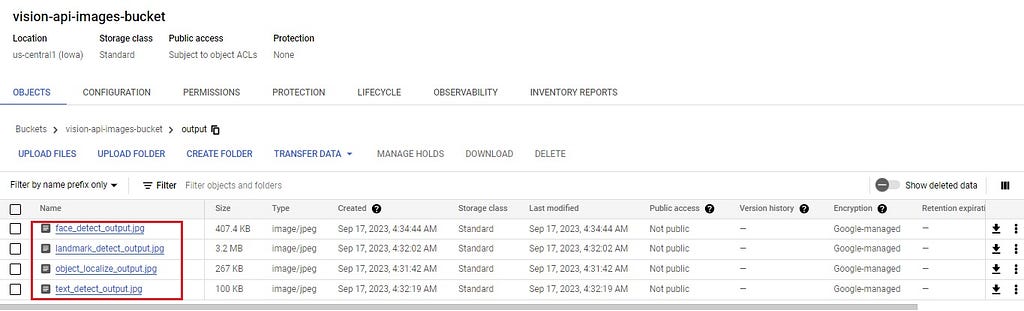
Now, create a folder named output in the storage bucket. This is where all the output images will be saved.

Clone the Vision API on Google Cloud Platform repository using the below command:
git clone https://github.com/NSTiwari/Vision-API-on-Google-Cloud-Platform.git
The GitHub repository provided above is a compilation of Vision API examples integrated with OpenCV that I have meticulously crafted for the visualization of inferences.
Navigate to the repository using the command:
cd Vision-API-on-Google-Cloud-Platform/
Currently, there are four files in this repository — face_detection.py, object_localization.py, landmark_detection.py, and text_detection.py to perform the different CV tasks.
Switch to the text editor by clicking on the Open Editor button.

Each of these files has a placeholder for project ID, bucket name, and input image name.
project_id = "YOUR_PROJECT_ID"
bucket_name = "YOUR_BUCKET_NAME"
image_file_name = "YOUR_IMAGE_FILE"
Replace these with the respective values of your project ID, bucket name, and image file name for all the files. Make sure to save the files after updating them.

Now, execute all the Python scripts with the following commands on the cloud shell.
# Run the face detector.
python face_detection.py

# Copy the face detection output to the storage bucket.
gsutil cp face_detect_output.jpg gs://vision-api-images-bucket/output/

# Run the object localizer.
python object_localization.py

# Copy the object localization output to the storage bucket.
gsutil cp object_localize_output.jpg gs://vision-api-images-bucket/output/

# Run the landmark detector.
python landmark_detection.py

# Copy the landmark detection output to the storage bucket.
gsutil cp landmark_detect_output.jpg gs://vision-api-images-bucket/output/

# Run the text detector.
python text_detection.py

# Copy the landmark detection output to the storage bucket.
gsutil cp text_detect_output.jpg gs://vision-api-images-bucket/output/
If all the commands are executed successfully, you should be able to see the output image files generated in the output folder of vision-api-images-bucket as follows:
Here’s Vision API in action with OpenCV for different Computer Vision tasks.
Face Detection
Below is an example of face detection using the Vision API. The API successfully detected three faces in the given picture.

Object Localization
Objects such as person, clothing, and pants are detected and precisely located.

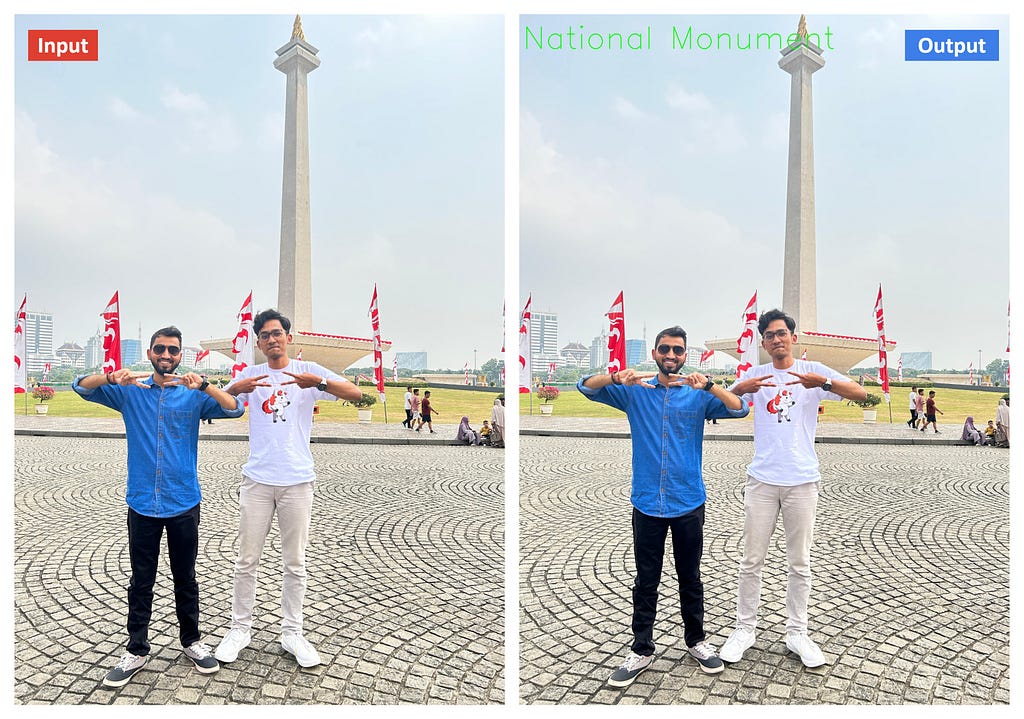
Landmark Detection
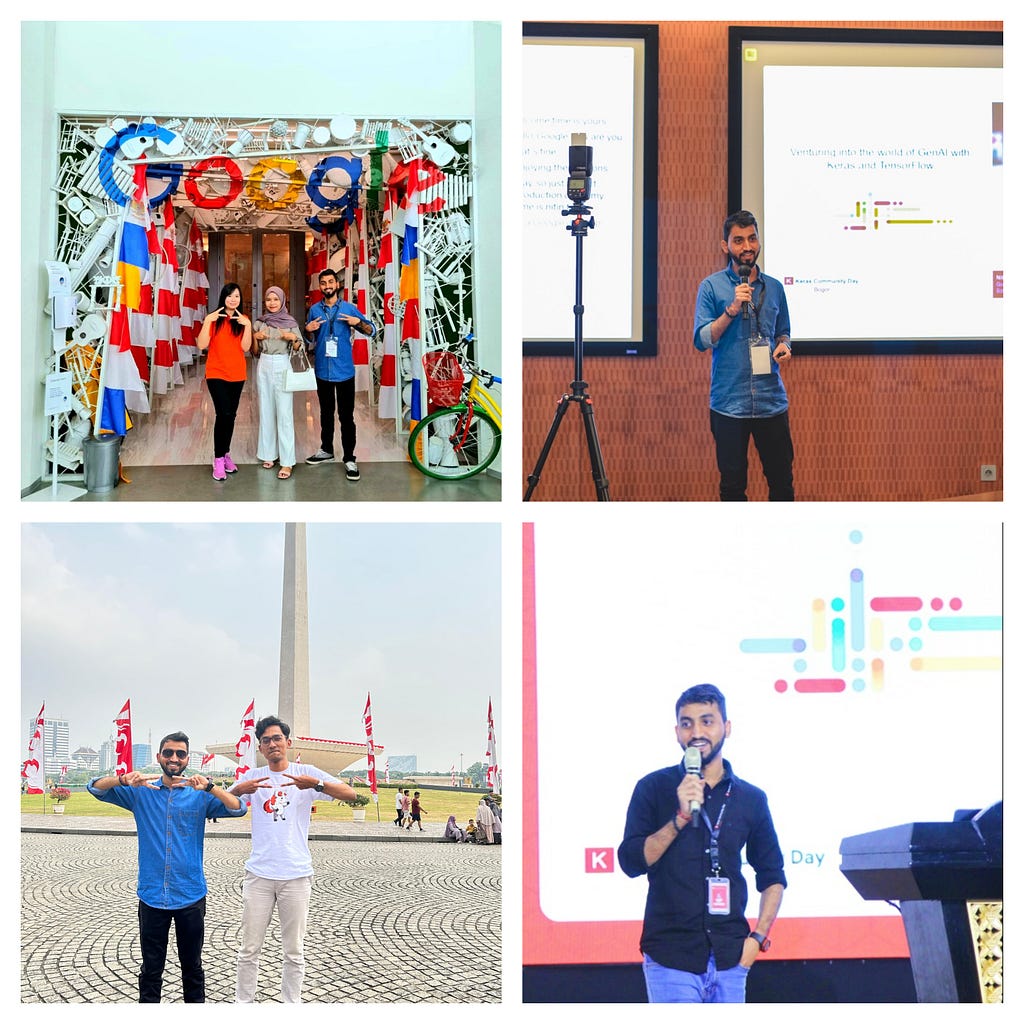
This photo was taken during my visit to Jakarta, Indonesia, at the National Monument (Monas). The Vision API accurately recognized this iconic landmark.
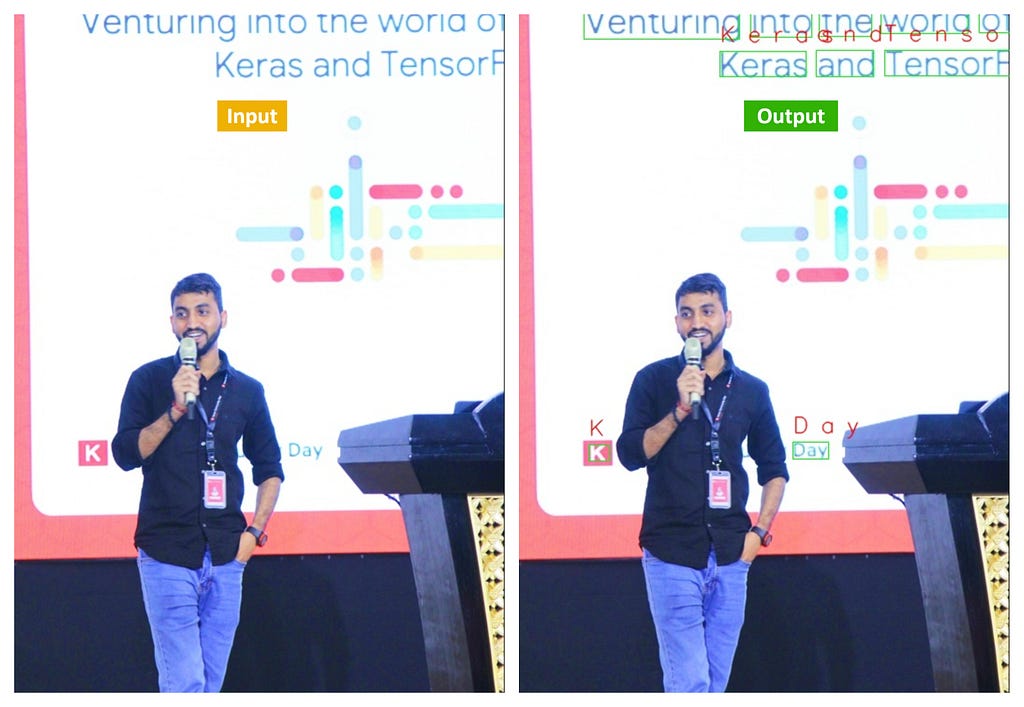
Text Detection
Lastly, the Vision API successfully identified text elements within this image, including mentions of “Keras,” “Day,” “TensorFlow,” and more.
That’s all about this article. To quickly recap —
- We began by exploring the functionalities of Vision API through an online demo, followed by a concise introduction to the Google Cloud Platform and Cloud Storage buckets.
- We then proceeded to delve into practical examples, demonstrating how to send requests to the Vision API effectively.
- To conclude our journey, we seamlessly integrated the Vision API with Python and OpenCV, enabling us to visualize the inferences drawn from various examples.
I hope you found this blog post valuable as you embark on your journey with the Vision API on the Google Cloud Platform. If you found the examples helpful, please consider showing your support by giving a star to the GitHub repository. Feel free to connect with me on LinkedIn in case you have any questions. I highly appreciate your feedback.
Be sure to stay tuned for the next blog in the “Machine Learning on Google Cloud” series.
![]()
[ML Story] Computer Vision made easy with Google Cloud Vision API was originally published in Google Developer Experts on Medium, where people are continuing the conversation by highlighting and responding to this story.