How to debug a Firefox add-on (extension)

how-to-debug-a-firefox-add-on-(extension)

Before we get started

Firefox supports browser extensions like Chromium-based browsers (Chrome, Arc, Brave, Edge etc.). Sometimes they’re referred to as add-ons in Firefox land.

This post assumes that you are debugging a browser extension you are building, i.e. have the source code for and can build it locally.

It’s also assumed that the Firefox add-on has been built, i.e. generated the files, including a manifest for the add-on to work.

The following instructions work for Firefox and Firefox Deveoper Edition.

Setup Firefox for debugging an add-on

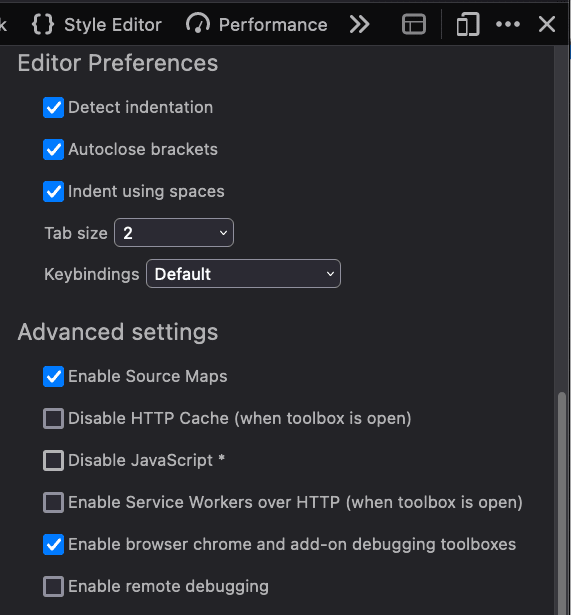
  1. Open the browser DevTools and click on the three dots button, then select settings.

    CleanShot 2023-08-07 at 22 06 39

  2. Scroll down to the Advanced Settings section and ensure Enable browser chrome and add-on debugging toolboxes is checked.

    CleanShot 2023-08-07 at 22 08 32

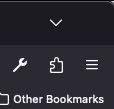
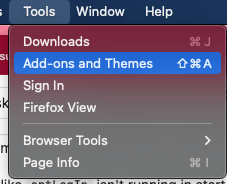
  3. Load the add-on by clicking on the puzzle icon in the top right of Firefox or via the application menu, Tools -> Add-ons and Themes

    CleanShot 2023-08-07 at 22 11 39

    CleanShot 2023-08-07 at 22 10 35

  4. Click on the cog icon to open the menu and select Debug Add-ons

    CleanShot 2023-08-07 at 22 12 16

  5. Ensure you built the extension with the changes in my branch by running npm run build

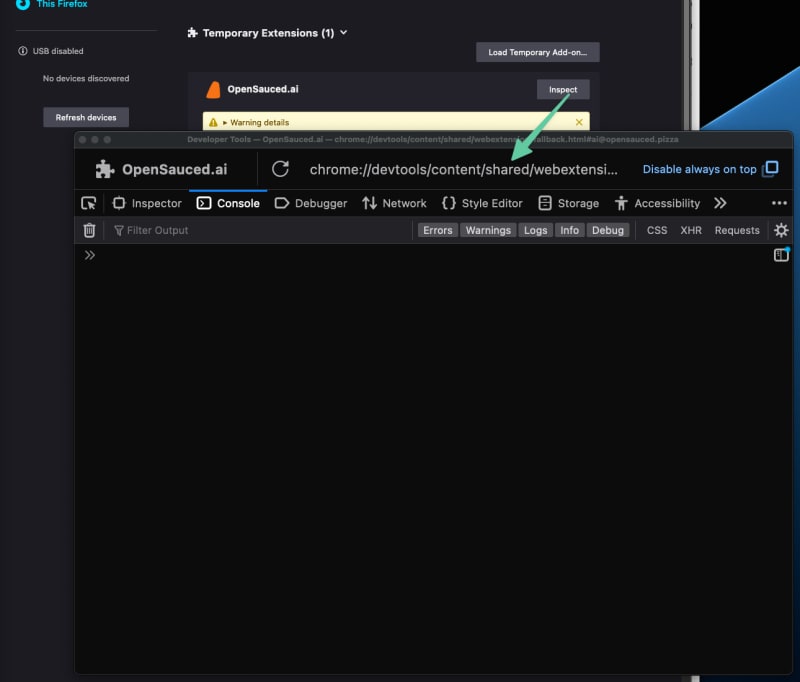
  6. Click on the Load Temporary Add-on... button

    CleanShot 2023-08-07 at 22 13 00

  7. Select the manifest file of the add-on from the OS file menu and click the Open button.

    CleanShot 2023-08-07 at 22 14 23

  8. The extension is now ready for use.

    CleanShot 2023-08-07 at 22 15 24

  9. Navigate to a GitHub page where you want to start debugging the remaining issues with the Firefox add-on

  10. If you want to debug or inspect the extension, click the Inspect button from the Temporary Extensions section where the extension was just loaded.

    CleanShot 2023-08-07 at 22 16 54

And that’s it!

Photo by Birger Strahl on Unsplash

Total
0
Shares
Leave a Reply

Your email address will not be published. Required fields are marked *

Previous Post
how-do-millions-of-people-book-meetings-with-god?

How do millions of people book meetings with God?

Next Post
establishing-postgresql-connection-with-prisma-in-nestjs:-a-comprehensive-guide-with-bookmark-api-example

Establishing PostgreSQL Connection with Prisma in NestJS: A Comprehensive Guide with Bookmark API Example

Related Posts
鸿蒙next应用国际化:时间与日期格式化

鸿蒙Next应用国际化:时间与日期格式化

本文旨在深入探讨华为鸿蒙HarmonyOS Next系统(截止目前API12)在应用国际化中时间与日期格式化方面的技术细节,基于实际开发实践进行总结。主要作为技术分享与交流载体,难免错漏,欢迎各位同仁提出宝贵意见和问题,以便共同进步。本文为原创内容,任何形式的转载必须注明出处及原作者。 在全球化的应用场景中,正确处理时间与日期的格式化是提供优质用户体验的关键因素之一。不同地区和语言对于时间与日期的表示方式存在显著差异,鸿蒙Next系统提供了丰富的功能来满足这种多样化的需求。本文将详细介绍时间日期格式化选项、相对时间格式化、时间段格式化,以及常见时间日期格式化问题及解决方案,抛砖引玉。 一、时间日期格式化选项 (一)日期显示格式(dateStyle) 格式取值与示例 full:显示完整的日期信息,包括年、月、日、星期。例如,在中文环境下可能显示为“2023年10月15日 星期日”。 long:显示较为详细的日期,通常包含年、月、日和星期的缩写。如“2023年10月15日 周日”。 medium:显示适中的日期格式,一般有年、月、日。例如“2023-10-15”。 short:显示简洁的日期,可能只包含月、日和年的部分信息。比如“10/15/23”(在某些地区格式)。 根据区域和语言选择格式 开发者可以使用 DateTimeFormat 类,根据用户所在区域的语言和文化习惯选择合适的 dateStyle 进行日期格式化。例如:…
Read More