Welcome back to another learning experience! In this step-by-step guide, I will provide you with comprehensive instructions to help you build an EKS cluster, VPC, and subnets effortlessly.
At the end of this guide, you will have achieved the following goals:
-
Successfully created roles for Nodes and EKS cluster using Terraform
-
Established a VPC specifically for the EKS cluster, enabling network isolation and control over the cluster’s resources.
-
Created subnets within the VPC, allowing for proper segmentation and allocation of resources.
-
Configured and attached IAM roles and policies to provide secure access and permissions for the EKS cluster.
-
Implemented autoscaling for the cluster, allowing it to dynamically adjust the number of nodes based on workload demands.
-
Gained hands-on experience with infrastructure-as-code practices using Terraform, ensuring consistency and reproducibility in your EKS cluster setup.
By accomplishing these goals, you will have a solid foundation for deploying and managing your EKS cluster efficiently, while following best practices for infrastructure provisioning and management.
To follow this tutorial with ease here are the prerequisites:
-
An AWS account
-
An Ubuntu Machine
-
Terraform installed on the machine
-
AWS CLI
Without any delay, let’s dive straight into the tutorial.
- CREATING THE EKS PROVIDER BLOCK
This step involves creating a provider’s block, which enables Terraform to interact with cloud providers and APIs effectively.
To proceed,you will create a new file named providers.tf.
Within this file, we will define our provider (AWS), and for this example, we will set the region as us-east-1. However, feel free to modify the region according to your preferred choice.
provider "aws" {
  region = "us-east-1"
}

terraform {
  required_providers {
    aws = {
      source  = "hashicorp/aws"
      version = "~> 3.0"
    }
  }
}
- CREATING THE VPC
In this section, our focus will be on creating a Virtual Private Cloud (VPC) specifically for our EKS cluster.
The VPC will be assigned a name tag called “main” for easy identification, and we will set the cidr_block to “10.0.0.0/16”. This cidr_block defines the range of IP addresses that can be used within the VPC.
By creating a dedicated VPC, we can ensure network isolation and control over the resources associated with our EKS cluster.
resource "aws_vpc" "main" {
  cidr_block = "10.0.0.0/16"

  tags = {
    Name = "main"
  }
}
- CREATING AN INTERNET GATEWAY
The Internet Gateway plays a crucial role in allowing resources within your public subnets, such as EC2 instances, to establish connections with the Internet when they possess a public IPv4 or IPv6 address.
To associate the Internet Gateway with the VPC, we will utilize the VPC ID.
Additionally, it is essential to assign a meaningful name tag to this resource. For this project’s Internet Gateway, I have selected the name tag ‘igw’. However, feel free to rename it according to your preference and project requirements.
resource "aws_internet_gateway" "igw" {
  vpc_id = aws_vpc.main.id

  tags = {
    Name = "igw"
  }
}
- CREATION OF SUBNETS
As part of our setup, we will create two subnets within the VPC: a public subnet and a private subnet. These subnets will be associated with two different availability zones.
resource "aws_subnet" "private-us-east-1a" {
  vpc_id            = aws_vpc.main.id
  cidr_block        = "10.0.0.0/19"
  availability_zone = "us-east-1a"

  tags = {
    "Name"                            = "private-us-east-1a"
    "kubernetes.io/role/internal-elb" = "1"
    "kubernetes.io/cluster/demo"      = "owned"
  }
}

resource "aws_subnet" "private-us-east-1b" {
  vpc_id            = aws_vpc.main.id
  cidr_block        = "10.0.32.0/19"
  availability_zone = "us-east-1b"

  tags = {
    "Name"                            = "private-us-east-1b"
    "kubernetes.io/role/internal-elb" = "1"
    "kubernetes.io/cluster/demo"      = "owned"
  }
}

resource "aws_subnet" "public-us-east-1a" {
  vpc_id                  = aws_vpc.main.id
  cidr_block              = "10.0.64.0/19"
  availability_zone       = "us-east-1a"
  map_public_ip_on_launch = true

  tags = {
    "Name"                       = "public-us-east-1a"
    "kubernetes.io/role/elb"     = "1"
    "kubernetes.io/cluster/demo" = "owned"
  }
}

resource "aws_subnet" "public-us-east-1b" {
  vpc_id                  = aws_vpc.main.id
  cidr_block              = "10.0.96.0/19"
  availability_zone       = "us-east-1b"
  map_public_ip_on_launch = true

  tags = {
    "Name"                       = "public-us-east-1b"
    "kubernetes.io/role/elb"     = "1"
    "kubernetes.io/cluster/demo" = "owned"
  }
}
- NATGATEWAY AND ELASTIC IP
Next, we will proceed with creating a NAT gateway and an elastic IP.
The elastic IP will be associated with the NAT gateway and connected to a public subnet.
Before setting up the NAT gateway, it is necessary to provision an Internet Gateway. For the NAT gateway, we will assign the name tag “nat” (feel free to modify it as desired) to identify this resource within our project.
resource "aws_eip" "nat" {
  vpc = true

  tags = {
    Name = "nat"
  }
}

resource "aws_nat_gateway" "nat" {
  allocation_id = aws_eip.nat.id
  subnet_id     = aws_subnet.public-us-east-1a.id

  tags = {
    Name = "nat"
  }

  depends_on = [aws_internet_gateway.igw]
}
- ROUTE TABLES
A route table consists of a collection of rules, known as routes, which govern the flow of network traffic within your subnet or gateway.
In our project, we will create separate routing tables for both the public and private subnets.
Please note that the placeholders within the configuration files are set to default values, but you are free to customize them based on your specific requirements.
Next, we will associate the respective route tables with each availability zone and establish the connection between each route table and the VPC that was created earlier.
Feel free to modify the name tags mentioned above to suit your preferences and project needs.
resource "aws_route_table" "private" {
  vpc_id = aws_vpc.main.id

  route = [
    {
      cidr_block                 = "0.0.0.0/0"
      nat_gateway_id             = aws_nat_gateway.nat.id
      carrier_gateway_id         = ""
      destination_prefix_list_id = ""
      egress_only_gateway_id     = ""
      gateway_id                 = ""
      instance_id                = ""
      ipv6_cidr_block            = ""
      local_gateway_id           = ""
      network_interface_id       = ""
      transit_gateway_id         = ""
      vpc_endpoint_id            = ""
      vpc_peering_connection_id  = ""
    },
  ]

  tags = {
    Name = "private"
  }
}

resource "aws_route_table" "public" {
  vpc_id = aws_vpc.main.id

  route = [
    {
      cidr_block                 = "0.0.0.0/0"
      gateway_id                 = aws_internet_gateway.igw.id
      nat_gateway_id             = ""
      carrier_gateway_id         = ""
      destination_prefix_list_id = ""
      egress_only_gateway_id     = ""
      instance_id                = ""
      ipv6_cidr_block            = ""
      local_gateway_id           = ""
      network_interface_id       = ""
      transit_gateway_id         = ""
      vpc_endpoint_id            = ""
      vpc_peering_connection_id  = ""
    },
  ]

  tags = {
    Name = "public"
  }
}

resource "aws_route_table_association" "private-us-east-1a" {
  subnet_id      = aws_subnet.private-us-east-1a.id
  route_table_id = aws_route_table.private.id
}

resource "aws_route_table_association" "private-us-east-1b" {
  subnet_id      = aws_subnet.private-us-east-1b.id
  route_table_id = aws_route_table.private.id
}

resource "aws_route_table_association" "public-us-east-1a" {
  subnet_id      = aws_subnet.public-us-east-1a.id
  route_table_id = aws_route_table.public.id
}

resource "aws_route_table_association" "public-us-east-1b" {
  subnet_id      = aws_subnet.public-us-east-1b.id
  route_table_id = aws_route_table.public.id
}
- CREATING THE EKS CLUSTER WITH ROLES
Amazon EKS utilizes a service-linked role called AWSServiceRoleForAmazonEKS. This role grants Amazon EKS the necessary permissions to manage clusters within your AWS account.
The attached policies enable the role to manage various resources, including network interfaces, security groups, logs, and VPCs.
In this section, our focus will be on creating an EKS cluster along with an IAM role. However, before that, we will first establish an IAM role policy and associate it with both the public and private subnets, ensuring the necessary connectivity and access.
resource "aws_iam_role" "demo" {
  name = "eks-cluster-demo"

assume_role_policy = <- EKS NODE GROUP & OPENID
Now, let's proceed with creating a node group for our EKS cluster.
This node group requires the attachment of three role policies: nodes-AmazonEKSWorkerNodePolicy, nodes-AmazonEKS_CNI_Policy, and nodes-AmazonEC2ContainerRegistryReadOnly. These policies provide the necessary permissions for the node group to function effectively.
In this project, we will focus on creating private nodes, meaning the nodes will reside in the private subnet. However, if you prefer the nodes to be public, you can modify the code accordingly.
Additionally, we will set up autoscaling for the node group. For this project, we will configure a desired state of two nodes, a maximum state of five nodes, and a minimum state of zero nodes. Please feel free to adjust these values as per your requirements.
resource "aws_iam_role" "nodes" {
  name = "eks-node-group-nodes"

  assume_role_policy = jsonencode({
    Statement = [{
      Action = "sts:AssumeRole"
      Effect = "Allow"
      Principal = {
        Service = "ec2.amazonaws.com"
      }
    }]
    Version = "2012-10-17"
  })
}

resource "aws_iam_role_policy_attachment" "nodes-AmazonEKSWorkerNodePolicy" {
  policy_arn = "arn:aws:iam::aws:policy/AmazonEKSWorkerNodePolicy"
  role       = aws_iam_role.nodes.name
}

resource "aws_iam_role_policy_attachment" "nodes-AmazonEKS_CNI_Policy" {
  policy_arn = "arn:aws:iam::aws:policy/AmazonEKS_CNI_Policy"
  role       = aws_iam_role.nodes.name
}

resource "aws_iam_role_policy_attachment" "nodes-AmazonEC2ContainerRegistryReadOnly" {
  policy_arn = "arn:aws:iam::aws:policy/AmazonEC2ContainerRegistryReadOnly"
  role       = aws_iam_role.nodes.name
}

resource "aws_eks_node_group" "private-nodes" {
  cluster_name    = aws_eks_cluster.demo.name
  node_group_name = "private-nodes"
  node_role_arn   = aws_iam_role.nodes.arn

  subnet_ids = [
    aws_subnet.private-us-east-1a.id,
    aws_subnet.private-us-east-1b.id
  ]

  capacity_type  = "ON_DEMAND"
  instance_types = ["t3.small"]

  scaling_config {
    desired_size = 2
    max_size     = 5
    min_size     = 0
  }

  update_config {
    max_unavailable = 1
  }

  labels = {
    role = "general"
  }

  # taint {
  #   key    = "team"
  #   value  = "devops"
  #   effect = "NO_SCHEDULE"
  # }

  # launch_template {
  #   name    = aws_launch_template.eks-with-disks.name
  #   version = aws_launch_template.eks-with-disks.latest_version
  # }

  depends_on = [
    aws_iam_role_policy_attachment.nodes-AmazonEKSWorkerNodePolicy,
    aws_iam_role_policy_attachment.nodes-AmazonEKS_CNI_Policy,
    aws_iam_role_policy_attachment.nodes-AmazonEC2ContainerRegistryReadOnly,
  ]
}

/* resource "aws_eks_node_group" "public-nodes" {
  cluster_name    = aws_eks_cluster.demo.name
  node_group_name = "public-nodes"
  node_role_arn   = aws_iam_role.nodes.arn

  subnet_ids = [
    aws_subnet.public-us-east-1a.id,
    aws_subnet.public-us-east-1b.id
  ]

  capacity_type  = "ON_DEMAND"
  instance_types = ["t3.small"]

  scaling_config {
    desired_size = 2
    max_size     = 5
    min_size     = 0
  }

  update_config {
    max_unavailable = 1
  }

  labels = {
    role = "general"
  }

  # taint {
  #   key    = "team"
  #   value  = "devops"
  #   effect = "NO_SCHEDULE"
  # }

  # launch_template {
  #   name    = aws_launch_template.eks-with-disks.name
  #   version = aws_launch_template.eks-with-disks.latest_version
  # }

  depends_on = [
    aws_iam_role_policy_attachment.nodes-AmazonEKSWorkerNodePolicy,
    aws_iam_role_policy_attachment.nodes-AmazonEKS_CNI_Policy,
    aws_iam_role_policy_attachment.nodes-AmazonEC2ContainerRegistryReadOnly,
  ]
}
 */
# resource "aws_launch_template" "eks-with-disks" {
#   name = "eks-with-disks"

#   key_name = "local-provisioner"

#   block_device_mappings {
#     device_name = "https://dev.to/dev/xvdb"

#     ebs {
#       volume_size = 50
#       volume_type = "gp2"
#     }
#   }
# }
OPENID
IAM OIDC (OpenID Connect) identity providers are components in AWS Identity and Access Management (IAM) that define an external identity provider (IdP) service supporting the OIDC standard. Examples of such IdPs include Google or Salesforce.
The purpose of an IAM OIDC identity provider is to establish trust between your AWS account and an OIDC-compatible IdP. By configuring an IAM OIDC identity provider, you can enable users from the external IdP to authenticate and access AWS resources. This allows you to leverage the existing user identities and authentication mechanisms provided by the external IdP within your AWS environment.
data "tls_certificate" "eks" {
  url = aws_eks_cluster.demo.identity[0].oidc[0].issuer
}

resource "aws_iam_openid_connect_provider" "eks" {
  client_id_list  = ["sts.amazonaws.com"]
  thumbprint_list = [data.tls_certificate.eks.certificates[0].sha1_fingerprint]
  url             = aws_eks_cluster.demo.identity[0].oidc[0].issuer
}
OPENID TEST
This test allows us to attach a policy to our OpenID.
By attaching a policy to our OpenID, we can define and enforce access control rules and permissions for the authenticated identities from the OpenID Connect provider. This helps ensure secure and controlled access to AWS resources based on the defined policy.
data "aws_iam_policy_document" "test_oidc_assume_role_policy" {
  statement {
    actions = ["sts:AssumeRoleWithWebIdentity"]
    effect  = "Allow"

    condition {
      test     = "StringEquals"
      variable = "${replace(aws_iam_openid_connect_provider.eks.url, "https://", "")}:sub"
      values   = ["system:serviceaccount:default:aws-test"]
    }

    principals {
      identifiers = [aws_iam_openid_connect_provider.eks.arn]
      type        = "Federated"
    }
  }
}

resource "aws_iam_role" "test_oidc" {
  assume_role_policy = data.aws_iam_policy_document.test_oidc_assume_role_policy.json
  name               = "test-oidc"
}

resource "aws_iam_policy" "test-policy" {
  name = "test-policy"

  policy = jsonencode({
    Statement = [{
      Action = [
        "s3:ListAllMyBuckets",
        "s3:GetBucketLocation"
      ]
      Effect   = "Allow"
      Resource = "arn:aws:s3:::*"
    }]
    Version = "2012-10-17"
  })
}

resource "aws_iam_role_policy_attachment" "test_attach" {
  role       = aws_iam_role.test_oidc.name
  policy_arn = aws_iam_policy.test-policy.arn
}

output "test_policy_arn" {
  value = aws_iam_role.test_oidc.arn
}
- AUTOSCALER
In this section, our focus will be on creating an autoscaling role specifically for our EKS cluster.
The autoscaling role plays a crucial role in managing the scaling of resources within the cluster, ensuring efficient utilization and automatic adjustment based on workload demands. By creating this role, we enable the cluster to dynamically scale the number of nodes in response to changes in workload or resource utilization.
data "aws_iam_policy_document" "eks_cluster_autoscaler_assume_role_policy" {
  statement {
    actions = ["sts:AssumeRoleWithWebIdentity"]
    effect  = "Allow"

    condition {
      test     = "StringEquals"
      variable = "${replace(aws_iam_openid_connect_provider.eks.url, "https://", "")}:sub"
      values   = ["system:serviceaccount:kube-system:cluster-autoscaler"]
    }

    principals {
      identifiers = [aws_iam_openid_connect_provider.eks.arn]
      type        = "Federated"
    }
  }
}

resource "aws_iam_role" "eks_cluster_autoscaler" {
  assume_role_policy = data.aws_iam_policy_document.eks_cluster_autoscaler_assume_role_policy.json
  name               = "eks-cluster-autoscaler"
}

resource "aws_iam_policy" "eks_cluster_autoscaler" {
  name = "eks-cluster-autoscaler"

  policy = jsonencode({
    Statement = [{
      Action = [
                "autoscaling:DescribeAutoScalingGroups",
                "autoscaling:DescribeAutoScalingInstances",
                "autoscaling:DescribeLaunchConfigurations",
                "autoscaling:DescribeTags",
                "autoscaling:SetDesiredCapacity",
                "autoscaling:TerminateInstanceInAutoScalingGroup",
                "ec2:DescribeLaunchTemplateVersions"
            ]
      Effect   = "Allow"
      Resource = "*"
    }]
    Version = "2012-10-17"
  })
}

resource "aws_iam_role_policy_attachment" "eks_cluster_autoscaler_attach" {
  role       = aws_iam_role.eks_cluster_autoscaler.name
  policy_arn = aws_iam_policy.eks_cluster_autoscaler.arn
}

output "eks_cluster_autoscaler_arn" {
  value = aws_iam_role.eks_cluster_autoscaler.arn
}
Once you have created all the necessary files, you can proceed to run the following commands to create your EKS cluster:
- Initialize Terraform and download the required provider plugins:
terraform init
- Apply the Terraform configuration to your AWS account:
terraform apply -auto-approve
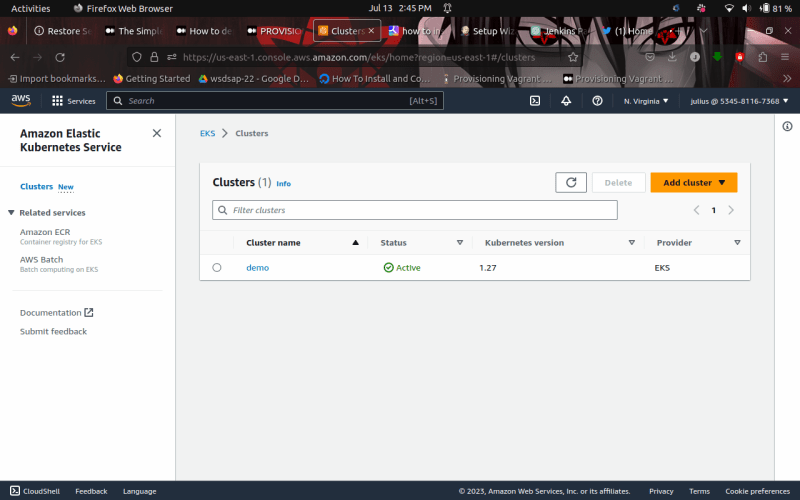
After successfully running these commands, you can go to your AWS account to verify if the EKS cluster is running. The AWS Management Console will display the running EKS cluster and the associated node groups you have created.
Please note that the resource names shown in the AWS Management Console may differ if you have customized them in your configuration files.
Congratulations! You have successfully created an EKS cluster in approximately 15 minutes. To connect to your cluster, use the following command:
$ aws eks --region example_region update-kubeconfig --name cluster_name
In the command above, replace "example_region" with the region where your cluster is running, and "cluster_name" with the name of your created cluster.
Well done on creating your EKS cluster! Congratulations on your accomplishment!
Conclusion
If you loved this tutorial, please, give it a like, comment, and don’t forget to click the follow button.


