
Introduction
The well-known tool React Dropzone enables users to drag and drop files for upload in React applications. It offers simple file validation by default, including file type and size limitations.
To enforce additional requirements, you might occasionally need to develop your own custom validation logic.
In this article, we’ll look at how to leverage the React Dropzone component’s built-in validation method to set file size limitations based on the sorts of files that they can accept.
Prerequisites
To follow along with this tutorial, you should have a basic understanding of React and have React Dropzone installed in your project. If you haven’t done so already, you can install it by running the following command:
npm install react-dropzone
Implementing Custom Validation Logic:
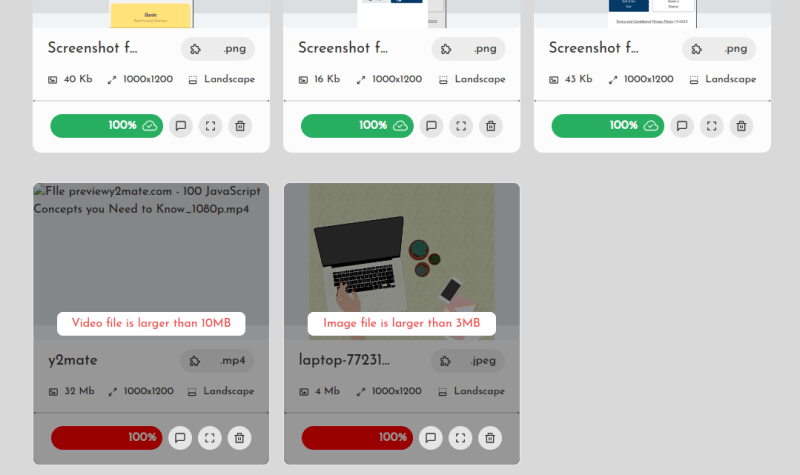
Let’s say we want to limit video files to a maximum size of 10MB and image files to a maximum size of 3MB. To achieve this, we will create a custom validation function called typeValidator that accepts a File object as a parameter and returns an error object if the file exceeds the specified limits.
const typeValidator = (file) => {
  if (file.type.startsWith("video/")) {
    if (file.size > 10 * 1024 * 1024) {
      // 10MB limit
      return {
        code: "size-too-large",
        message: "Video file is larger than 10MB",
      };
    }
  } else if (file.type.startsWith("image/")) {
    if (file.size > 3 * 1024 * 1024) {
      // 3MB limit
      return {
        code: "size-too-large",
        message: "Image file is larger than 3MB",
      };
    }
  }
  return null;
};
The typeValidator function determines whether the file type is **image/** or **video/** by examining the extension. If they do, the file size is then checked against the appropriate restrictions. It returns an error object with a code and a related error message if the file goes over the limitations. If not, null is returned to show that the file is valid.
Using the Custom Validation Function in React Dropzone:
Let’s add the custom validation function into the React Dropzone component now that we have it. For further information, see the React Dropzone doc.
import React from "react";
import { useDropzone } from "react-dropzone";

const MyDropzone = () => {
  const onDrop = (acceptedFiles, rejectedFiles) => {
    // Handle the accepted files
    console.log("Accepted files:", acceptedFiles);

    // Handle the rejected files
    console.log("Rejected files:", rejectedFiles);
  };

  const { getRootProps, getInputProps } = useDropzone({
    onDrop,
    validator: typeValidator,
  });

  return (
    <div {...getRootProps()}>
      <input {...getInputProps()} />
      <p>Drag and drop files here, or click to select files</p>
    </div>
  );
};

export default MyDropzone;
In the code above, we import the necessary dependencies and define our MyDropzone component. Inside the component, we use the useDropzone hook provided by the React Dropzone library to configure the Dropzone behavior.
By passing the validator prop with the typeValidator function, we instruct the Dropzone component to apply our custom validation logic. When files are dropped or selected, the onDrop function is called, receiving two arrays: acceptedFiles and rejectedFiles. The accepted files are the ones that passed the validation, while the rejected files are the ones that exceeded the specified limits.
Conclusion
In this blog post, we explored how to implement custom file validation in a React Dropzone component.
By creating a custom validation function and integrating it with the Dropzone component, we were able to enforce size restrictions based on file types. This approach allows for flexible and tailored file validation within your React applications.
Feel free to extend the provided example to suit your specific requirements and build robust file upload functionality.
If you have any questions or need further assistance, feel free to connect with me on twitter
Remember, as the great programmer Gandalf once said,
All we have to decide is what to code with the time that is given to us.
Happy coding, fellow adventurer!