When working with containers in Kubernetes, it’s important to know what are the resources involved and how they are needed. Some processes will require more CPU or memory than others. Some are critical and should never be starved.
Kubernetes defines Limits as the maximum amount of a resource to be used by a container.
Requests, on the other hand, are the minimum guaranteed amount of a resource that is reserved for a container.
Knowing that, we should configure our containers and Pods properly in order to get the best of both.
In this article, we will see:
- Resources in Kubernetes
- Kubernetes requests
- Kubernetes limits
- Namespace ResourceQuota
- Namespace LimitRange
Resources in Kubernetes
CPU settings in Kubernetes
CPU is a unit of computing processing time, measured in cores.
- You can use millicores (m) to represent smaller amounts than a core (e.g., 500m would be half a core)
- The minimum amount is 1m
- A Node might have more than one core available, so requesting CPU > 1 is possible
CPU is a compressible resource, meaning that it can be stretched in order to satisfy all the demand. In case that the processes request too much CPU, some of them will be throttled.
Memory settings in Kubernetes
Memory is measured in Kubernetes in bytes.
- You can use, E, P, T, G, M, k to represent Exabyte, Petabyte, Terabyte, Gigabyte, Megabyte and kilobyte, although only the last four are commonly used. (e.g., 500M, 4G)
- Warning: don’t use lowercase m for memory (this represents Millibytes, which is ridiculously low)
A Mebibyte (and their analogues Kibibyte, Gibibyte,…) is 2 to the power of 20 bytes. It was created to avoid the confusion with the Kilo, Mega definitions of the metric system. You should be using this notation, as it’s the canonical definition for bytes, while Kilo and Mega are multiples of 1000
Memory is a non-compressible resource, meaning that it can’t be stretched in the same manner as CPU. If a process doesn’t get enough memory to work, the process is killed.
Kubernetes requests
Kubernetes defines requests as a guaranteed minimum amount of a resource to be used by a container.
Basically, it will set the minimum amount of the resource for the container to consume.
When a Pod is scheduled, kube-scheduler will check the Kubernetes requests in order to allocate it to a particular Node that can satisfy at least that amount for all containers in the Pod. If the requested amount is higher than the available resource, the Pod will not be scheduled and remain in Pending status.
In this example, we set a request for 100m cores of CPU and 4Mi of memory:
    resources:
      requests:
        cpu: 0.1
        memory: 4Mi
Requests are used:
- When allocating Pods to a Node, so the indicated requests by the containers in the Pod are satisfied.
- At runtime, the indicated amount of requests will be guaranteed as a minimum for the containers in that Pod.
Memory requests
If a container consumes more memory than its request amount, and its Node has capacity problems, kubelet might evict the Pod of that container.
CPU requests
A CPU request is a quota of the CPU that will be granted for a particular container.
Internally, this is implemented using the Linux CFS (Completely Fair Scheduler).
 Pods A and B have requests to guarantee CPU time. Pod C will be throttled as it has no request, but eventually will be processed.
Kubernetes won’t evict Pods due to CPU consumption, but performance will be affected if the Node has capacity problems, as it will need to allocate less CPU time than the expected. This is known as throttling and basically means that your process will need to wait until the CPU can be used again.
Kubernetes limits
Kubernete defines limits as a maximum amount of a resource to be used by a container.
This means that the container can never consume more than the memory amount or CPU amount indicated.
    resources:
      limits:
        cpu: 0.5
        memory: 100Mi
Limits are used:
- When allocating Pods to a Node. If no requests are set, by default, Kubernetes will assign requests = limits.
- At runtime, Kubernetes will check that the containers in the Pod are not consuming a higher amount of resources than indicated in the limit.
Memory limits
Memory limits set the maximum allowed amount of memory for a container. In case the limit is surpassed, Kubernetes will kill the process due to Out of Memory (OOM).
 Top Pod has a request set of 1G, while Bottom Pod has a limit of 1G. If Top Pod requires more memory exceptionally, the node can provide. The Bottom Pod can’t ever consume more than 1G, so it’s killed
CPU limits
CPU limits set the maximum allowed amount of CPU for a container. In case it’s surpassed, Kubernetes will throttle the process, thus delaying its execution.
In very few cases should you be using limits to control your resources usage in Kubernetes. This is because if you want to avoid starvation (ensure that every important process gets its share), you should be using requests in the first place.
By setting up limits, you are only preventing a process from retrieving additional resources in exceptional cases, causing an OOM kill in the event of memory, and Throttling in the event of CPU.

Practical example
Let’s say we are running a cluster with, for example, 4 cores and 16GB RAM nodes. We can extract a lot of information:
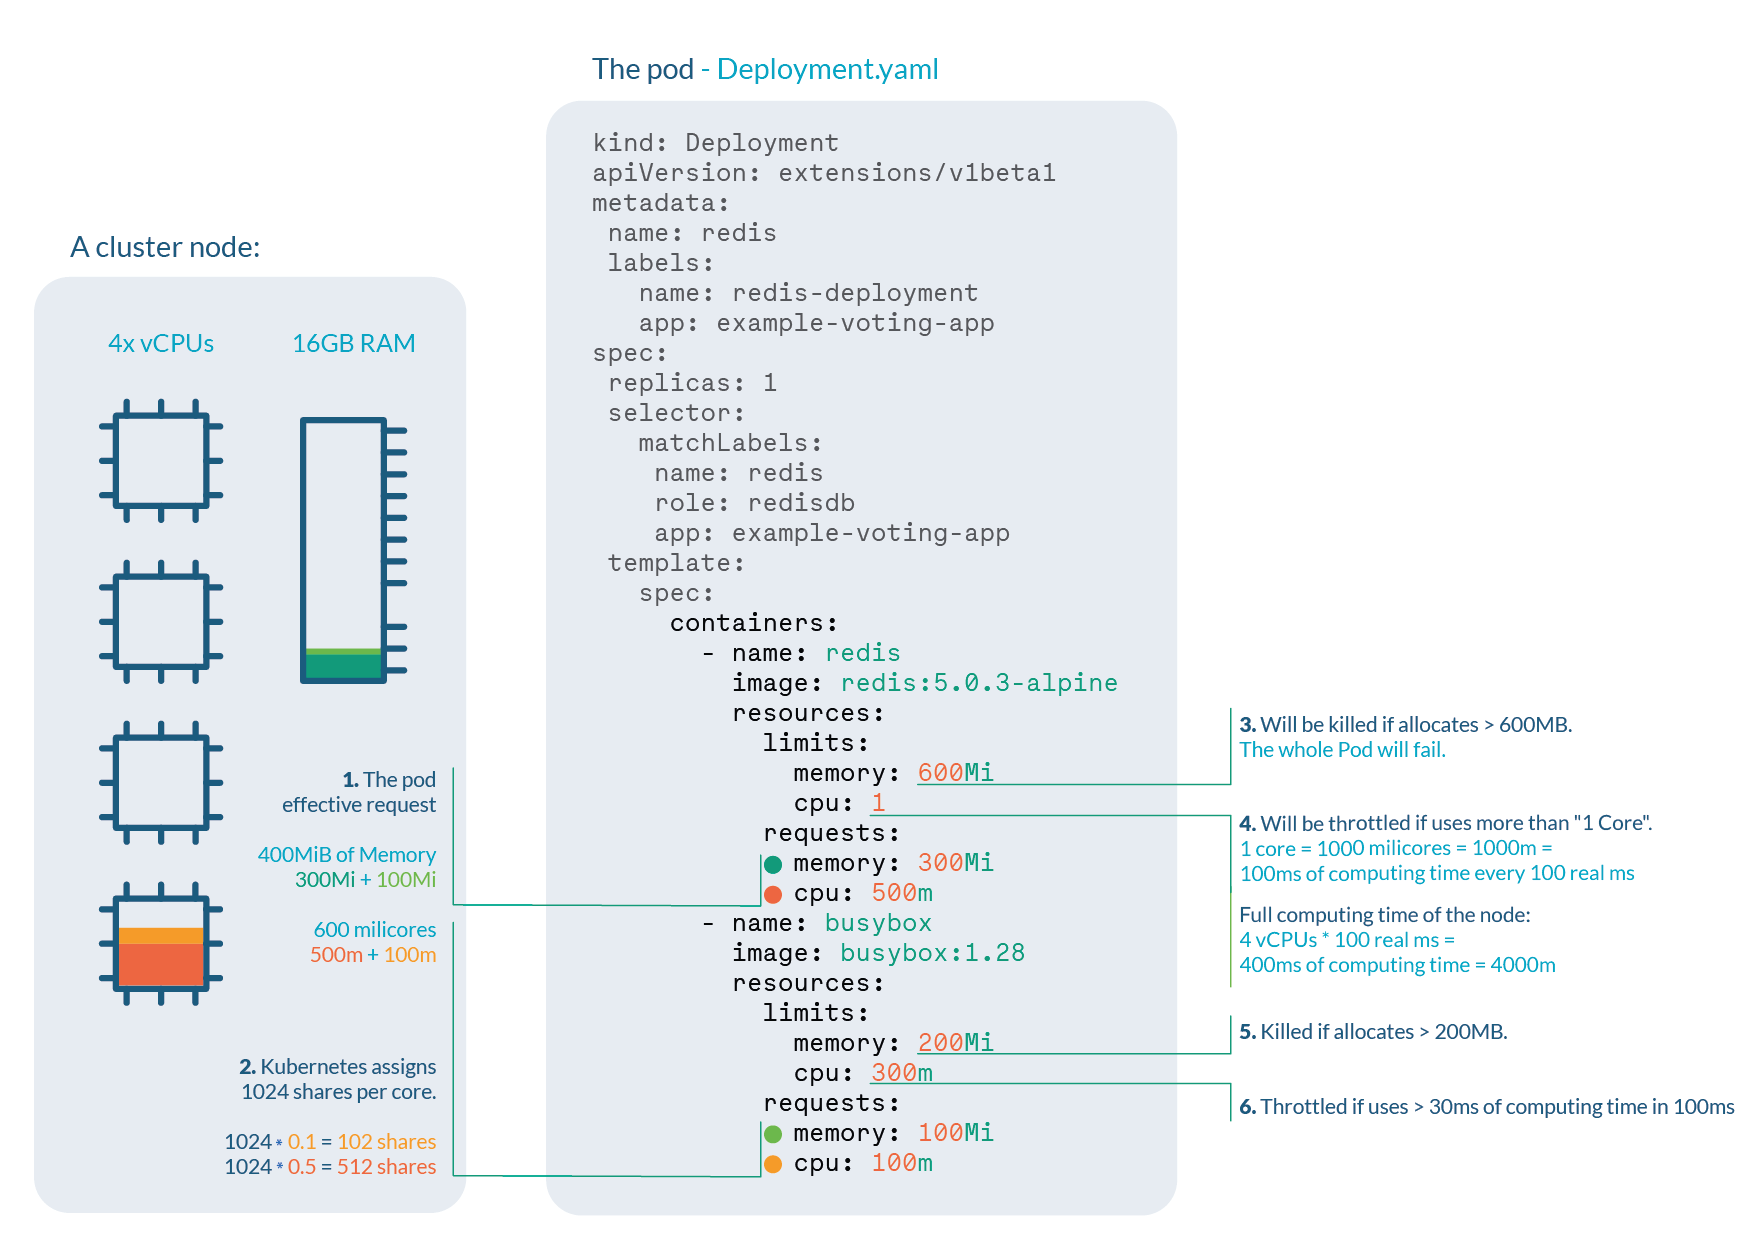
- Pod effective request is 400 MiB of memory and 600 millicores of CPU. You need a node with enough free allocatable space to schedule the pod.
- CPU shares for the redis container will be 512, and 102 for the busybox container. Kubernetes always assign 1024 shares to every core, so redis: 1024 * 0.5 cores ≅ 512 and busybox: 1024 * 0.1cores ≅ 102
- Redis container will be OOM killed if it tries to allocate more than 600MB of RAM, most likely making the pod fail.
- Redis will suffer CPU throttle if it tries to use more than 100ms of CPU in every 100ms, (since we have 4 cores, available time would be 400ms every 100ms) causing performance degradation.
- Busybox container will be OOM killed if it tries to allocate more than 200MB of RAM, resulting in a failed pod.
- Busybox will suffer CPU throttle if it tries to use more than 30ms of CPU every 100ms, causing performance degradation.
Namespace ResourceQuota
Thanks to namespaces, we can isolate Kubernetes resources into different groups, also called tenants.
With ResourceQuotas, you can set a memory or CPU limit to the entire namespace, ensuring that entities in it can’t consume more from that amount.
apiVersion: v1
kind: ResourceQuota
metadata:
  name: mem-cpu-demo
spec:
  hard:
    requests.cpu: 2
    requests.memory: 1Gi
    limits.cpu: 3
    limits.memory: 2Gi
- requests.cpu: the maximum amount of CPU for the sum of all requests in this namespace
- requests.memory: the maximum amount of Memory for the sum of all requests in this namespace
- limits.cpu: the maximum amount of CPU for the sum of all limits in this namespace
- limits.memory: the maximum amount of memory for the sum of all limits in this namespace
Then, apply it to your namespace:
kubectl apply -f resourcequota.yaml --namespace=mynamespace
You can list the current ResourceQuota for a namespace with:
kubectl get resourcequota -n mynamespace
Note that if you set up ResourceQuota for a given resource in a namespace, you then need to specify limits or requests accordingly for every Pod in that namespace. If not, Kubernetes will return a “failed quota” error:
Error from server (Forbidden): error when creating "mypod.yaml": pods "mypod" is forbidden: failed quota: mem-cpu-demo: must specify limits.cpu,limits.memory,requests.cpu,requests.memory
In case you try to add a new Pod with container limits or requests that exceed the current ResourceQuota, Kubernetes will return an “exceeded quota” error:
Error from server (Forbidden): error when creating "mypod.yaml": pods "mypod" is forbidden: exceeded quota: mem-cpu-demo, requested: limits.memory=2Gi,requests.memory=2Gi, used: limits.memory=1Gi,requests.memory=1Gi, limited: limits.memory=2Gi,requests.memory=1Gi
Namespace LimitRange
ResourceQuotas are useful if we want to restrict the total amount of a resource allocatable for a namespace. But what happens if we want to give default values to the elements inside?
LimitRanges are a Kubernetes policy that restricts the resource settings for each entity in a namespace.
apiVersion: v1
kind: LimitRange
metadata:
  name: cpu-resource-constraint
spec:
  limits:
  - default:
      cpu: 500m
    defaultRequest:
      cpu: 500m
    min:
      cpu: 100m
    max:
      cpu: "1"
    type: Container
-
default: Containers created will have this value if none is specified. -
min: Containers created can’t have limits or requests smaller than this. -
max: Containers created can’t have limits or requests bigger than this.
Later, if you create a new Pod with no requests or limits set, LimitRange will automatically set these values to all its containers:
    Limits:
      cpu:  500m
    Requests:
      cpu:  100m
Now, imagine that you add a new Pod with 1200M as limit. You will receive the following error:
Error from server (Forbidden): error when creating "pods/mypod.yaml": pods "mypod" is forbidden: maximum cpu usage per Container is 1, but limit is 1200m
Note that by default, all containers in Pod will effectively have a request of 100m CPU, even with no LimitRanges set.
Conclusion
Choosing the optimal limits for our Kubernetes cluster is key in order to get the best of both energy consumption and costs.
Oversizing or dedicating too many resources for our Pods may lead to costs skyrocketing.
Undersizing or dedicating very few CPU or Memory will lead to applications not performing correctly, or even Pods being evicted.
As mentioned, Kubernetes limits shouldn’t be used, except in very specific situations, as they may cause more harm than good. There’s a chance that a Container is killed in case of Out of Memory, or throttled in case of Out of CPU.
For requests, use them when you need to ensure a process gets a guaranteed share of a resource.
Rightsize your Kubernetes resources with Sysdig Monitor
With Sysdig Monitor new feature, cost advisor, you can optimize your Kubernetes costs
- Memory requests
- CPU requests
Sysdig Advisor accelerates mean time to resolution (MTTR) with live logs, performance data, and suggested remediation steps. It’s the easy button for Kubernetes troubleshooting!

![how-to-work-with-issues-in-jira-[tutorial]](https://prodsens.live/wp-content/uploads/2022/11/5685-how-to-work-with-issues-in-jira-tutorial-110x110.jpg)