A step-by-step, no-hype tutorial using Anthropic’s official Agent SDK
By Geeta Kakrani — AI Consultant | Google Developer Expert (AI)
If you’ve been writing simple “call the API, get a response” scripts with an LLM, you already know the limitation: every call is a one-shot Q&A. You ask, it answers, the conversation is over. There’s no planning, no tool use, no “keep working until the task is actually done.”
The Claude Agent SDK — Anthropic’s official, open-source Python and TypeScript library — solves exactly this. It gives you the same agent loop, tool execution engine, and context management that powers Claude Code, but as a library you can call from your own Python program. No need to build your own tool-calling loop from scratch.
In this tutorial, we’ll install it, set it up, and build a working agent — step by step, using only what’s documented and verified.
What you’ll need
- Python 3.10 or later
- An Anthropic API key (from the Claude Console)
- 15–20 minutes
Step 1: Set up your project
Create a fresh folder for this project. The SDK, by default, has access to files in this folder and its subfolders — so keep it clean and dedicated.
bash
mkdir my-agent && cd my-agent
python3 -m venv .venv
source .venv/bin/activate   # on Windows: .venvScriptsactivate
Step 2: Install the SDK
bash
pip install claude-agent-sdk
That’s it — no separate CLI install needed. The package bundles the Claude Code CLI binary internally and uses it automatically.
Note: If pip throws an externally-managed-environment error (common on newer Ubuntu/Debian/Homebrew Python), make sure you’re inside the virtual environment you just activated in Step 1.
Step 3: Set your API key
Create a .env file in your project folder:
ANTHROPIC_API_KEY=your-api-key-here
(If you’re on AWS, Google Cloud, or Azure, the SDK also supports Bedrock, Vertex AI, and Azure Foundry authentication — but for this tutorial, a plain API key is simplest.)
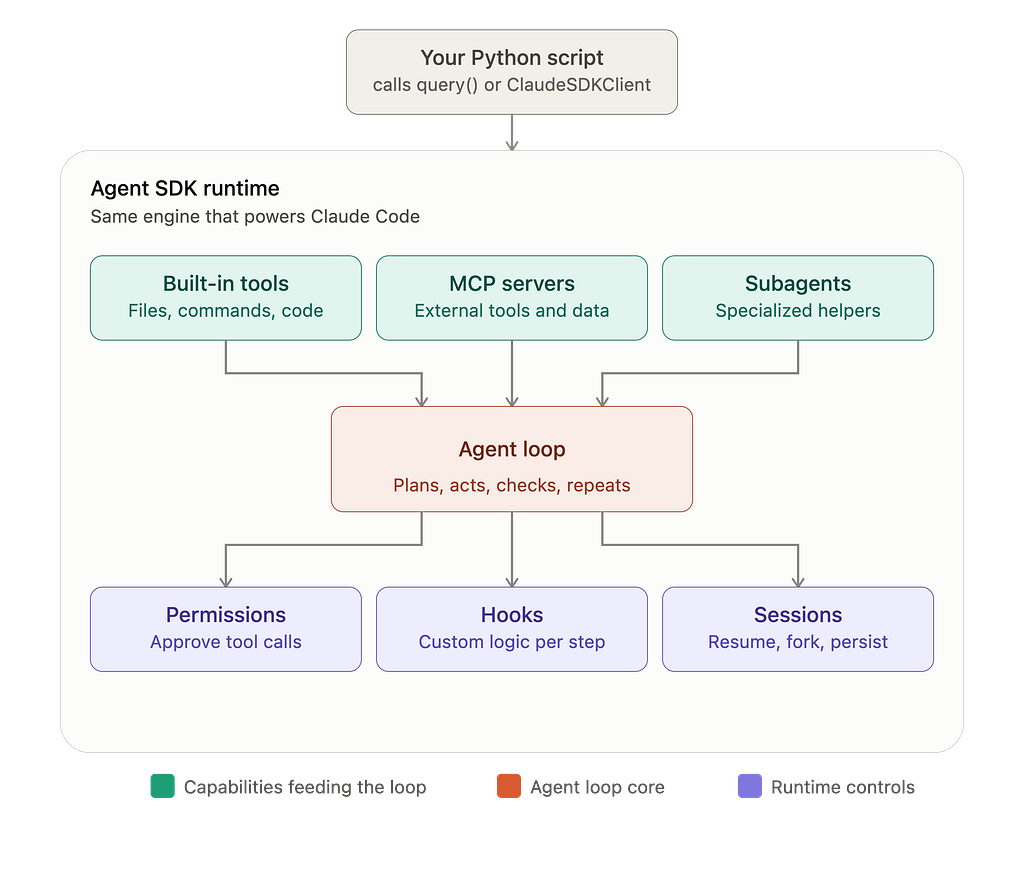
The architecture, before you write any code
It helps to see the whole picture before diving into syntax. Your script calls into the SDK runtime, which sits on three capability modules feeding a central agent loop, governed by three runtime controls:
Feeding the loop:
- Built-in tools — read/write files, run shell commands, edit code
- MCP servers — connect external tools and data sources via the Model Context Protocol
- Subagents — specialized helper agents spun up for focused subtasks
The core:
- Agent loop — plans the next step, acts by calling a tool, checks the result, and repeats until the task is genuinely done. This loop is the entire difference between a chatbot and an agent: a chatbot stops after one answer, an agent keeps going until the goal is met.
Governing the loop:
- Permissions — control which tool calls run automatically and which need your approval
- Hooks — run your own custom code at key points in the agent’s lifecycle
- Sessions — persist context across exchanges, and let you resume or fork a conversation later
For this tutorial, we’ll only touch the core loop and a basic permission mode — but knowing the full architecture up front means the code below makes sense as an instance of a bigger system, not a black box.
Step 4: Write your first agent
Create a file called agent.py:
python
import asyncio
from claude_agent_sdk import query, ClaudeAgentOptions
async def main():
    options = ClaudeAgentOptions(
        system_prompt="You are a helpful Python coding assistant.",
        permission_mode="acceptEdits",
        cwd="."
    )
    async for message in query(
        prompt="List all the files in this directory and tell me what each one does.",
        options=options
    ):
        print(message)
asyncio.run(main())
Run it:
bash
python agent.py
What just happened? query() starts an agent session, and the SDK streams back messages as Claude works — reading files, reasoning, and responding — the same way Claude Code does, except you’re driving it from your own script instead of a terminal.
A few things worth understanding about this code:
- system_prompt sets the agent’s role — just like a system message in a normal chat API call.
- permission_mode=”acceptEdits” tells the agent it can make file edits without asking you to approve each one. For anything touching production code, you’d want a stricter mode.
- cwd sets which folder the agent can read from and act in. This is your safety boundary — the agent won’t wander outside it.
- Each call to query() starts a fresh session with no memory of earlier calls. If you need a multi-turn conversation, the SDK provides ClaudeSDKClient for that — worth exploring once you’re comfortable with the basics.
Step 5: Give it a real task
The real power shows up when you stop asking it to “answer a question” and start giving it a goal. Try replacing the prompt with something like:
python
prompt="Find any bugs in utils.py and fix them. Explain what you changed and why."
Point it at a file with a genuine bug, and watch it read the file, identify the issue, edit the code, and explain its reasoning — all in one run, without you babysitting each step.
Why this matters for developers right now
This isn’t a toy demo. The Agent SDK ships with built-in tools for reading and writing files, running shell commands, and searching the web, plus support for hooks (custom code at key points in the agent’s lifecycle), subagents (specialized agents for focused subtasks), and MCP (connecting external tools and data sources). It’s the same foundation Anthropic uses internally for Claude Code — which means what you build with it is genuinely production-capable, not a stripped-down sandbox version.
If you’re a developer trying to understand what “AI agents” actually mean beneath the buzzword, this is the most honest way to find out: install the SDK, write twenty lines of code, and watch an agent plan and execute a real task in front of you.
Where to go next
- Explore ClaudeSDKClient for multi-turn, stateful conversations
- Try defining a custom tool with the @tool decorator to extend what your agent can do
- Look into permission modes if you’re planning to run this against real code

Build Your First AI Agent in Python — A Hands-On Guide to the Claude Agent SDK was originally published in Google Developer Experts on Medium, where people are continuing the conversation by highlighting and responding to this story.