
This is a multi-tier web application stack setup to be run locally. The first project will set up the basis for the following projects. This post documents the manual process of the setup, which can be long but will give you a good idea of the flow of information. You can find the automated version as well as the source code here.
IMPORTANT
Some commands require the use of vi or vim. To save some time, here are the basics:
-
:q: quits the program. -
:wq: saves and quits. -
esc: normal mode, when you can save or enter insert mode. -
i: enter insert mode, to paste you can tryctrl + shift + v.
You can check this cheatsheet for more information.
Table of Content
- Stack
- Requirements
- Understanding the process
- Setting up the VM
- First Boot
-
Configuration
- Database
- Setup
- Dependencies
- Services
- MySQL
- Source and Database
- Memcache
- Setup
- Dependencies
- Services
- RabbitMQ
- Setup
- Dependencies
- Services
- Tomcat
- Setup
- Depedencies
- Configuration
- Deployment
- NGINX
- Setup
- Depedencies
- Configuration
- Validation
Stack
- NGINX
- Apache
- RabbitMQ
- Memcached
- MySQL
- Linux
Requirements
- Oracle Virtualbox
- Vagrant and Vagrant plugins
- CLI
Understanding the process
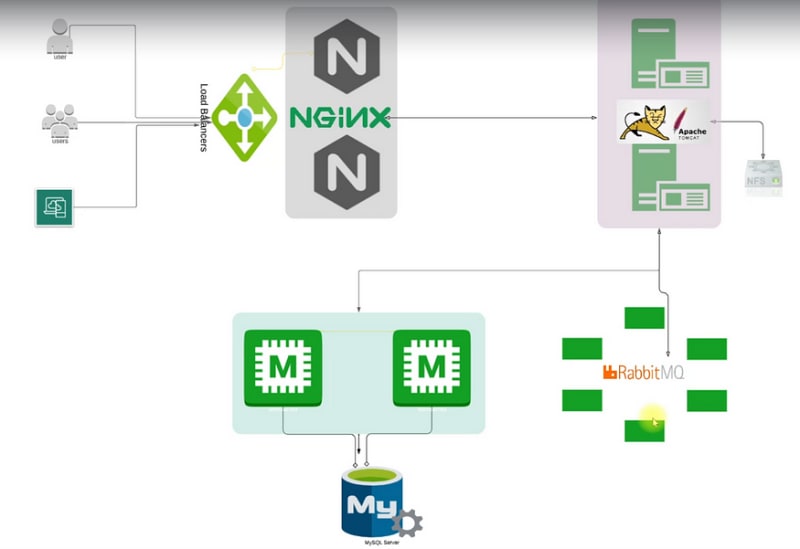
The user will access the web app. It will create a load balancer using NGINX in our server. The requirest will be sent to the Apache Tomcat service.
Apache Tomcat is a Java web application service. RabbitMQ is a service called message broker or queueing agent. It is used to connect one application to another.
RabbitMQ is connected to Tomcat. In this project, we won’t be using it; it is for practice. The user will log in with credentials that will be searched in an SQL database. Before searching, it will use Memcached to cache the database that is connected to the MySQL server.
The first time a request comes, it will be sent from Tomcat to the MySQL database to search for the user credentials, and then it will be cashed by the Memcached cache service.
We’ll be using Vagrant to set up the virtual machines via an automated process. Vagrant will connect to Virtualbox for the virtualization process. Each of these services will have their own virtual machine.
Setting up the VM
First, we will set up the virtual machines. In our working directory, we will create a file called Vagrantfile without any extension. This will be a multi-vm vagrant file with five virtual machines. The contents of the file should be as follow:
Vagrant.configure("2") do |config|
  config.hostmanager.enabled = true
  config.hostmanager.manage_host = true

### Database ####
  config.vm.define "db01" do |db01|
    db01.vm.box = "eurolinux-vagrant/centos-stream-9"
    db01.vm.hostname = "db01"
    db01.vm.network "private_network", ip: "192.168.56.15"
    db01.vm.provider "virtualbox" do |vb|
     vb.memory = "1024"
   end

  end

### Memcache ####
  config.vm.define "mc01" do |mc01|
    mc01.vm.box = "eurolinux-vagrant/centos-stream-9"
    mc01.vm.hostname = "mc01"
    mc01.vm.network "private_network", ip: "192.168.56.14"
    mc01.vm.provider "virtualbox" do |vb|
     vb.memory = "1024"
   end
  end

### RabbitMQ ####
config.vm.define "rmq01" do |rmq01|
    rmq01.vm.box = "eurolinux-vagrant/centos-stream-9"
    rmq01.vm.hostname = "rmq01"
    rmq01.vm.network "private_network", ip: "192.168.56.16"
    rmq01.vm.provider "virtualbox" do |vb|
     vb.memory = "1024"
   end
  end

### Tomcat ###
   config.vm.define "app01" do |app01|
    app01.vm.box = "eurolinux-vagrant/centos-stream-9"
    app01.vm.hostname = "app01"
    app01.vm.network "private_network", ip: "192.168.56.12"
    app01.vm.provision "shell", path: "tomcat.sh"
    app01.vm.provider "virtualbox" do |vb|
     vb.memory = "1024"
   end
   end

### NGINX ###
  config.vm.define "web01" do |web01|
    web01.vm.box = "ubuntu/jammy64"
    web01.vm.hostname = "web01"
    web01.vm.network "private_network", ip: "192.168.56.11"
    web01.vm.provider "virtualbox" do |vb|
     vb.gui = true
     vb.memory = "1024"
   end
end

end
Each VM is configured to use 1 GB of RAM, and the minimum should be around 800 MB. All of them have a specific IP assigned, and the web app will be deployed to the web01 IP address. Almost all of them will be running Centos Stream 9, while only the NGINX is an Ubuntu machine.
We will use the Vagrant Host Manager to manage the hostname and IP addresses of the VMs.
Before continuing, make sure to install the host manager previously mentioned. You can install it by running vagrant plugin install vagrant-hostmanager. Check their Github for more information.
First Boot
To boot up the machines, run vagrant up on your working directory and wait for the setup to complete. As we are using provisioning to automate scripts, it can take some time. If the Ubuntu virtual box pops up, minimize it, DO NOT CLOSE IT.
To make sure all VMs are working, run vagrant status, and it should list the five machines with running (virtualbox) as the status.
Let’s ssh into the first one, called db01, and check the host file. For this, run vagrant ssh db01, then run cat /etc/hosts, and it should display all VMs and IPs.
[vagrant@db01 ~]$ cat /etc/hosts
127.0.0.1   localhost localhost.localdomain localhost4 localhost4.localdomain4
::1         localhost localhost.localdomain localhost6 localhost6.localdomain6
127.0.1.1 db01 db01

## vagrant-hostmanager-start
192.168.56.14   mc01
192.168.56.15   db01
192.168.56.12   app01
192.168.56.11   web01
192.168.56.16   rmq01

## vagrant-hostmanager-end
We can ping one machine from another to test if all are connected and can see each other. We run ping web01 -c 3 from another VM. Here we are pining the web01 VM to check if we can see it. To access any specific VM, run vagrant ssh db01 or the name of any machine. This should be done for every VM in order to ensure they are all working.
A successful ping would be:
[vagrant@db01 ~]$ ping web01 -c 3
PING web01 (192.168.56.11) 56(84) bytes of data.
64 bytes from web01 (192.168.56.11): icmp_seq=1 ttl=64 time=1.12 ms
64 bytes from web01 (192.168.56.11): icmp_seq=2 ttl=64 time=0.664 ms
64 bytes from web01 (192.168.56.11): icmp_seq=3 ttl=64 time=0.585 ms

--- web01 ping statistics ---
3 packets transmitted, 3 received, 0% packet loss, time 2003ms
rtt min/avg/max/mdev = 0.585/0.790/1.122/0.236 ms
Now that we know that all the VMs can talk to each other, we can move to the configuration of each VM.
The following section is long and full of commands
Configuration
Now we are going to configure each independent VM.
Database
First, let’s ssh into the VM by running vagrant ssh db01 (db01 is the name of this particular VM). Then change to the sudo user and run sudo -i. Note that this is the first thing we’ll do in every VM.
Setup
Once as sudo, we’ll update the system and also install the EPEL repo (EPEL stands for Extra Packages for Enterprise Linux). To do this run yum update -y && yum install epel-release -y.
Dependencies
We’ll install MariaDB and git into this VM. Run yum install git mariadb-server -y.
Services
Let’s start and enable the services. To do so, run the following commands: ‘ systemctl start mariadbandsystemctl enable mariadb. Now let's check the status to see if we successfully started and enabled the service. Runsystemctl status mariadb`, which should be green and active.
MySQL
Now we are going to configure the MySQL database. It will ask a few questions. To keep it short, here are my answers.
- Set root password? [Y/n] Y
- New password: admin123
- Remove anonymous users? [Y/n] Y
- Disallow root login remotely? [Y/n] n
- Remove test database and access to it? [Y/n] Y
- Reload privilege tables now? [Y/n] Y
Now, we are going to finish the setup for the database. Access MySQL by running mysql -u root -padmin123. And run the following commands:
mysql> create database accounts;

mysql> grant all privileges on accounts.* TO 'admin'@’%’ identified by 'admin123' ;

mysql> FLUSH PRIVILEGES;

mysql> exit;
Source and Database
Clone this repo by running git clone -b main https://github.com/dariusbarbus/vprofile-project.git. cd into the folder and run the following commands, first mysql -u root -padmin123 accounts < src/main/resources/db_backup.sql and second mysql -u root -padmin123 accounts.
Memcache
Setup
Let's start by updating the system and installing EPEL, as before ,with the command yum update -y && yum install epel-release -y.
Dependencies
We'll install only memcached in this VM by running yum install memcached -y.
Services
Start the service and check its status by running:
sudo systemctl start memcached

sudo systemctl enable memcached
And after that run:
sed -i 's/127.0.0.1/0.0.0.0/g' /etc/sysconfig/memcached

sudo systemctl restart memcached
Again, check the status with systemctl status memcached.
RabbitMQ
Setup
You know the drill, update the system by running yum update -y && yum install epel-release -y.
Dependencies
So far, we have been using yum to manage package installation on our Centos machine. There's another package manager called dnf. It is to be a more modern version introduced in Fedora to replace yum.
We are going to use it now for a few things.
First, install RabbitMQ and Wget by running dnf -y install centos-release-rabbitmq-38 wget. Then, enable the RabbitMQ repo via dnf --enablerepo=centos-rabbitmq-38 -y install rabbitmq-server.
Services
Start the rabbit server service by running systemctl enable --now rabbitmq-server. Check the status with systemctl status rabbitmq-server.
Now do a little configuration by running:
sh -c 'echo "[{rabbit, [{loopback_users, []}]}]." > /etc/rabbitmq/rabbitmq.config'

rabbitmqctl add_user test test

rabbitmqctl set_user_tags test administrator
And restart the server with systemctl restart rabbitmq-server. Don't forget to always check the status.
Tomcat
Setup
Update the system and install EPEL with yum update -y && yum install epel-release -y.
Dependencies
We are going to install the Java SDK as well as git, Maven ,and Wget by running dnf -y install java-11-openjdk java-11-openjdk-devel git maven wget.
Configuration
Start by moving into the temp directory with cd /tmp/. From there, download the tar file of Tomcat with wget https://archive.apache.org/dist/tomcat/tomcat-9/v9.0.75/bin/apache-tomcat-9.0.75.tar.gz and extract it with tar xzvf apache-tomcat-9.0.75.tar.gz.
Add the Tomcat user, copy some data, and change the ownership of a folder, all with the following:
useradd --home-dir /usr/local/tomcat --shell /sbin/nologin tomcat

cp -r /tmp/apache-tomcat-9.0.75/* /usr/local/tomcat/

chown -R tomcat.tomcat /usr/local/tomcat
Create a file called tomcat.service that will setup the systemctl to work with Tomcat. Start by runnin vi /etc/systemd/system/tomcat.service to create the file and populate it with the following:
[Unit]
Description=Tomcat

After=network.target

[Service]
User=tomcat

WorkingDirectory=/usr/local/tomcat

Environment=JRE_HOME=/usr/lib/jvm/jre

Environment=JAVA_HOME=/usr/lib/jvm/jre

Environment=CATALINA_HOME=/usr/local/tomcat

Environment=CATALINE_BASE=/usr/local/tomcat

ExecStart=/usr/local/tomcat/bin/catalina.sh run

ExecStop=/usr/local/tomcat/bin/shutdown.sh

SyslogIdentifier=tomcat-%i

[Install]
WantedBy=multi-user.target
Reload the systemd files with systemctl daemon-reload, then systemctl start tomcat to start the service, and systemctl enable tomcat. Don't forget to check the status.
Deployment
Clone this repo git clone -b main https://github.com/dariusbarbus/vprofile-project.git and cd into the folder. If you have made any modification during the setup, like using a different password for MySQL, you have to edit src/main/resources/application.properties.
Now, install Maven by running mvn install,we are still inside the vprofile directory.
For the few final steps, stop the tomcat service with systemctl stop tomcat. Remove the ROOT directory and replace it with the VProfile one.
rm -rf /usr/local/tomcat/webapps/ROOT*

cp target/vprofile-v2.war /usr/local/tomcat/webapps/ROOT.war
Start the Tomcat service systemctl start tomcat and check the status systemctl status tomcat.
Give the tomcat.tomcat user ownership with chown tomcat.tomcat usr/local/tomcat/webapps -R and restart the service with systemctl restart tomcat.
NGINX
Because this machine is Ubuntu-based and not Centos, the commands will change.
Setup
To update the system, run apt update && apt upgrade -y.
Dependencies
Install NGINX by running apt install nginx -y.
Configuration
Create a vproapp file by running vi /etc/nginx/sites-available/vproapp and populate it with:
upstream vproapp {

  server app01:8080;

}

server {

  listen 80;

  location / {

    proxy_pass http://vproapp;

  }

}
Remove the default website, create a symbolic link, and restart the service.
rm -rf /etc/nginx/sites-enabled/default

ln -s /etc/nginx/sites-available/vproapp /etc/nginx/sites-enabled/vproapp

systemctl restart nginx
Validation
The deployment of the web app is also automatic.
Now that we have our web app deployed, we need to test it. For that, go to 192.168.56.11, the IP address of the web01 VM. It should show the following login screen.

To log in, use the username admin_vp and the password admin_vp. And after that, you are into the VProfile web app.
This is the screen once you log in.
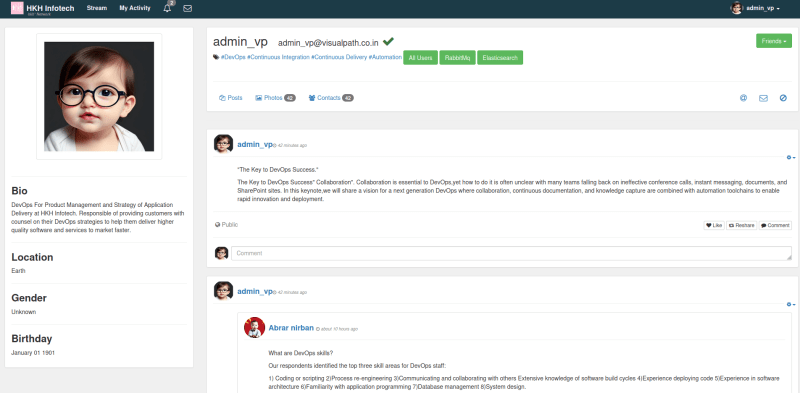
Now you should have the project running locally in your machine.
This project was based on hkhcoder VProfile Project.
Thank you for reading.


I’m sure it is the most vital information for me personally. And i am glad reading your article. But should remark on few general things, Your website style is ideal, the articles really is excellent : D. Good job, cheers