
What you will find in this article?

Product onboarding is super crucial for the first user experience. Building a captivating onboarding experience can be a key factor in the success of your product. As onboarding lead users to value. Ideally.
So, it took me couple of days to figure out, research and found out what is the perfect onboarding for project I am building.
This tutorial walks you through how to create an effective and beautiful onboarding process using Next.js, Framer Motion and Tailwind CSS.
- What steps to include in onboarding
- Where to find the onboarding examples from other projects.
- Framer Motion in action
Papermark – the first dynamic open-source alternative to DocSend.
Just a quick background about us. Papermark is the dynamic open-source alternative to DocSend. We basically help to manage secure document sharing, including real-time analytics. All of it is open-source.
I would be super happy if you could give us a star! And let me know in the comments ❤️
https://github.com/mfts/papermark

Setting up Next.js with TypeScript and Tailwindcss
We are using create-next-app to generate a new Next.js project. We’ll also be using TypeScript and Tailwind CSS, so we’ll select those options when prompted.
npx create-next-app

# ---
# you'll be asked the following prompts
What is your project named?  my-app
Would you like to add TypeScript with this project?  Y/N
# select `Y` for typescript
Would you like to use ESLint with this project?  Y/N
# select `Y` for ESLint
Would you like to use Tailwind CSS with this project? Y/N
# select `Y` for Tailwind CSS
Would you like to use the `src/ directory` with this project? Y/N
# select `N` for `src/` directory
What import alias would you like configured? `@/*`
# enter `@/*` for import alias
Onboarding Best Practises
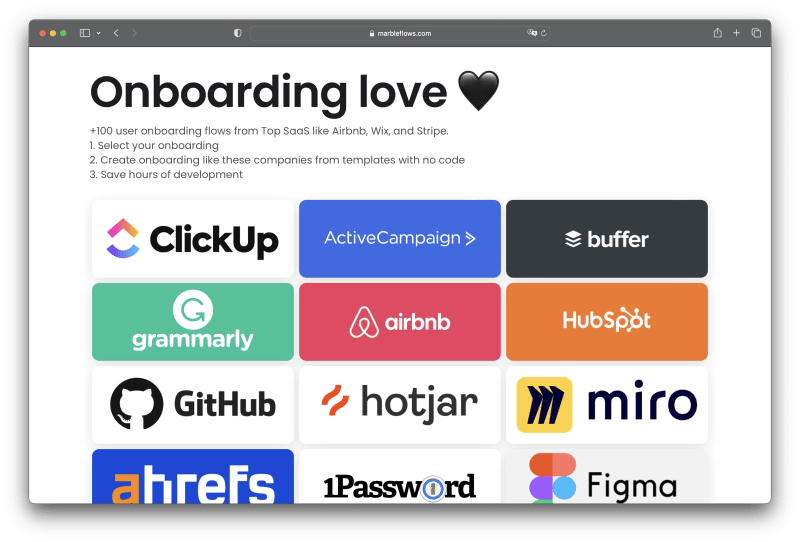
I found full examples of different onboarding flows on Onboarding Love.
Define what is the value for my product where I want to bring users.
Value for user: to see the analytics on shared document. So I need to bring them as close as possible to it during the onboaridng.
Building onboarding
Are you ready to jump in? Here’s a breakdown of the steps we will go through in this article:
- Step: Welcome Window
- Step: Questionnaire about Document Type
- Step: Document Upload
- Step: Create and Share Link
- Step: Celebrate with Confetti!
In each step, I’ll provide you with the corresponding code so you can follow along, learn, and maybe even build your own onboarding process! Don’t worry, you don’t need to be an expert in Next.js, Framer Motion or Tailwind CSS. I’ll guide you through every step of the way.
Step 1: Welcome Window
After successful signup, present users with a welcome window. This includes a brief animated gif and description oon Papermark. I used Next.js for rendering and controlling this window and animations can be managed using a library like Framer Motion.
// components/welcome/intro.tsx
import { motion } from "framer-motion";
import STAGGER_CHILD_VARIANTS from "./stagger-variants";

export default function Intro() {

  return (
    <motion.div
      className="z-10"
      exit={{ opacity: 0, scale: 0.95 }}
      transition={{ duration: 0.3, type: "spring" }}
    >
      <motion.div
        variants={{
          show: {
            transition: {
              staggerChildren: 0.2,
            },
          },
        }}
        initial="hidden"
        animate="show"
        className="[...]"
      >
        <motion.h1
          className="[...]"
          variants={STAGGER_CHILD_VARIANTS}
        >
          Welcome to Papermark
        motion.h1>
        <motion.p
          className="max-w-md text-gray-200 transition-colors sm:text-lg"
          variants={STAGGER_CHILD_VARIANTS}
        >
          Papermark gives you the power to share documents with your clients and see analytics on how they interact with them.
        motion.p>
        <motion.button
          variants={STAGGER_CHILD_VARIANTS}
          className="[...]"
        >
          Get Started
        motion.button>
      motion.div>
    motion.div>
  );
}

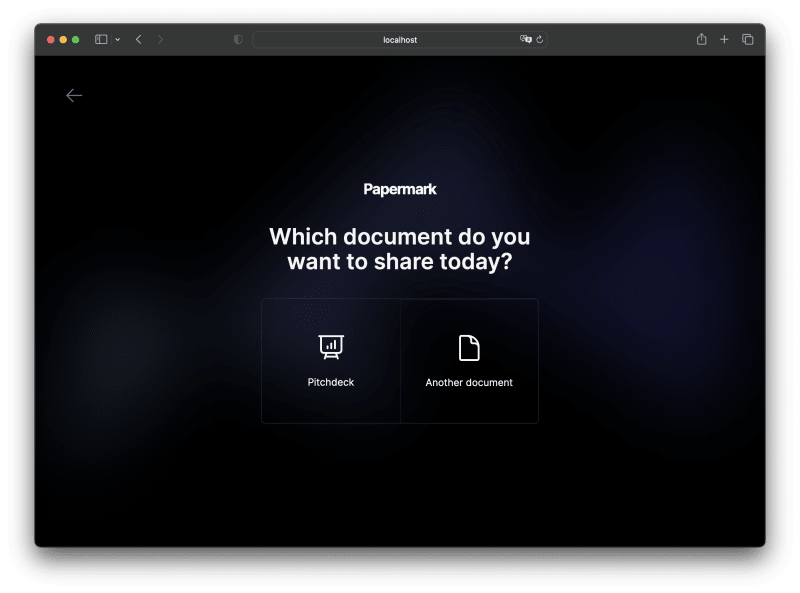
Step 2: Questionnaire about Document Type
The next step is one question questionnaire to understand the type of documents the user intends to upload.
I think it is a good practise to ask a questions users. But dont over do it.
This information can be valuable for customizing their experience or for analytical purposes. Tailwind CSS can be used to create a simple and visually appealing form for this step.
// components/welcome/questionnaire.js
import { motion } from "framer-motion";
import STAGGER_CHILD_VARIANTS from "./stagger-variants";

export default function Next() {
  return (
    <motion.div
      className="[...]"
      variants={{
        hidden: { opacity: 0, scale: 0.95 },
        show: {
          opacity: 1,
          scale: 1,
          transition: {
            staggerChildren: 0.2,
          },
        },
      }}
      initial="hidden"
      animate="show"
      exit="hidden"
      transition={{ duration: 0.3, type: "spring" }}
    >
      <motion.div
        variants={STAGGER_CHILD_VARIANTS}
        className="flex flex-col items-center space-y-10 text-center"
      >
        <p>Papermarkp>
        <h1>Which document do you want to share today?h1>
      motion.div>
      <motion.div
        variants={STAGGER_CHILD_VARIANTS}
        className="..."
      >
        <button>
          <PresentationChartBarIcon />
          <span>Pitchdeckspan>
        button>
        <button>
          <DocumentIcon />
          <span>Another documentspan>
        button
      motion.div>
    motion.div>
  );
}
Step 3: Upload Document
The core functionality of my app is turning a document into a sharable link, so in onboarding I would like users to submit document.
Guide the user to upload their first document. You can create a simple upload interface using Next.js. Once the document is uploaded, store the document in the database.
// components/welcome/upload.tsx
import { motion } from "framer-motion";
import { useState } from "react";
import DocumentUpload from "../document-upload";
import STAGGER_CHILD_VARIANTS from "./stagger-variants";

export default function Upload() {
  const [currentFile, setCurrentFile] = useState<File | null>(null);

  const handleSubmit = async (event: any) => {
    event.preventDefault();

    // handle the file upload here
  };

  return (
    <>
     <motion.div
       className="z-10 flex flex-col space-y-10 text-center"
       variants={{
         hidden: { opacity: 0, scale: 0.95 },
         show: {
           opacity: 1,
           scale: 1,
           transition: {
             staggerChildren: 0.2,
           },
         },
       }}
       initial="hidden"
       animate="show"
       exit="hidden"
       transition={{ duration: 0.3, type: "spring" }}
     >
       <motion.div
         variants={STAGGER_CHILD_VARIANTS}
         className="flex flex-col items-center space-y-10 text-center"
       >
         <h1 className="[...]">
           Upload your document
         h1>
       motion.div>
       <motion.div variants={STAGGER_CHILD_VARIANTS}>
         <main className="mt-8">
           <form
             encType="multipart/form-data"
             onSubmit={handleSubmit}
             className="flex flex-col"
           >
             <DocumentUpload
               currentFile={currentFile}
               setCurrentFile={setCurrentFile}
             />

             <div className="flex justify-center">
               <button type="submit">Upload Documentbutton>
             div>
           form>
         main>
       motion.div>
     motion.div>

  );
}

Step 4: Shareable link is ready.
After the document upload, I prompt the user to share a unique shareable link for their document. As soon as they sahre it they get to value. You can use a UUID package to generate a unique identifier for each document uploaded.
Extra: Add a celebration
Finally, you can celebrate the user’s successful onboarding with a small animation, such as a confetti shower. This can be implemented using a library like react-confetti.
And bring the user into the core application, like a dashboard.
// pages/celebrate.tsx
import Confetti from 'react-dom-confetti';

export default const EndOnboarding = () => {
  const [celebrate, setCelebrate] = useState<boolean>(false);

  return (
    <div>
      <Confetti active={celebrate} />
      <button onClick={() => setCelebrate(true)}>Celebrate!button>
    div>
  );
};
Conclusion
Wuhuuu this is the onboarding!
It’s important to rely on best practice and other product onboarding flows. This one is inspired by dub.sh‘s welcome journey.
With the help of Next.js, Framer Motion, and Tailwind CSS, we’ve created an engaging and user-friendly onboarding experience for Papermark.
Thank you for reading. I am Marc, an open-source enthusiast. I am building papermark.io – the dynamic open-source alternative to DocSend.
Happy coding, friends!
Looking at stars ⭐️
If this article helped you better understand how to create an onboarding experience with Next.js, Framer Motion and Tailwind CSS, please give us a star! And let me know your thoughts in the comments. ❤️
https://github.com/mfts/papermark