
Blogging as a technical expertise or professional is one way to validate our skills, share knowledge with others, and also grow ourself in any technical field. Most times setting up a blog might be so burdensome, especially when considering the tech stacks to use so as to keep it simple.
What we will be building
In this article, we will be learning how to set up a simple Jamstack blog using Xata, Cloudinary, react-markdown, and Netlify. We will be utilizing the power of Jamstack and some serverless technologies to achieve our goal.
Here is the source code for the working application.
Prerequisites and what to do
- Set up our Xata account.
- Set up our Cloudinary account.
- Set up our application using Next.js and Chakra UI.
- Basic Knowledge of JavaScript, React, or Next.js.
Setting up Xata and creating our first database table
Xata is a Serverless Data Platform. We can think of it as the combination of a serverless relational database, a search engine, and an analytics engine, all behind a single consistent API. It has first-class support for branches, a workflow for zero-downtime schema migrations, as well as support for edge caching.
To set up Xata, we first need an account. We can either use the SDK for our development or the REST API generated for our table to interact with Xata. For the purpose of this article, we will be using the Xata SDK for our development.
- Go to Xata and signup to get access.
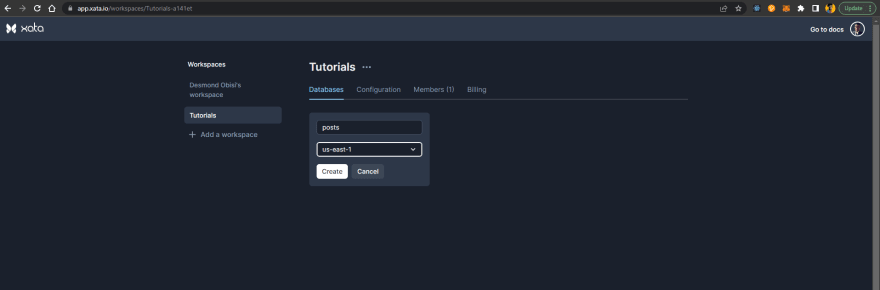
- We login to our account and create a workspace. We can create as many workspaces as we want depending on our subscription plan.
- Create a database inside the workspace as shown below:

- Proceed to create a table and add our table items or data. We can specify data types for each item in our table depending on what we will store in them.
Our table items for the blog post are:
    title - string
    body - string
    image - string (we will be storing the image url here from cloudinary)
    tags - multiselect (this accepts array of data)

Creating Cloudinary account for our image transformation
Cloudinary is a tool that helps with the transformation of images and videos to load faster with no visual degradation, automatically generates an image and video variants, and delivers high-quality responsive experiences to increase conversions. Whatever media optimizations we need for better performance in our applications can be achieved with this tool.
To set up our Cloudinary, we also have to create an account and get our cloud space on Cloudinary. We can access Cloudinary in many ways too using APIs or SDKs. Cloudinary offers its SDKs in different languages so feel free to explore it outside Jamstack as well. For the purpose of this article, we will be using the API from our Cloudinary cloud to generate social cards for our blog posts. No need to open Figma or other design tools every time, Cloudinary got you!
- Go to Cloudinary and sign up to get access to a cloud.
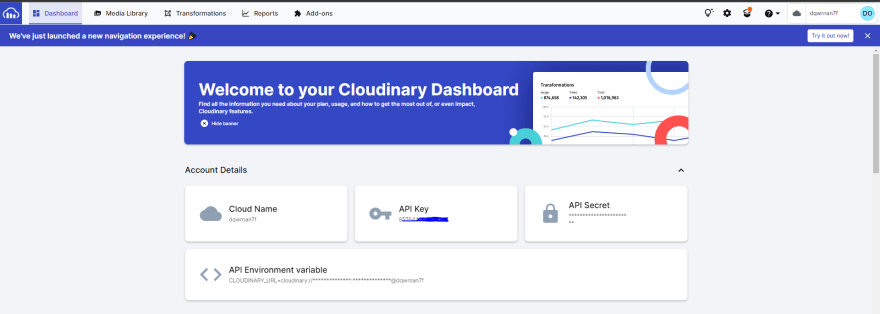
- We will login and confirm we can see our dashboard with information like cloudname, API Keys etc. We will be needing them later.
Create Next JS app and connect Xata SDK
To set up a Next.js App, we run either of the following commands depending on our preference
    npx create-next-app@latest
     or
    yarn create next-app
     or
    pnpm create next-app
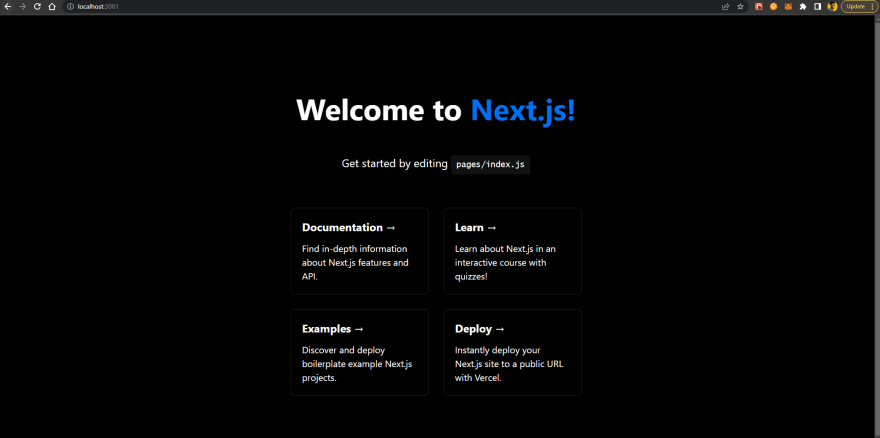
After the setup, we will run this command to start the application.
npm run dev
We should get a screen like this:
Now we have our application up and running, let’s get to the real deal. We will be initializing the Xata SDK and writing a function that uses our cloudname and image public id on Cloudinary to generate a social card for our blog posts.
Setting up APIs to interact with our Xata DB
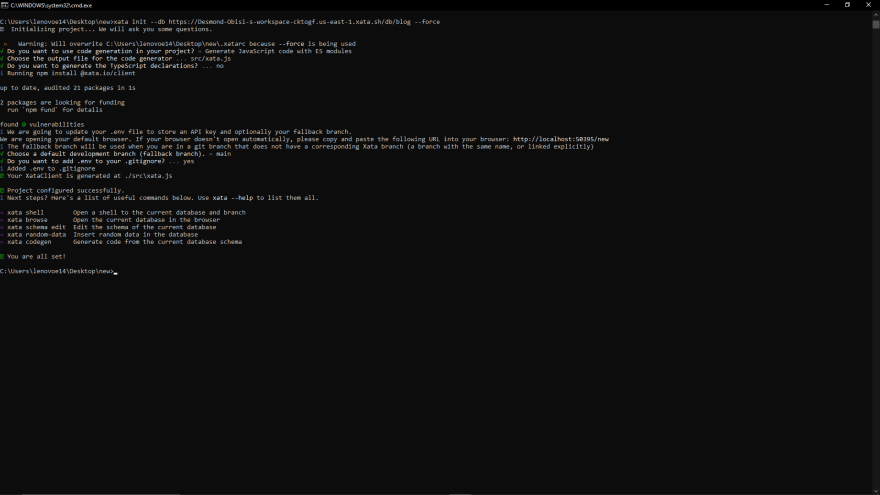
- Firstly we open our terminal and run these commands in our root directory and project directory respectively
    - Install the Xata CLI

    npm install @xata.io/cli -g

     or

    npm install @xata.io/client@latest

    - Initialize your project locally with the Xata CLI

    xata init --db https://-cktogf.us-east-1.xata.sh/db/
-
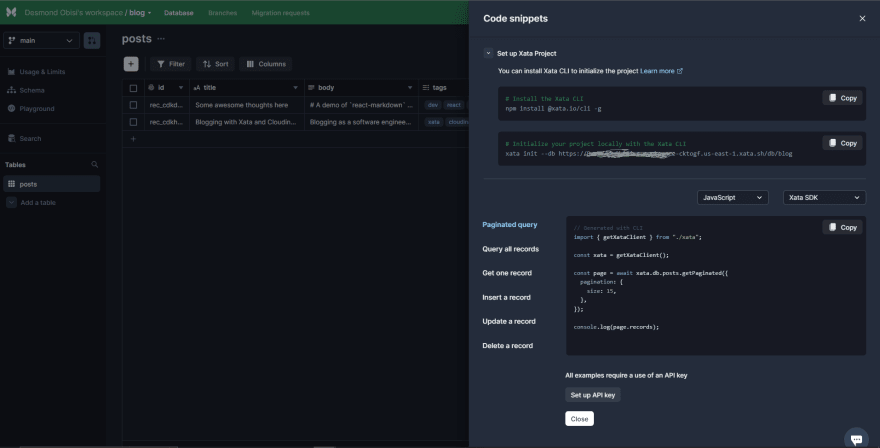
These commands can easily be copied from our database UI in Xata. See an example below:
-
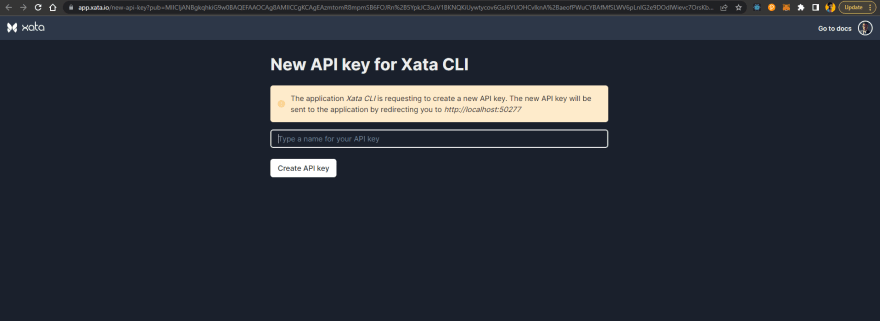
The last command will ask for some configurations according to our preference before it goes ahead to install the SDK. Also, it will trigger a window so we can connect our API key automatically to our project. See the example here:

Now we are all set to start using Xata in our project!
Social Image Generation for our Blog with Cloudinary
Now, let’s set up our serverless function for image transformation using Cloudinary.
- First, we need our cloudname, a card design that contains either our brand or whatever we want to use and identify with as our social card, and a space where we will overlay text automatically using Cloudinary function. In other words, once anybody sees this social card, they know the owner of the articles.
- We can get design inspiration from this article or this Figma design. Below is my default social card and the upload to Cloudinary. The image can be our logo, brand image, or anything we want to be our brand.
- Go to our project directory, create a directory component and create a file
GenerateImage.js - Paste the following code inside the file

    function cleanText(text) {
        return encodeURIComponent(text).replace(/%(23|2C|2F|3F|5C)/g, '%25$1');
    }

    /**
     * Generates a social sharing image with custom text using Cloudinary’s APIs.
     *
     * @see https://cloudinary.com/documentation/image_transformations#adding_text_captions
     *
     */
    export default function generateSocialImage({
        title,
        tagline,
        cloudName,
        imagePublicID,
        cloudinaryUrlBase = 'https://res.cloudinary.com',
        titleFont = 'righteous',
        titleExtraConfig = '',
        taglineExtraConfig = '',
        taglineFont = 'caveat',
        imageWidth = 1280,
        imageHeight = 669,
        textAreaWidth = 760,
        textLeftOffset = 480,
        titleGravity = 'south_west',
        taglineGravity = 'north_west',
        titleLeftOffset = null,
        taglineLeftOffset = null,
        titleBottomOffset = 254,
        taglineTopOffset = 445,
        textColor = 'FFFFFF',
        titleColor,
        taglineColor,
        titleFontSize = 64,
        taglineFontSize = 48,
        version = null,
    }) {
        // configure social media image dimensions, quality, and format
        const imageConfig = [
            `w_${imageWidth}`,
            `h_${imageHeight}`,
            'c_fill',
            'q_auto',
            'f_auto',
        ].join(',');

        // configure the title text
        const titleConfig = [
            `w_${textAreaWidth}`,
            'c_fit',
            `co_rgb:${titleColor || textColor}`,
            `g_${titleGravity}`,
            `x_${titleLeftOffset || textLeftOffset}`,
            `y_${titleBottomOffset}`,
            `l_text:${titleFont}_${titleFontSize}${titleExtraConfig}:${cleanText(
                title,
            )}`,
        ].join(',');

        // configure the tagline text
        const taglineConfig = tagline
            ? [
                `w_${textAreaWidth}`,
                'c_fit',
                `co_rgb:${taglineColor || textColor}`,
                `g_${taglineGravity}`,
                `x_${taglineLeftOffset || textLeftOffset}`,
                `y_${taglineTopOffset}`,
                `l_text:${taglineFont}_${taglineFontSize}${taglineExtraConfig}:${cleanText(
                    tagline,
                )}`,
            ].join(',')
            : undefined;

        // combine all the pieces required to generate a Cloudinary URL
        const urlParts = [
            cloudinaryUrlBase,
            cloudName,
            'image',
            'upload',
            imageConfig,
            titleConfig,
            taglineConfig,
            version,
            imagePublicID,
        ];

        // remove any falsy sections of the URL (e.g. an undefined version)
        const validParts = urlParts.filter(Boolean);

        // join all the parts into a valid URL to the generated image
        return validParts.join('/');
    }
So from this code sample, we will be needing our cloudname and our custom image public id (we will upload it from our account on Cloudinary. It’s quite straightforward to generate our social cover image. Other optional config items are fonts for our blog title and taglines. There are defaults for them in the function but we can override them wherever we call the function by passing it as a parameter. We will see this in our CreateModal component later, how we will automatically overlay text on our design image and transform it each time we create a blog post.
We are all set for our Cloudinary image transformation set-up!
Building our CRUD APIs and Interfaces using Next.js and Chakra UI
We are getting closer to our final product. Next, we will be writing CRUD (Create, Read, Update, Delete) functions we will use to interact with our Xata DB and then present the data on the user interface.
For our user interface, we will be using Next.js and Chakra UI, our APIs will be stored in the Next.js api directory, and our dynamic pages in the pages directory.
Our APIs for Interacting with Xata are as follows:
    import { getXataClient } from '../../src/xata.js'

    const xata = getXataClient()

    // allpost.js. API to get/read all our blog posts
    export default async function getAllXata(req, res) {
        const records = await xata.db.posts.getAll();
        return res.json({
            ok: true,
            posts: records
        })
    }

    // create.js. API to get create our blog posts
    export default async function createToXata(req, res) {
        let posts = req.body
        await xata.db.posts.create(posts)
        res.json({
            ok: true,
        })
    }

    // update.js. API to update a blog post
    export default async function updateToXata(req, res) {
        let id = req.body.id
        let post = {
            title: req.body.post.title,
            body: req.body.post.body,
            image: req.body.post.image,
            tags: req.body.post.tags
        }
        console.log(id, post)
        await xata.db.posts.update(id, post);
        res.json({
            ok: true,
        })
    }

    //post.js API to read one post
    export default async function getOneXata(req, res) {
        let id = req.query
        console.log(id)
        const record = await xata.db.posts.read(id);
        return res.json({
            ok: true,
            post: record
        })

    }

    //delete.js API to delete a blog post
    const deleteItem = async (id) => {
      return await xata.db.posts.delete(id)
    }
    export default async function deleteFromXata(req,res) {
      const { id } = req.body
      await deleteItem(id)
      res.json({
        ok: true,
      })
    }
We can also get these codes from our Xata workspace according to the image below:
To start designing our user interface, we will install chakra-ui, chakra-ui/icons, react-icons, react-markdown and react-tostify. We will use Chakra UI and React Icons libraries to build the user interfaces of our application, React Markdown to allow markdown in our blog textarea field and React Toastify to show updates to user when they make any API call.
    - Using NPM
    npm i @chakra-ui/react @chakra-ui/icons @emotion/react @emotion/styled framer-motion react-icons react-markdown react-toastify

    - Using Yarn
    yarn add @chakra-ui/react @chakra-ui/icons @emotion/react @emotion/styled framer-motion react-icons react-markdown react-toastify
Then we will wrap our App with providers from chakra-ui and also pass react-toastify to our App body as shown below:
    import { ChakraProvider } from '@chakra-ui/react'
    import {ToastContainer} from 'react-toastify'
    import "react-toastify/dist/ReactToastify.min.css";


    function MyApp({ Component, pageProps }) {
      return (


      )
    }

    export default MyApp
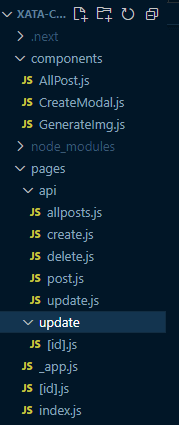
We will proceed to create our pages inside the pages directory. We will be updating the index.js page and creating two dynamic routed pages: one in the pages/[id].js directory and another in the page/update/[id].js directory which is a sub directory to pages as shown in the previous application tree.
So we can access https://appurl/id and https://appurl/update/id when we want to view a single blog post and update a blog post respectively. Read more about dynamic routing in Next.js here
For our pages/index.js file, we will use this code below:
import { useState, useEffect } from 'react'
import CreatePost from '../components/CreateModal'
import { FaGithub } from 'react-icons/fa'
import { Icon, ButtonGroup, Text, Spacer, Link } from '@chakra-ui/react'
import AllPosts from '../components/AllPost'
export default function Home() {
const [posts, setPosts] = useState([])
useEffect(() => {
const getData = async () => {
await fetch('/api/allposts', {
method: 'GET',
}).then((response) => response.json())
.then((data) => setPosts(data.posts));
}
getData();
}, [])
return (
<>
Blog with Xata and Cloudinary
)
}
For our pages/[id].js file, we will use this code below:
import { useRouter } from 'next/router'
import { Box, Image, Text, Icon, Link, Container, Spinner, Alert, AlertDescription, AlertIcon, AlertTitle } from '@chakra-ui/react'
import { FaGithub } from 'react-icons/fa'
import ReactMarkdown from 'react-markdown'
import remarkGfm from 'remark-gfm'
import rehypeHighlight from 'rehype-highlight'
import rehypeRaw from 'rehype-raw'
import rehypeSanitize from 'rehype-sanitize'
import useSWR from 'swr'
const fetcher = (...args) => fetch(...args).then((res) => res.json())
const PostDetails = () => {
const router = useRouter();
const { id } = router.query;
console.log({ router });
//Getting data from xata using swr
const { data, error } = useSWR(`/api/post?id=${id}`, fetcher)
if (error) return (
Error!
Failed to Load.
)
if (!data) return
Blog with Xata and Cloudinary
{post.body}
)
}
export default PostDetails
We used SWR (stale-while-revalidate) to fetch our data because it is an easier way to handle fetching data at the request time in Next.js. The team behind Next.js has created a React hook for data fetching called SWR. It is highly recommended if you’re fetching data on the client side. It handles caching, revalidation, focus tracking, refetching at intervals, and more. Read more about it here.
For our pages/update/[id].js file, we will use this code below:
import { useState, useEffect } from 'react'
import { useRouter } from 'next/router'
import {
Button,
Textarea,
Input,
FormControl,
FormLabel,
Container,
Text,
Spacer,
Icon,
Link,
Spinner,
Alert,
AlertDescription,
AlertIcon,
AlertTitle
} from '@chakra-ui/react'
import { FaGithub } from 'react-icons/fa'
import { toast } from 'react-toastify'
import generateSocialImage from '../../components/GenerateImg'
import useSWR from 'swr'
const fetcher = (...args) => fetch(...args).then((res) => res.json())
const UpdatePost = () => {
const [title, setTitle] = useState('');
const [body, setBody] = useState('');
const [tags, setTags] = useState('');
const router = useRouter();
const { id } = router.query;
//Get data from xata db
const { data, error } = useSWR(`/api/post?id=${id}`, fetcher)
if (error) return (
Error!
Failed to Load.
)
if (!data) return
Blog with Xata and Cloudinary
Post Title
{ setTitle(e.target.value) }} />
Post Tags
{ setTags(e.target.value) }} />
Post Body