One of our DevRel initiatives at Directus is constantly improving our documentation. As a small team with finite time and resources, we rely a lot on user feedback to help guide our writing efforts. But we were missing the most important bit there – your feedback.
What We’re Building
At the time of this post, the Directus Docs runs on VitePress (which in turn is based on Vue.js and Vite). Vitepress is a nice bit of kit for quickly generating a static documentation site, but sadly there’s no built-in feature for gathering user feedback.
So I decided to build my own so our team could make better decisions on where to spend our precious time and attention.
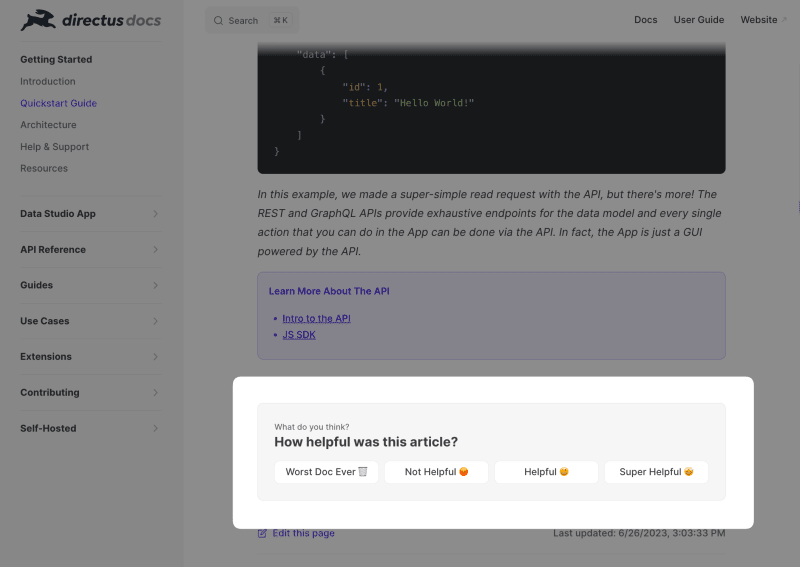
While this project was built in the context of Vitepress, this post will show you how to do it with Vue generally. Here’s what our finished product will look like.
Prerequisites
Before we hop 🐰 in , here’s what you’ll need to follow along:
Knowledge
- Beginner knowledge of Javascript, Typescript, and Vue.js (Composition API)
Tooling
- A Directus instance up and running (either self-hosted or on Directus Cloud)
- A Vue.js project set up (Using Vite is recommended)
Preparing Directus Collection
First off, we’re going to need a place to store all this valuable feedback we’ll be gathering.
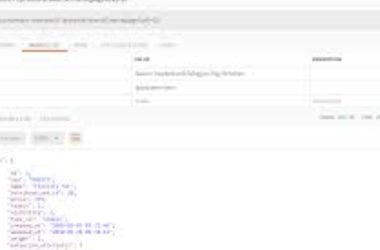
Create a docs_feedback collection with the following data model:
docs_feedback

- id (Type: uuid)
- date_created (Type: Timestamp, Interface: Date/Time)
- url (Type: String, Interface: Input)
- rating (Type: Integer, Interface: Slider)
- title (Type: String, Interface: Input)
- comments (Type: Text, Interface: Textarea)
Creating Vue Component for Article Feedback
Just as if it were the lone dev on a cross-functional team – we’re going to place a lot of different responsibilities on our hard-working little Vue component.
- Rating System: We’ll use a 1 to 4 scale, with each value associated with a different message. These messages will help engage users and guide them through the feedback process.
- Open Ended Feedback: We provide a text area for users to write their thoughts. This is where the gold is. We want users to share their ideas, suggestions, and insights – positive or constructive 😭.
- Posting Data to Directus: The component handles the submission of the feedback to Directus. It constructs the feedback object and makes a POST request to the feedback API endpoint.
Scaffolding the Feedback Component
Create a new file in our components directory named ArticleFeedback.vue . Then copy and paste the following code.
<script setup lang="ts">
script>

<template>
     class="wrapper">
         class="step">


                 class="desc">How can we improve?
                 class="heading">How helpful was this article?