What is this article about?
In this article, you’ll learn how to build a Kanban Board the same as you have in JIRA, Monday and Trello. We will do it with a beautiful drag-and-drop feature using React, Socket.io, and React beautiful DND. Users will be able to sign in, create and update various tasks, and add comments.
Novu – the first open-source notification infrastructure
Just a quick background about us. Novu is the first open-source notification infrastructure. We basically help to manage all the product notifications. It can be In-App (the bell icon like you have in the Dev Community – Websockets), Emails, SMSs and so on.
I would be super happy if you could give us a star! It will help me to make more articles every week 🚀
https://github.com/novuhq/novu
We will also send some awesome swag during Hacktoberfest 😇
What is Socket.io?
Socket.io is a popular JavaScript library that allows us to create real-time, bi-directional communication between web browsers and a Node.js server. It is a highly performant and reliable library optimized to process a large volume of data with minimal delay. It follows the WebSocket protocol and provides better functionalities, such as fallback to HTTP long-polling or automatic reconnection, which enables us to build efficient real-time applications.

How to create a real-time connection with Socket.io & React.js
Here, we’ll set up the project environment for the project. You’ll also learn how to add Socket.io to a React and Node.js application and connect both development servers for real-time communication via Socket.io.
Create the project folder containing two sub-folders named client and server.
mkdir todo-list
cd todo-list
mkdir client server
Navigate into the client folder via your terminal and create a new React.js project.
cd client
npx create-react-app ./
Install Socket.io client API and React Router. React Router is a JavaScript library that enables us to navigate between pages in a React application.
npm install socket.io-client react-router-dom
Delete the redundant files such as the logo and the test files from the React app, and update the App.js file to display Hello World as below.
function App() {
    return (
        <div>
            <p>Hello World!p>
        div>
    );
}
export default App;
Navigate into the server folder and create a package.json file.
cd server & npm init -y
Install Express.js, CORS, Nodemon, and Socket.io Server API.
Express.js is a fast, minimalist framework that provides several features for building web applications in Node.js. CORS is a Node.js package that allows communication between different domains.
Nodemon is a Node.js tool that automatically restarts the server after detecting file changes, and Socket.io allows us to configure a real-time connection on the server.
npm install express cors nodemon socket.io
Create an index.js file – the entry point to the web server.
touch index.js
Set up a simple Node.js server using Express.js. The code snippet below returns a JSON object when you visit the http://localhost:4000/api in your browser.
//👇🏻index.js
const express = require("express");
const app = express();
const PORT = 4000;

app.use(express.urlencoded({ extended: true }));
app.use(express.json());

app.get("/api", (req, res) => {
    res.json({
        message: "Hello world",
    });
});

app.listen(PORT, () => {
    console.log(`Server listening on ${PORT}`);
});
Import the HTTP and the CORS library to allow data transfer between the client and the server domains.
const express = require("express");
const app = express();
const PORT = 4000;

app.use(express.urlencoded({ extended: true }));
app.use(express.json());

//New imports
const http = require("http").Server(app);
const cors = require("cors");

app.use(cors());

app.get("/api", (req, res) => {
    res.json({
        message: "Hello world",
    });
});

http.listen(PORT, () => {
    console.log(`Server listening on ${PORT}`);
});
Next, add Socket.io to the project to create a real-time connection. Before the app.get()block, copy the code below.
//New imports
.....
const socketIO = require('socket.io')(http, {
    cors: {
        origin: "http://localhost:3000"
    }
});

//Add this before the app.get() block
socketIO.on('connection', (socket) => {
    console.log(`⚡: ${socket.id} user just connected!`);
    socket.on('disconnect', () => {
            socket.disconnect()
      console.log('🔥: A user disconnected');
    });
});
From the code snippet above, the socket.io("connection") function establishes a connection with the React app, then creates a unique ID for each socket and logs the ID to the console whenever a user visits the web page.
When you refresh or close the web page, the socket fires the disconnect event showing that a user has disconnected from the socket.
Configure Nodemon by adding the start command to the list of scripts in the package.json file. The code snippet below starts the server using Nodemon.
//In server/package.json

"scripts": {
    "test": "echo "Error: no test specified" && exit 1",
    "start": "nodemon index.js"
  },
You can now run the server with Nodemon by using the command below.
npm start
Building the user interface
Here, we’ll create the user interface for the application. It is divided into three pages: the Login page, Task page – the central part of the application, and The Comments page – where users can comment on each task.
Navigate into client/src and create a components folder containing the Login.js, Task.js, and Comments.js files.
cd client/src
mkdir components
cd components
touch Login.js Task.js Comments.js
Update the App.js file to render the newly created components on different routes via React Router.
import { BrowserRouter, Route, Routes } from "react-router-dom";
import Comments from "./components/Comments";
import Task from "./components/Task";
import Login from "./components/Login";

function App() {
    return (
        <BrowserRouter>
            <Routes>
                <Route path='/' element={<Login />} />
                <Route path='/task' element={<Task />} />
                <Route path='/comments/:category/:id' element={<Comments />} />
            Routes>
        BrowserRouter>
    );
}

export default App;
Navigate into the src/index.css file and copy the code below. It contains all the CSS required for styling this project.
@import url("https://fonts.googleapis.com/css2?family=Space+Grotesk:wght@300;400;500;600;700&display=swap");
* {
    font-family: "Space Grotesk", sans-serif;
    box-sizing: border-box;
}
a {
    text-decoration: none;
}
body {
    margin: 0;
    padding: 0;
}
.navbar {
    width: 100%;
    background-color: #f1f7ee;
    height: 10vh;
    border-bottom: 1px solid #ddd;
    display: flex;
    align-items: center;
    justify-content: space-between;
    padding: 20px;
}
.form__input {
    min-height: 20vh;
    display: flex;
    align-items: center;
    justify-content: center;
}
.input {
    margin: 0 5px;
    width: 50%;
    padding: 10px 15px;
}
.addTodoBtn {
    width: 150px;
    padding: 10px;
    cursor: pointer;
    background-color: #367e18;
    color: #fff;
    border: none;
    outline: none;
    height: 43px;
}
.container {
    width: 100%;
    min-height: 100%;
    display: flex;
    align-items: center;
    justify-content: space-between;
    padding: 10px;
}

.completed__wrapper,
.ongoing__wrapper,
.pending__wrapper {
    width: 32%;
    min-height: 60vh;
    display: flex;
    flex-direction: column;
    padding: 5px;
}
.ongoing__wrapper > h3,
.pending__wrapper > h3,
.completed__wrapper > h3 {
    text-align: center;
    text-transform: capitalize;
}
.pending__items {
    background-color: #eee3cb;
}
.ongoing__items {
    background-color: #d2daff;
}
.completed__items {
    background-color: #7fb77e;
}
.pending__container,
.ongoing__container,
.completed__container {
    width: 100%;
    min-height: 55vh;
    display: flex;
    flex-direction: column;
    padding: 5px;
    border: 1px solid #ddd;
    border-radius: 5px;
}
.pending__items,
.ongoing__items,
.completed__items {
    width: 100%;
    border-radius: 5px;
    margin-bottom: 10px;
    padding: 15px;
}
.comment {
    text-align: right;
    font-size: 14px;
    cursor: pointer;
    color: rgb(85, 85, 199);
}
.comment:hover {
    text-decoration: underline;
}
.comments__container {
    padding: 20px;
}
.comment__form {
    width: 100%;
    display: flex;
    align-items: center;
    justify-content: center;
    flex-direction: column;
    margin-bottom: 30px;
}
.comment__form > label {
    margin-bottom: 15px;
}
.comment__form textarea {
    width: 80%;
    padding: 15px;
    margin-bottom: 15px;
}
.commentBtn {
    padding: 10px;
    width: 200px;
    background-color: #367e18;
    outline: none;
    border: none;
    color: #fff;
    height: 45px;
    cursor: pointer;
}
.comments__section {
    width: 100%;
    display: flex;
    align-items: center;
    justify-content: center;
    flex-direction: column;
}

.login__form {
    width: 100%;
    height: 100vh;
    display: flex;
    flex-direction: column;
    align-items: center;
    justify-content: center;
}
.login__form > label {
    margin-bottom: 15px;
}
.login__form > input {
    width: 70%;
    padding: 10px 15px;
    margin-bottom: 15px;
}
.login__form > button {
    background-color: #367e18;
    color: #fff;
    padding: 15px;
    cursor: pointer;
    border: none;
    font-size: 16px;
    outline: none;
    width: 200px;
}
The Login page
Here, the application accepts the username and saves it in the local storage for identification.
Update the Login.js file as below:
import React, { useState } from "react";
import { useNavigate } from "react-router-dom";

const Login = () => {
    const [username, setUsername] = useState("");
    const navigate = useNavigate();

    const handleLogin = (e) => {
        e.preventDefault();
        //👇🏻 saves the username to localstorage
        localStorage.setItem("userId", username);
        setUsername("");
        //👇🏻 redirects to the Tasks page.
        navigate("/tasks");
    };
    return (
        <div className='login__container'>
            <form className='login__form' onSubmit={handleLogin}>
                <label htmlFor='username'>Provide a usernamelabel>
                <input
                    type='text'
                    name='username'
                    id='username'
                    required
                    onChange={(e) => setUsername(e.target.value)}
                    value={username}
                />
                <button>SIGN INbutton>
            form>
        div>
    );
};

export default Login;
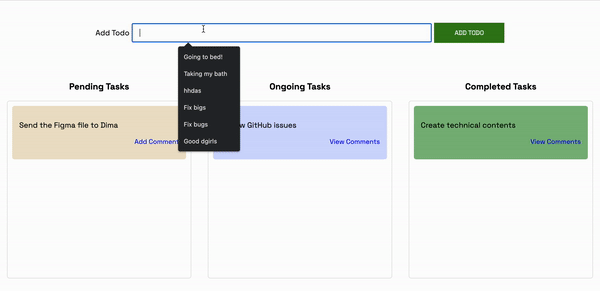
The Task page
Here, I’ll guide you through creating the web layout for the Tasks page. The image below represents the page’s layout.

Divide the layout into three components namely: Nav.js, AddTask.js – the form input section, and TasksContainer.js – containing the tasks.
cd src/components
touch Nav.js AddTask.js TasksContainer.js
Render the components within the Task.js file.
import React from "react";
import AddTask from "./AddTask";
import TasksContainer from "./TasksContainer";
import Nav from "./Nav";
import socketIO from "socket.io-client";

/*
👇🏻  Pass Socket.io into the required components
    where communications are made with the server
*/
const socket = socketIO.connect("http://localhost:4000");

const Task = () => {
    return (
        <div>
            <Nav />
            <AddTask socket={socket} />
            <TasksContainer socket={socket} />
        div>
    );
};

export default Task;
Copy the code below into the Nav.js file.
import React from "react";

const Nav = () => {
    return (
        <nav className='navbar'>
            <h3>Team's todo listh3>
        nav>
    );
};
export default Nav;
Update the AddTask.js file as below:
import React, { useState } from "react";

const AddTask = ({ socket }) => {
    const [task, setTask] = useState("");

    const handleAddTodo = (e) => {
        e.preventDefault();
        //👇🏻 Logs the task to the console
        console.log({ task });
        setTask("");
    };
    return (
        <form className='form__input' onSubmit={handleAddTodo}>
            <label htmlFor='task'>Add Todolabel>
            <input
                type='text'
                name='task'
                id='task'
                value={task}
                className='input'
                required
                onChange={(e) => setTask(e.target.value)}
            />
            <button className='addTodoBtn'>ADD TODObutton>
        form>
    );
};

export default AddTask;
Copy the code below into the TasksContainer.js file. It renders three parent elements for the pending, ongoing, and completed tasks.
import React from "react";
import { Link } from "react-router-dom";

const TasksContainer = ({ socket }) => {
    return (
        <div className='container'>
            <div className='pending__wrapper'>
                <h3>Pending Tasksh3>
                <div className='pending__container'>
                    <div className='pending__items'>
                        <p>Debug the Notification centerp>
                        <p className='comment'>
                            <Link to='/comments'>2 CommentsLink>
                        p>
                    div>
                div>
            div>

            <div className='ongoing__wrapper'>
                <h3>Ongoing Tasksh3>
                <div className='ongoing__container'>
                    <div className='ongoing__items'>
                        <p>Create designs for Novup>
                        <p className='comment'>
                            <Link to='/comments'>Add CommentLink>
                        p>
                    div>
                div>
            div>

            <div className='completed__wrapper'>
                <h3>Completed Tasksh3>
                <div className='completed__container'>
                    <div className='completed__items'>
                        <p>Debug the Notification centerp>
                        <p className='comment'>
                            <Link to='/comments'>2 CommentsLink>
                        p>
                    div>
                div>
            div>
        div>
    );
};

export default TasksContainer;
Congratulations!💃🏻 The layout is now set. Hence, let’s create a simple template for the Comments page.
The Comments page
Copy the code below into the Comments.js file. It logs the comment and the username to the console.
import React, { useEffect, useState } from "react";
import socketIO from "socket.io-client";
import { useParams } from "react-router-dom";

const socket = socketIO.connect("http://localhost:4000");

const Comments = () => {
    const [comment, setComment] = useState("");

    const addComment = (e) => {
        e.preventDefault();
        console.log({
            comment,
            userId: localStorage.getItem("userId"),
        });
        setComment("");
    };

    return (
        <div className='comments__container'>
            <form className='comment__form' onSubmit={addComment}>
                <label htmlFor='comment'>Add a commentlabel>
                <textarea
                    placeholder='Type your comment...'
                    value={comment}
                    onChange={(e) => setComment(e.target.value)}
                    rows={5}
                    id='comment'
                    name='comment'
                    required
                >textarea>
                <button className='commentBtn'>ADD COMMENTbutton>
            form>

            <div className='comments__section'>
                <h2>Existing Commentsh2>
                <div>div>
            div>
        div>
    );
};

export default Comments;
The user interface is now complete. Next, let’s add React Beautiful DND to the application to enable the drag-and-drop feature.
How to add the drag-and-drop feature with React Beautiful DND
Here, you’ll learn how to add the drag-and-drop feature using React Beautiful DND and communicate between the React app and a Socket.io Node.js server.
How does React Beautiful DND work?
React Beautiful DND is a highly performant library that allows us to select and drag an item from its current position to another position on the page.
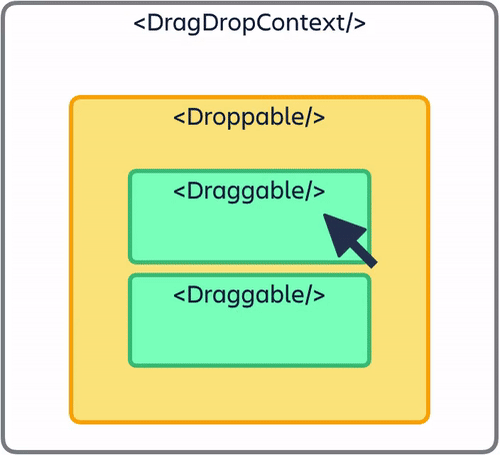
The image above explains how to set up React Beautiful DND. You must wrap all the draggable and droppable items within the
Making the tasks draggable and droppable with React Beautiful DND
Here, you’ll learn how to add React Beautiful DND to the React app and make the tasks movable from one category to another (pending, ongoing, and completed).
Install React Beautiful DND and ensure you are not using React in strict mode. (Check src/index.js).
npm install react-beautiful-dnd
Open the server/index.js file and create an object containing all the dummy data for each task category.
//👇🏻 server/index.js

//👇🏻 Generates a random string
const fetchID = () => Math.random().toString(36).substring(2, 10);

//👇🏻 Nested object
let tasks = {
    pending: {
        title: "pending",
        items: [
            {
                id: fetchID(),
                title: "Send the Figma file to Dima",
                comments: [],
            },
        ],
    },
    ongoing: {
        title: "ongoing",
        items: [
            {
                id: fetchID(),
                title: "Review GitHub issues",
                comments: [
                    {
                        name: "David",
                        text: "Ensure you review before merging",
                        id: fetchID(),
                    },
                ],
            },
        ],
    },
    completed: {
        title: "completed",
        items: [
            {
                id: fetchID(),
                title: "Create technical contents",
                comments: [
                    {
                        name: "Dima",
                        text: "Make sure you check the requirements",
                        id: fetchID(),
                    },
                ],
            },
        ],
    },
};

//👇🏻 host the tasks object via the /api route
app.get("/api", (req, res) => {
    res.json(tasks);
});
Next, fetch the tasks within the TasksContainer.js file. The code snippet below converts the tasks object to an array before rendering the component.
import React, { useState, useEffect } from "react";
import { Link } from "react-router-dom";

const TasksContainer = () => {
    const [tasks, setTasks] = useState({});

    useEffect(() => {
        function fetchTasks() {
            fetch("http://localhost:4000/api")
                .then((res) => res.json())
                .then((data) => {
                    console.log(data);
                    setTasks(data);
                });
        }
        fetchTasks();
    }, []);

    return (
        <div className='container'>
            {/*
            👇🏻 Returns an array of each tasks (Uncomment to view the data structure)

             {Object.entries(tasks).map((task) => console.log(task))} */}

            {Object.entries(tasks).map((task) => (
                <div
                    className={`${task[1].title.toLowerCase()}__wrapper`}
                    key={task[1].title}
                >
                    <h3>{task[1].title} Tasksh3>
                    <div className={`${task[1].title.toLowerCase()}__container`}>
                        {task[1].items.map((item, index) => (
                            <div
                                className={`${task[1].title.toLowerCase()}__items`}
                                key={item.id}
                            >
                                <p>{item.title}p>
                                <p className='comment'>
                                    <Link to='/comments'>
                                        {item.comments.length > 0 ? `View Comments` : "Add Comment"}
                                    Link>
                                p>
                            div>
                        ))}
                    div>
                div>
            ))}
        div>
    );
};

export default TasksContainer;
Import the required components from “react-beautiful-dnd” into the TasksContainer.js file.
//👇🏻 At the top of the TasksContainer.js file
import { DragDropContext, Droppable, Draggable } from "react-beautiful-dnd";
Update the TaskContainer.js file as below:
return (
    <div className='container'>
        {/** --- 👇🏻 DragDropContext  ---- */}
        <DragDropContext onDragEnd={handleDragEnd}>
            {Object.entries(tasks).map((task) => (
                <div
                    className={`${task[1].title.toLowerCase()}__wrapper`}
                    key={task[1].title}
                >
                    <h3>{task[1].title} Tasksh3>
                    <div className={`${task[1].title.toLowerCase()}__container`}>
                        {/** --- 👇🏻 Droppable --- */}
                        <Droppable droppableId={task[1].title}>
                            {(provided) => (
                                <div ref={provided.innerRef} {...provided.droppableProps}>
                                    {task[1].items.map((item, index) => (
                                            {/** --- 👇🏻 Draggable --- */}
                                        <Draggable
                                            key={item.id}
                                            draggableId={item.id}
                                            index={index}
                                        >
                                            {(provided) => (
                                                <div
                                                    ref={provided.innerRef}
                                                    {...provided.draggableProps}
                                                    {...provided.dragHandleProps}
                                                    className={`${task[1].title.toLowerCase()}__items`}
                                                >
                                                    <p>{item.title}p>
                                                    <p className='comment'>
                                                        <Link to={`/comments/${task[1].title}/${item.id}`}>
                                                            {item.comments.length > 0
                                                                ? `View Comments`
                                                                : "Add Comment"}
                                                        Link>
                                                    p>
                                                div>
                                            )}
                                        Draggable>
                                    ))}
                                    {provided.placeholder}
                                div>
                            )}
                        Droppable>
                    div>
                div>
            ))}
        DragDropContext>
    div>
);
- From the code snippet above:
- The
DragDropContextwraps the entire drag-and-drop container, and Droppable represents the parent element for the draggable elements. - The Draggable and Droppable components accept a draggable and droppable ID. They also accept a child element,
provided– that allows us to reference and render each element as a draggable and droppable item. - Feel free to separate the code into different components and click here to learn more about React Beautiful DND.
- The
The DragDropContext accepts a prop onDragEnd, which fires immediately after dragging an element.
//👇🏻 This function is the value of the onDragEnd prop
const handleDragEnd = ({ destination, source }) => {
    if (!destination) return;
    if (
        destination.index === source.index &&
        destination.droppableId === source.droppableId
    )
        return;

    socket.emit("taskDragged", {
        source,
        destination,
    });
};
The code snippet above accepts the destination and source of dragged item, checks if it was dragged to a droppable destination, and if the source and the destination are not the same before sending a message to the Node.js server via Socket.io.
Create a listener to the taskDragged event on the backend.
socketIO.on("connection", (socket) => {
    console.log(`⚡: ${socket.id} user just connected!`);

    socket.on("taskDragged", (data) => {
        console.log(data);
    });

    socket.on("disconnect", () => {
        socket.disconnect();
        console.log("🔥: A user disconnected");
    });
});
Let’s briefly examine the data returned after dragging an item:

The code snippet below shows that the item moved from the Pending category to the Ongoing category. The index also changed from 0 to 1.
{
  source: { index: 0, droppableId: 'pending' },
  destination: { droppableId: 'ongoing', index: 1 }
}
Next, make the dragged item remain at its destination. Update the taskDragged listener as below:
socket.on("taskDragged", (data) => {
    const { source, destination } = data;

    //👇🏻 Gets the item that was dragged
    const itemMoved = {
        ...tasks[source.droppableId].items[source.index],
    };
    console.log("DraggedItem>>> ", itemMoved);

    //👇🏻 Removes the item from the its source
    tasks[source.droppableId].items.splice(source.index, 1);

    //👇🏻 Add the item to its destination using its destination index
    tasks[destination.droppableId].items.splice(destination.index, 0, itemMoved);

    //👇🏻 Sends the updated tasks object to the React app
    socket.emit("tasks", tasks);

    /* 👇🏻 Print the items at the Source and Destination
        console.log("Source >>>", tasks[source.droppableId].items);
        console.log("Destination >>>", tasks[destination.droppableId].items);
        */
});
Create a listener for the tasks event within the TasksContainer component.
useEffect(() => {
    socket.on("tasks", (data) => setTasks(data));
}, [socket]);

Congratulations!🎉 You can now drag and drop items from one category to another.
How to create new tasks
In this section, I’ll guide you through creating new tasks from the React app.
Update the AddTask.js file to send the new task to the backend server.
import React, { useState } from "react";

const AddTask = ({ socket }) => {
    const [task, setTask] = useState("");

    const handleAddTodo = (e) => {
        e.preventDefault();
        //👇🏻 sends the task to the Socket.io server
        socket.emit("createTask", { task });
        setTask("");
    };
    return (
        <form className='form__input' onSubmit={handleAddTodo}>
            <label htmlFor='task'>Add Todolabel>
            <input
                type='text'
                name='task'
                id='task'
                value={task}
                className='input'
                required
                onChange={(e) => setTask(e.target.value)}
            />
            <button className='addTodoBtn'>ADD TODObutton>
        form>
    );
};

export default AddTask;
Create a listener for the createTask event on the backend server and add the item to the tasks object.
socketIO.on("connection", (socket) => {
    console.log(`⚡: ${socket.id} user just connected!`);

    socket.on("createTask", (data) => {
        // 👇🏻 Constructs an object according to the data structure
        const newTask = { id: fetchID(), title: data.task, comments: [] };
        // 👇🏻 Adds the task to the pending category
        tasks["pending"].items.push(newTask);
        /*
        👇🏻 Fires the tasks event for update
         */
        socket.emit("tasks", tasks);
    });
    //...other listeners
});
Completing the Comments page
In this section, you’ll learn how to add and retrieve comments on each task.
Update the Comments.js file as below:
import React, { useEffect, useState } from "react";
import socketIO from "socket.io-client";
import { useParams } from "react-router-dom";

const socket = socketIO.connect("http://localhost:4000");

const Comments = () => {
    const { category, id } = useParams();
    const [comment, setComment] = useState("");

    const addComment = (e) => {
        e.preventDefault();
        /*
        👇🏻 sends the comment, the task category, item's id and the userID.
         */
        socket.emit("addComment", {
            comment,
            category,
            id,
            userId: localStorage.getItem("userId"),
        });
        setComment("");
    };

    return (
        <div className='comments__container'>
            <form className='comment__form' onSubmit={addComment}>
                <label htmlFor='comment'>Add a commentlabel>
                <textarea
                    placeholder='Type your comment...'
                    value={comment}
                    onChange={(e) => setComment(e.target.value)}
                    rows={5}
                    id='comment'
                    name='comment'
                    required
                >textarea>
                <button className='commentBtn'>ADD COMMENTbutton>
            form>
            <div className='comments__section'>
                <h2>Existing Commentsh2>
                <div>div>
            div>
        div>
    );
};

export default Comments;
Recall that the route for the Comments page is /comments/:category/:id; the code snippet above retrieves the item’s category and its ID from the page’s URL, then sends the item’s category, ID, user ID, and the comment to the Node.js server.
Next, create an event listener on the Node.js server that adds the comment to the specific task via its ID.
socket.on("addComment", (data) => {
    const { category, userId, comment, id } = data;
    //👇🏻 Gets the items in the task's category
    const taskItems = tasks[category].items;
    //👇🏻 Loops through the list of items to find a matching ID
    for (let i = 0; i < taskItems.length; i++) {
        if (taskItems[i].id === id) {
    //👇🏻 Then adds the comment to the list of comments under the item (task)
            taskItems[i].comments.push({
                name: userId,
                text: comment,
                id: fetchID(),
            });
            //👇🏻 sends a new event to the React app
            socket.emit("comments", taskItems[i].comments);
        }
    }
});
Fetch the comments via Socket.io.
const Comments = () => {
    const { category, id } = useParams();
    const [comment, setComment] = useState("");
    const [commentList, setCommentList] = useState([]);

    //👇🏻 Listens to the comments event
    useEffect(() => {
        socket.on("comments", (data) => setCommentList(data));
    }, []);

    //...other listeners
    return (
        <div className='comments__container'>
            <form className='comment__form' onSubmit={addComment}>
                ...
            form>

            {/** 👇🏻 Displays all the available comments*/}
            <div className='comments__section'>
                <h2>Existing Commentsh2>
                {commentList.map((comment) => (
                    <div key={comment.id}>
                        <p>
                            <span style={{ fontWeight: "bold" }}>{comment.text} span>by{" "}
                            {comment.name}
                        p>
                    div>
                ))}
            div>
        div>
    );
};

export default Comments;
Lastly, add this useEffect hook to fetch the comments when the page is loaded to the browser.
useEffect(() => {
    socket.emit("fetchComments", { category, id });
}, [category, id]);
Listen to the event on the backend and trigger the comments event to return the list of comments matching the item’s ID and category.
socket.on("fetchComments", (data) => {
    const { category, id } = data;
    const taskItems = tasks[category].items;
    for (let i = 0; i < taskItems.length; i++) {
        if (taskItems[i].id === id) {
            socket.emit("comments", taskItems[i].comments);
        }
    }
});
Congratulations!💃🏻 We’ve completed this project.
EXTRA: Sending notifications with Novu
If you want to add notifications to the application when a user adds a comment or a new task, you can do that easily with Novu within the Nav.js component.
Novu allows you to add various notification types, such as email, SMS, and in-app notifications.
How to add Novu to a React and Node.js application
To add the in-app notification, install the Novu Node.js SDK on the server and the Notification Center in the React app.
👇🏻 Install on the client
npm install @novu/notification-center

👇🏻 Install on the server
npm install @novu/node
Create a Novu project by running the code below. A personalised dashboard is available to you.
👇🏻 Install on the client
npx novu init
You will need to sign in with Github before creating a Novu project. The code snippet below contains the steps you should follow after running npx novu init
Now let's setup your account and send your first notification
❓ What is your application name? Devto Clone
❓ Now lets setup your environment. How would you like to proceed?
   > Create a free cloud account (Recommended)
❓ Create your account with:
   > Sign-in with GitHub
❓ I accept the Terms and Condidtions (https://novu.co/terms) and have read the Privacy Policy (https://novu.co/privacy)
    > Yes
✔️ Create your account successfully.

We've created a demo web page for you to see novu notifications in action.
Visit: http://localhost:57807/demo to continue
Visit the demo web page http://localhost:57807/demo, copy your subscriber ID from the page, and click the Skip Tutorial button. We’ll be using it later in this tutorial.

Update the components/Nav.js file to contain Novu and its required elements for in-app notifications from the documentation.
import React from "react";
import {
    NovuProvider,
    PopoverNotificationCenter,
    NotificationBell,
} from "@novu/notification-center";
import { useNavigate } from "react-router-dom";

const Nav = () => {
    const navigate = useNavigate();

    const onNotificationClick = (notification) =>
        navigate(notification.cta.data.url);
    return (
        <nav className='navbar'>
            <h3>Team's todo listh3>
            <div>
                <NovuProvider
                    subscriberId=''
                    applicationIdentifier=''
                >
                    <PopoverNotificationCenter
                        onNotificationClick={onNotificationClick}
                        colorScheme='light'
                    >
                        {({ unseenCount }) => (
                            <NotificationBell unseenCount={unseenCount} />
                        )}
                    PopoverNotificationCenter>
                NovuProvider>
            div>
        nav>
    );
};

export default Nav;
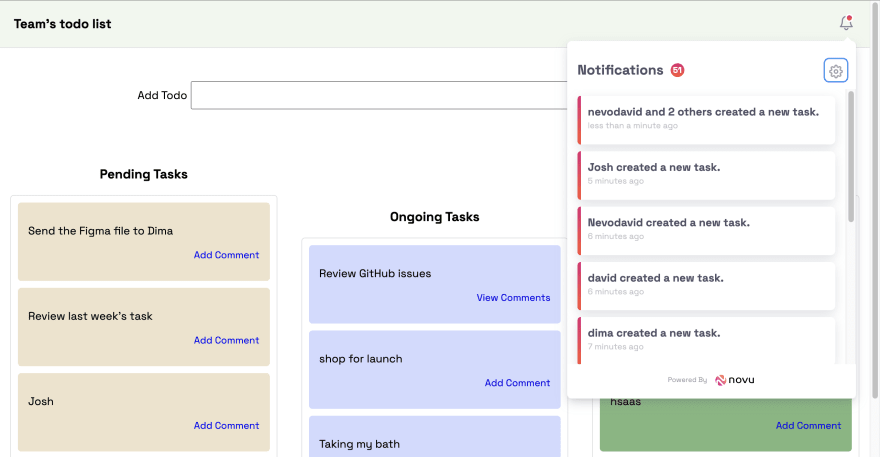
The code snippet above adds Novu notification bell icon to the Nav component, enabling us to view all the notifications from the application.
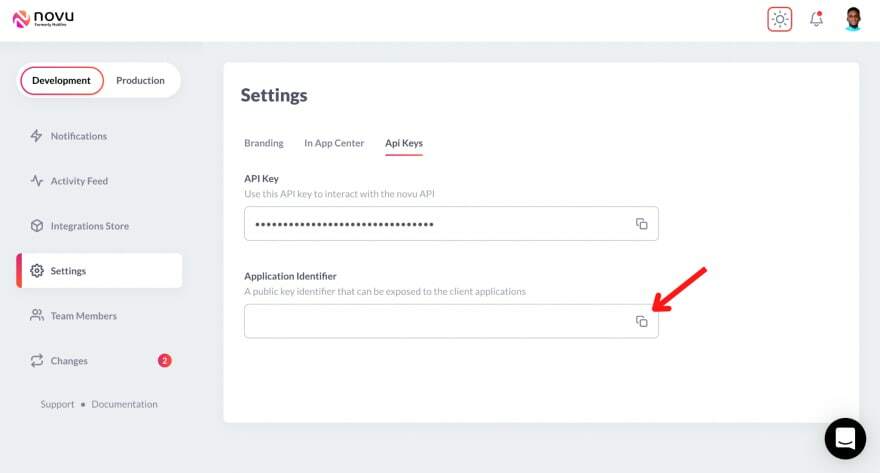
💡 The NovuProvider component requires your Subscriber ID – copied earlier from http://localhost:57807/demoand your application ID available in the Settings section under API Keys on the Novu Manage Platform.
Next, let’s create the workflow for the application, which describes the features you want to add to the application.
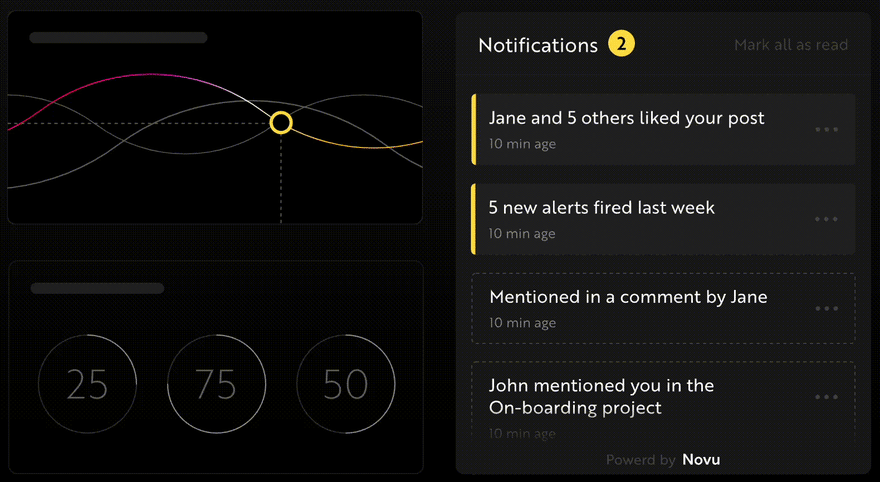
Select Notification from the Development sidebar and create a notification template. Select the newly created template, click on Workflow Editor, and ensure the workflow is as below:

From the image above, Novu triggers the Digest engine before sending the in-app notification.
Novu Digest allows us to control how we want to send notifications within the application. It collects multiple trigger events and sends them as a single message. The image above sends notifications every 2 minutes, and it can be effective when you have many users and frequent updates.
Click the In-App step and edit the notification template to contain the content below.
{{userId}} added a new task.
💡 Novu allows you to add dynamic content or data to the templates using the Handlebars templating engine. The data for the username variable will be inserted into the template as a payload from the request.
Save the template by clicking Update button and head back to your code editor.
Adding Novu to the application
Import Novu from the package and create an instance using your API Key on the server.
//server/index.js
const { Novu } = require("@novu/node");
const novu = new Novu("Create a function that sends the notification via Novu to the React app.
const sendNotification = async (user) => {
    try {
        const result = await novu.trigger(<TEMPLATE_ID>, {
            to: {
                subscriberId: <SUBSCRIBER_ID>,
            },
            payload: {
                userId: user,
            },
        });
        console.log(result);
    } catch (err) {
        console.error("Error >>>>", { err });
    }
};

//👇🏻 The function is called after a new task is created
socket.on("createTask", (data) => {
        const newTask = { id: fetchID(), title: data.task, comments: [] };
        tasks["pending"].items.push(newTask);
        socket.emit("tasks", tasks);
//👇🏻 Triggers the notification via Novu
        sendNotification(data.userId);
    });
The code snippet above sends a notification to all users when a new task is added to the application.
Conclusion
So far, you’ve learnt how to set up Socket.io in a React and Node.js application, communicate between a server and a client via Socket.io, and drag and drop items with React Beautiful DND.
This is a demo of what you can build using Socket.io and React Beautiful DND. Feel free to improve the application by adding authentication, the ability to assign tasks to a particular user, and add notifications when a user drops a comment.
The source code for this tutorial is available here: https://github.com/novuhq/blog/tree/main/react-beautiful-dnd-todo-list

Thank you for reading!
P.S Novu is sending awesome swag on Hacktoberfest! Happy if you can support us by giving us a star! ⭐️